Have you ever wanted to control a single light from three different switches? Maybe in a long hallway, large room, or stairwell where flipping the light on or off from multiple spots would make life easier.
It sounds tricky, but it’s actually something you can learn to do yourself. Imagine the convenience you’ll gain—no more walking back and forth in the dark or guessing if you left the light on. You’ll discover simple steps and clear explanations that make connecting three switches to one light a task you can confidently tackle.
Ready to brighten your space with smarter control? Let’s dive in.
Types Of Switches For Multiple Control
Controlling one light from several switches needs special switch types. Each type has a unique role in the wiring system. Choosing the right switches helps to make the control easy and efficient.
Understanding the differences between these switches is key. It helps to plan the wiring and avoid mistakes. Here are the main types used for multiple control setups.
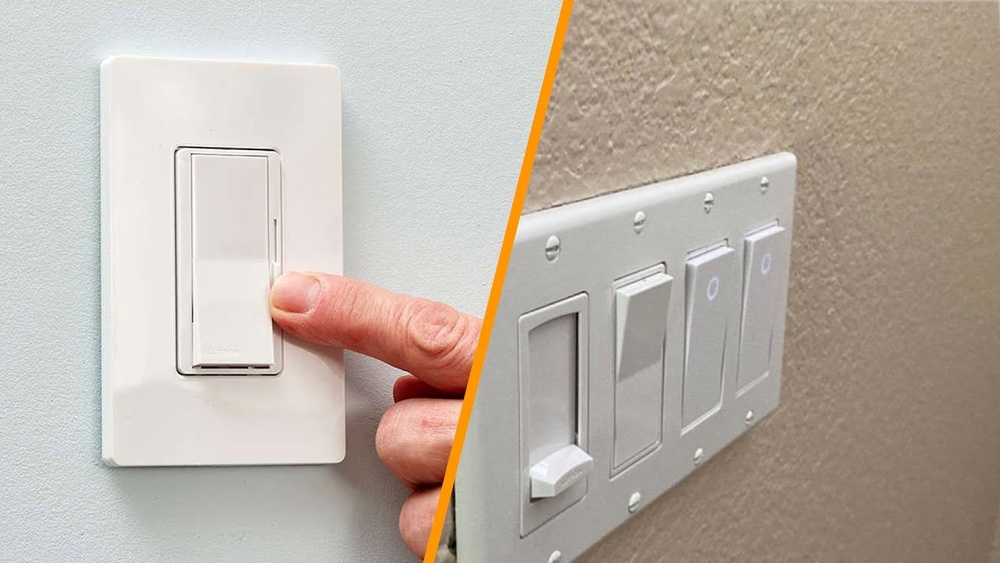
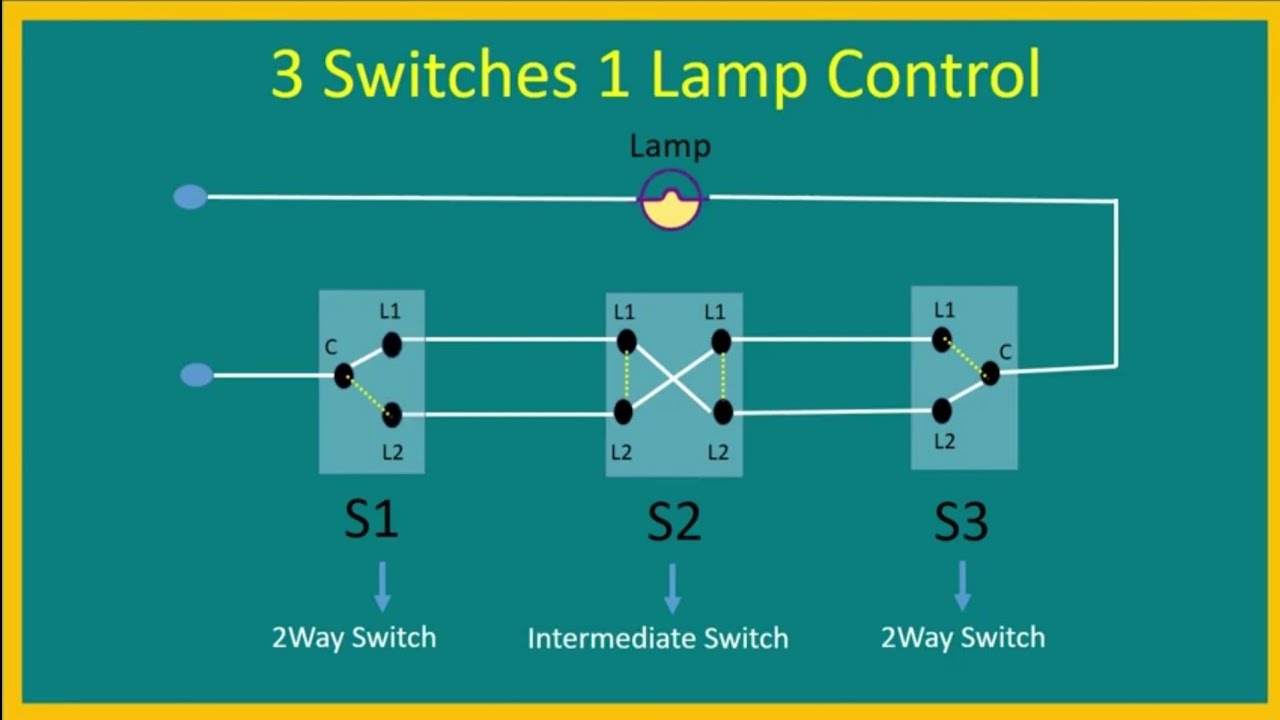
Single-pole Vs Three-way Vs Four-way Switches
Single-pole switches control one light from one place. They have two terminals and a simple on/off function. These switches are common in most homes for basic control.
Three-way switches allow control of one light from two locations. They have three terminals and work in pairs. This switch type is perfect for stairs or long hallways.
Four-way switches add control from three or more locations. They have four terminals and are used between two three-way switches. This setup is useful for large rooms or multiple entrances.
Combining three-way and four-way switches makes multi-point control possible. This setup connects three or more switches to one light smoothly.
Credit: community.hubitat.com
Tools And Materials Needed
To connect three switches to one light, you need the right tools and materials. Having the proper equipment helps ensure safety and success. This guide lists everything you need to complete the job smoothly.
Essential Electrical Tools
You will need a few basic tools for this wiring project. A screwdriver set is necessary for loosening and tightening screws. Wire strippers help remove insulation from wires without damage. A voltage tester ensures power is off before starting. Pliers assist in bending and twisting wires. Electrical tape is useful for securing wire connections.
Required Wiring And Switches
Choose the correct wiring type for home electrical circuits. Typically, 14/3 or 12/3 wire is used to connect three switches. You will also need three three-way or four-way switches depending on setup. Wire nuts help join wires safely. Make sure all materials meet local electrical codes for safety.
Safety Precautions Before Starting
Working with electrical wiring can be risky without the right safety steps. Before connecting three switches to one light, follow key safety precautions. These steps protect you from electric shocks and other hazards. Take your time and focus on safety first.
Power Shutoff
Turn off power at the main circuit breaker. This stops electricity from flowing to the switch and light. Double-check that the power is off by flipping the switches. Never work on live wires. This simple step prevents serious injury.
Use Of Voltage Tester
Use a voltage tester to confirm no electricity is present. Test the wires and terminals you will work on. The tester shows if wires are still energized. This extra check ensures your safety before touching any wires.
Credit: www.youtube.com
Wiring Basics For Multiple Switches
Wiring multiple switches to control one light involves a clear understanding of electrical basics. This setup uses special wiring to allow control from different spots. The key is to connect the switches correctly so the light responds to any switch.
Before starting, identify the wires and their roles. This knowledge helps avoid mistakes and keeps the system safe. Let’s break down the wiring basics for multiple switches.
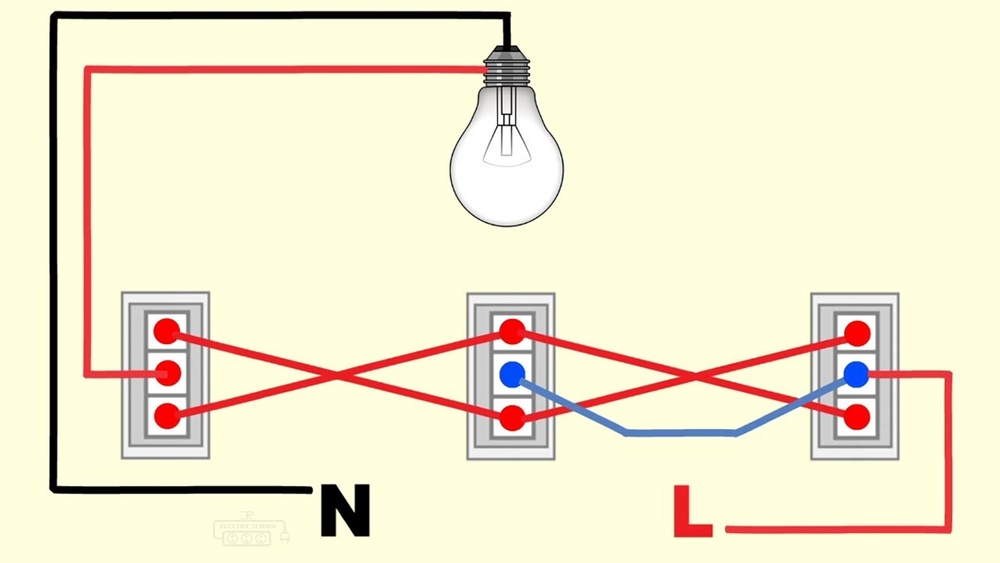
Understanding Traveler Wires
Traveler wires connect the switches to each other. They carry current back and forth. Usually, two traveler wires run between switches. These wires allow switches to send signals that turn the light on or off. Correctly connecting traveler wires is essential for the system to work.
Neutral And Ground Connections
The neutral wire completes the circuit by returning current to the power source. It stays connected to the light fixture. The ground wire protects against electrical faults. It connects all metal parts and the electrical box. Proper neutral and ground connections ensure safety and proper functioning.
Step-by-step Wiring Process
Wiring three switches to control one light can seem tricky. This step-by-step guide breaks down the process into clear parts. Follow each step carefully to ensure safety and correct operation. Having the right tools and turning off power at the breaker are important before starting.
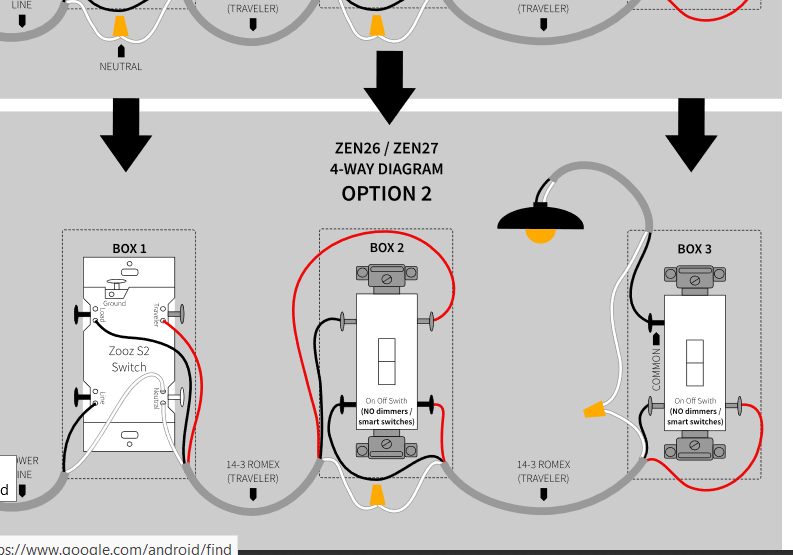
Connecting The First Switch
Begin by identifying the power source cable. Connect the live wire (usually black) to the common terminal on the first switch. Attach the neutral wire (white) to the wire nut, keeping it separate from the switch terminals. Connect traveler wires (often red and black) to the traveler terminals. Secure all connections tightly to avoid loose wiring.
Wiring The Intermediate Switch
The middle switch is different from the others. It has four terminals instead of three. Connect the two traveler wires from the first switch to the input terminals of the intermediate switch. Run two more traveler wires from the output terminals of this switch to the last switch. Make sure each wire is firmly attached and properly insulated.
Installing The Last Switch
At the last switch, connect the traveler wires from the intermediate switch to the traveler terminals. Attach the live wire going to the light fixture to the common terminal. Confirm all wires are connected according to the switch labels. Check that the wires are not touching each other or the switch frame.
Connecting To The Light Fixture
Run the live wire from the last switch to the light fixture’s live terminal. Connect the neutral wire from the power source directly to the light’s neutral terminal. Attach the ground wires to the fixture and the switch boxes. Test the system after turning the power back on. The light should work from all three switches.
Testing And Troubleshooting
Testing and troubleshooting are key steps after wiring three switches to one light. These steps ensure the setup works safely and correctly. Small mistakes can cause the light not to work or create electrical hazards. Careful checking helps catch problems early.
Checking Switch Functionality
Start by turning each switch on and off. The light should respond to every switch. If it does not, check the switch itself. Use a voltage tester to see if power reaches the switch. Replace any switch that does not send power correctly.
Make sure switches are firmly attached and wires are secure. Loose connections can stop switches from working. Listen for clicks when toggling switches; no sound may mean a broken switch.
Common Wiring Issues
Look for crossed wires or loose ends inside switch boxes. These cause shorts or open circuits. Double-check wire colors and connections against the wiring diagram. Neutral and ground wires must be connected properly.
Check for damaged wire insulation or exposed copper. These are fire risks and must be fixed. Use wire nuts or electrical tape to secure any loose wire ends. Confirm all switches share the correct traveler wires for multi-way control.
Tips For A Professional Finish
Achieving a clean and safe electrical setup requires attention to detail. A professional finish not only looks good but also prevents future problems. Simple steps can make your wiring neat and reliable. Organizing wires and clear labeling ensure easy maintenance later.
Securing Wires
Keep all wires tight and in place. Use wire clips or straps to fasten cables along walls or inside boxes. Avoid loose or hanging wires that can cause shorts or damage. Neat wiring reduces the risk of accidents. Make sure no wires are pinched when closing switch boxes.
Labeling And Documentation
Mark each wire clearly using tags or colored tape. Write down the connections in a simple diagram or note. This helps anyone who works on the system later. Clear labels save time and avoid confusion. Store your documentation near the switches or in a safe place.

Credit: www.diychatroom.com
Frequently Asked Questions
How Can I Connect 3 Switches To One Light?
You can connect three switches to one light using two 3-way switches and one 4-way switch. This setup allows controlling the light from multiple locations easily and safely.
What Wiring Is Needed For Three Switches And One Light?
Use traveler wires between switches and a neutral wire to the light fixture. Proper wiring ensures safe and efficient control from all switches.
Can I Install 3 Switches For One Light Without An Electrician?
If you have electrical knowledge, you can install it yourself. Otherwise, hire a licensed electrician to ensure safety and code compliance.
What Tools Do I Need To Connect 3 Switches To One Light?
You’ll need wire strippers, screwdrivers, voltage testers, electrical tape, and appropriate wiring. These tools help ensure a safe and effective installation.
Conclusion
Connecting three switches to one light is easier than it seems. Follow the right steps carefully to avoid mistakes. Use the proper wiring and tools to keep everything safe. Test your work before finalizing the setup. This way, you control the light from different places.
Enjoy the convenience and flexibility this wiring offers. Take your time and stay patient throughout the process. Small effort now saves big trouble later. You can do this with clear instructions and focus. Brighten your space with smart switch connections today.