Have you ever wanted to control an outlet with a light switch but didn’t know where to start? Connecting an outlet to a light switch can make your space more convenient and energy-efficient.
Imagine turning on a lamp or a fan with just a flick of a switch—no need to reach for the plug every time. You’ll learn simple, step-by-step instructions to safely and effectively connect an outlet from a light switch. Whether you’re a beginner or just need a clear guide, this post will help you gain confidence and get the job done right.
Keep reading to discover how easy it can be!

Credit: www.quora.com
Tools And Materials Needed
Gathering the right tools and materials makes connecting an outlet from a light switch easier. Having everything ready keeps the work safe and smooth. Here is a list of what you need before starting.
Essential Tools
You will need a screwdriver set to remove and attach screws. Wire strippers help remove insulation without damaging wires. A voltage tester is crucial to ensure power is off. Needle-nose pliers assist in bending and holding wires. A drill may be needed if new holes are required.
Required Materials
Start with a new electrical outlet rated for your circuit. Use electrical wire matching your home’s wiring gauge. Wire nuts join wires securely inside the box. Electrical tape adds an extra layer of safety. Outlet cover plates finish the installation neatly.
Safety Gear
Wear insulated gloves to protect against electric shocks. Safety glasses guard your eyes from debris. Use a face mask if dust or particles may be present. Work in a well-lit area to see clearly. Keep a fire extinguisher nearby as a precaution.
Safety Precautions
Safety is the top priority when working with electrical wiring. Connecting an outlet from a light switch requires care and attention. Following safety precautions prevents accidents and injuries. This section explains key safety steps to keep you safe during the task.
Turn Off Power At The Circuit Breaker
Always switch off power before starting any electrical work. Find the correct circuit breaker and turn it off. Use a voltage tester to confirm no power is flowing. Never trust the switch alone to cut power.
Use Proper Tools And Equipment
Use insulated tools made for electrical work. Avoid metal tools without insulation. Wear rubber-soled shoes to reduce shock risk. Keep tools dry and in good condition.
Wear Protective Gear
Wear safety glasses to protect your eyes. Use gloves made for electrical tasks. Avoid loose clothing or jewelry that can catch wires. Keep your workspace clean and free of hazards.
Check Wiring And Connections Carefully
Inspect wires for damage before connecting. Use wire strippers to avoid cutting wire strands. Secure connections tightly to prevent sparks or shorts. Follow wiring diagrams or instructions exactly.
Work In A Dry Environment
Water and electricity are a dangerous mix. Ensure the area is dry before starting. Avoid working in damp or wet conditions. Dry hands and tools reduce the risk of shock.
How Electrical Wiring Works
Understanding how electrical wiring works helps you safely connect an outlet from a light switch. Electricity flows through wires that carry power to devices. The wiring creates a path for electricity to travel. This path includes several key parts that control and use electricity.
Knowing these parts makes it easier to follow wiring instructions. It also helps you avoid common mistakes. Let’s explore the basics of electrical circuits and the roles of switches and outlets.
Basic Circuit Components
A basic electrical circuit has three main parts: power source, wires, and load. The power source is usually your home’s electrical panel. It provides the energy needed to run devices.
Wires connect everything. They carry electricity from the power source to devices and back. The load is the device that uses electricity, like a light or outlet.
Circuits have two wires: hot and neutral. The hot wire carries electricity to the device. The neutral wire carries electricity back to complete the circuit. A ground wire protects against electrical faults by directing electricity safely to the ground.
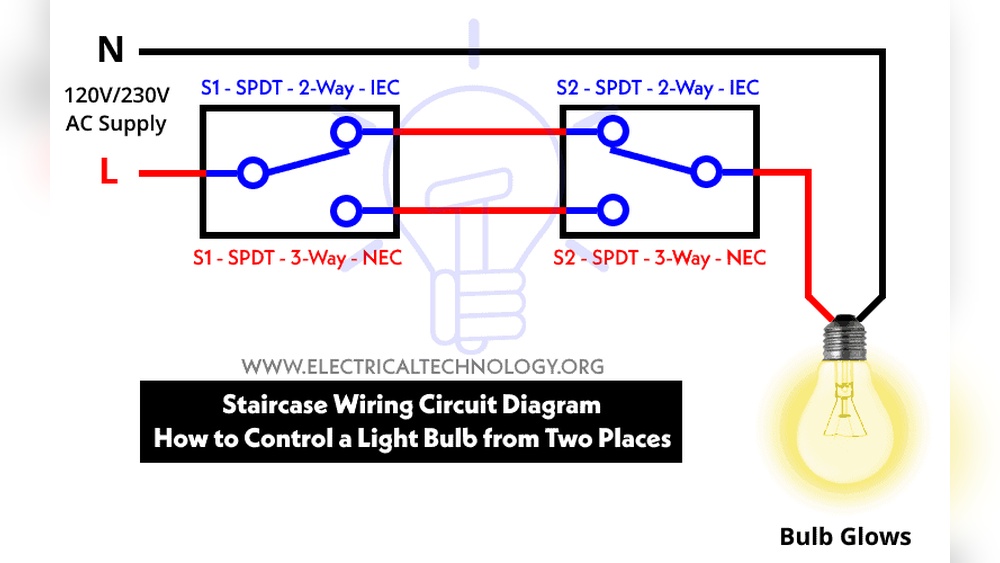
Role Of Switches And Outlets
Switches control the flow of electricity in a circuit. They act like a gate, opening or closing the path for electricity. When a switch is on, electricity flows to the device. When off, it stops the flow.
Outlets provide a place to plug in devices. They connect electrical devices to the circuit. Outlets get power from the wires and supply it to your appliances or tools.
When connecting an outlet from a light switch, the switch controls power to both the light and outlet. This setup allows you to turn the outlet on or off with the switch.

Credit: www.do-it-yourself-help.com
Planning Your Wiring Setup
Before connecting an outlet from a light switch, plan your wiring carefully. Good planning helps avoid mistakes and keeps you safe. Take time to think about the outlet type and where to place it. This step saves effort and money later.
Check your home’s wiring and electrical box. Knowing these details helps you choose the right parts. Measure distances between the switch and outlet spot. This information guides your wire length and layout.
Choosing The Right Outlet
Select an outlet that fits your needs and local rules. Standard outlets work for most rooms. GFCI outlets protect against electric shock and suit wet areas like kitchens. Make sure the outlet matches your power needs and is rated for your circuit’s voltage.
Locating The Switch And Outlet
Place the switch where it is easy to reach. Place the outlet close to the device you want to power. Avoid spots near water or heat sources. Check wall studs and pipes before cutting holes. Plan for neat wiring paths to keep wires safe and hidden.
Turning Off Power Safely
Turning off power safely is the first step in connecting an outlet from a light switch. It protects you from electric shocks and prevents damage to wiring. Never skip this step, even if you think the power is off.
Electricity can be dangerous and cause serious injury. Always take precautions before working on any electrical project. Follow safety rules carefully to keep yourself and others safe.
Locate The Main Circuit Breaker
Find the main circuit breaker box in your home. It is usually in the basement, garage, or utility room. This box controls the power to your entire house.
Look for the switch labeled “Main” or “Main Breaker.” This switch controls all the power in your home.
Turn Off The Power To The Circuit
Switch off the circuit breaker for the room where you will work. This stops electricity flow to that area. You can also turn off the main breaker for full power cutoff.
Label the breaker if it is not marked. This helps avoid confusion later.
Use A Voltage Tester
Check the wires with a voltage tester before starting work. It confirms that the power is really off. Never trust the breaker alone.
Touch the tester to the wires at the switch or outlet. No light or sound means no power.
Wear Protective Gear
Wear insulated gloves and safety glasses for extra protection. They help prevent electric shocks and injuries. Always use tools with insulated handles.
Keep your work area dry and clean. Water and electricity do not mix.

Credit: www.youtube.com
Wiring The Outlet From The Switch
Wiring the outlet from the switch is a key step in your electrical project. This process lets you control the outlet with the switch. It needs careful handling to keep everything safe and working well. Understanding the wires and their connections is important before starting.
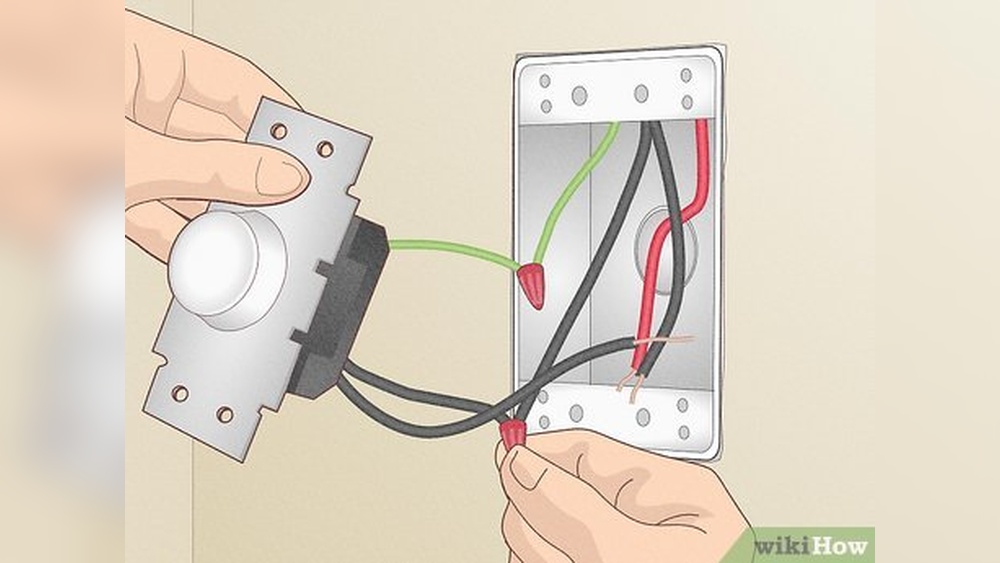
Identifying Wires
First, find the wires inside the switch box. Usually, you see three types: hot, neutral, and ground. The hot wire is often black or red. Neutral wires are white. Ground wires are green or bare copper. Use a voltage tester to check which wire carries power.
Connecting The Hot Wire
Connect the hot wire from the switch to the outlet’s hot terminal. This terminal is usually marked in brass or gold color. Make sure the connection is tight to avoid loose wires. The switch controls the flow of electricity through this wire.
Connecting The Neutral And Ground Wires
Attach the neutral wire from the outlet to the neutral wire in the switch box. Both are usually white. Then, connect the ground wire from the outlet to the ground wire in the box. Ground wires ensure safety by preventing shocks. Use wire nuts to secure all connections.
Testing The Connection
Testing the connection is a key step after wiring an outlet from a light switch. It ensures the outlet works safely and correctly. You must check the wires and the power flow before use. Doing this prevents shocks and damage to your devices.
Using A Voltage Tester
A voltage tester helps check if electricity flows through the outlet. Turn off the main power before testing wires. Touch the tester probes to the outlet terminals. A light or beep means voltage is present. No signal means no power or a wiring problem. This tool is simple and safe for quick checks.
Ensuring Proper Functionality
After confirming voltage, test the outlet with a device. Plug in a lamp or phone charger to see if it works. Turn the connected light switch on and off. The device should power on and off with the switch. If it does, the connection works well. If not, check your wiring again carefully.
Troubleshooting Common Issues
Troubleshooting common issues helps you fix problems quickly. Connecting an outlet from a light switch can be simple. Yet, some problems may stop it from working. Knowing the basics makes repairs easier.
Safety is key. Always turn off power before checking wires or outlets. Use a tester to see if power is flowing. Keep tools and parts ready. This way, you can solve issues without delay.
No Power At Outlet
Check if the outlet has power. Use a voltage tester to confirm. If no power shows, inspect wiring connections. Loose or broken wires cause no power. Tighten all wire nuts and screws. Verify the outlet is not damaged. Replace it if needed.
Switch Not Controlling Outlet
The switch may not control the outlet properly. Test the switch by turning it on and off. If the outlet stays on or off, wiring might be wrong. Look at the switch connections. The hot wire should connect to the switch. The outlet’s hot wire must go through the switch. Fix any wrong connections.
Tripped Breakers
Breakers trip if there is a short or overload. Check the breaker box for tripped switches. Reset any tripped breaker by switching it off and on. If it trips again, look for wiring errors. Overloaded circuits need fewer devices. Inspect the outlet and switch for damaged wires. Replace or repair as needed.
Tips For A Neat And Safe Installation
Installing an outlet from a light switch needs care and attention. A neat and safe setup protects your home and makes your work last longer.
Follow clear steps and use the right tools. This keeps wires organized and reduces risks of shocks or fires. A tidy installation also looks better and makes future repairs easier.
Use Proper Wire Connectors
Choose wire connectors that fit the wires well. Do not twist wires without connectors. Secure connections prevent loose wires and sparks.
Label All Wires Clearly
Mark each wire with tape or labels. This helps you know which wire goes where. It saves time and avoids mistakes later.
Keep Wires Organized Inside The Box
Arrange wires neatly inside the electrical box. Avoid overcrowding to prevent damage. Use cable ties or clamps to hold wires in place.
Turn Off Power Before Starting
Always switch off the power at the circuit breaker. Test with a voltage tester to confirm power is off. Safety first to avoid shocks.
Use The Right Tools For The Job
Use insulated screwdrivers and wire strippers. Proper tools make the job easier and safer. Avoid using damaged or worn-out tools.
Frequently Asked Questions
How Do I Connect An Outlet To A Light Switch Safely?
To connect an outlet to a light switch safely, turn off the power first. Use a voltage tester to confirm no electricity flows. Follow wiring codes and connect wires properly: black to black, white to white, and ground to ground.
Always use a junction box.
Can I Control An Outlet With A Light Switch?
Yes, you can control an outlet with a light switch by wiring the outlet’s hot wire through the switch. This setup allows the switch to turn the outlet on or off, ideal for lamps or other devices needing switch control.
What Tools Are Needed To Connect An Outlet From A Switch?
You need a screwdriver, wire strippers, voltage tester, electrical tape, and wire nuts. Additionally, use a junction box and appropriate wiring. These tools help you safely and efficiently connect an outlet from a light switch.
Is It Legal To Wire An Outlet From A Light Switch?
Wiring an outlet from a light switch is legal if done according to local electrical codes. Always check your area’s regulations before starting. Improper wiring can be unsafe and may violate code requirements, so consider hiring a professional if unsure.
Conclusion
Connecting an outlet from a light switch is simpler than it seems. Follow safety rules and turn off power first. Use the right tools and check your wiring carefully. Take your time to avoid mistakes or hazards. This skill can save money and add convenience to your home.
Always test the outlet to ensure it works properly. Learning basic electrical tasks helps you feel more confident. Stay safe and enjoy your new setup!