Are you tired of struggling with buttons that pop off or zippers that get stuck? The Dritz Snap Fastener Kit could be the simple solution you’ve been looking for.
Imagine being able to fix your clothes quickly and easily, without any sewing skills. In this guide, you’ll discover exactly how to use the Dritz Snap Fastener Kit step by step. By the end, you’ll feel confident to tackle your own repairs and upgrades, saving time and money.
Ready to make your wardrobe work better for you? Let’s dive in!

Credit: www.walmart.com
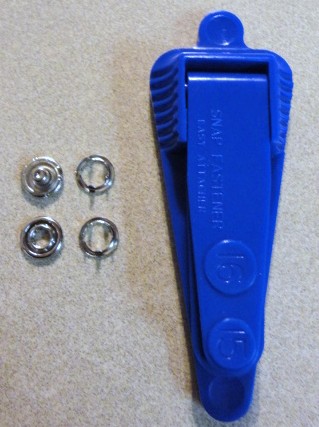
Dritz Snap Fastener Kit Components
The Dritz Snap Fastener Kit contains all necessary parts for attaching snaps to fabric. It helps fix or add snaps easily without sewing. Each component in the kit plays a specific role in the snap fastening process.
Understanding the kit’s parts makes the task smoother. It saves time and ensures a firm snap connection.
Contents Of The Kit
The kit includes metal snap fasteners, which come in pairs: a cap and a socket, plus a stud and a post. These four pieces work together to create the snap closure.
A plastic base and an anvil are also part of the kit. These support the fabric and fasteners during installation.
Lastly, the kit contains a metal tool used to press the snaps together securely.
Tool Functions
The metal tool has two ends designed for different snap parts. One end sets the cap and socket, while the other end sets the stud and post.
The plastic base holds the fabric steady. It prevents damage to the material when pressing the snaps.
The anvil acts as a hard surface to shape the snap parts. It ensures each snap fastener fits tightly and stays in place.
Credit: www.indianainker.com
Preparing Your Fabric
Preparing your fabric is the first step to use the Dritz Snap Fastener Kit. Proper preparation helps the snaps hold well and last long. Taking time here saves frustration later.
Clean and smooth fabric works best. Remove wrinkles and dirt before starting. This ensures a neat finish and proper snap attachment.
Choosing The Right Fabric
Choose fabric that matches your project needs. Lightweight fabrics like cotton or linen work well for small snaps. Heavier fabrics like denim or canvas need stronger snaps.
Thin fabrics may tear if snaps are too large. Thick fabrics need longer fastener posts. Match snap size with fabric thickness for best results.
Marking Snap Placement
Mark where you want to place each snap clearly. Use chalk or a fabric marker that washes off. Place marks on both fabric sides for accurate alignment.
Double-check snap positions before attaching. Correct placement keeps snaps functional and looks neat. Measure twice, mark once.
Attaching Snap Fasteners
Attaching snap fasteners is simple with the Dritz Snap Fastener Kit. Each snap has two parts that connect securely. The kit includes tools to set both sides on your fabric. Follow the steps carefully for a neat finish.
Setting The Cap And Socket
Start by placing the fabric on a hard surface. Put the cap on the front side of the fabric. Align the socket piece on the back side, facing the cap. Use the Dritz setting tool to press them together. Tap gently with a hammer until they lock in place. Check that the cap and socket fit tightly without movement.
Securing The Stud And Post
Turn the fabric over to the inside. Place the post through the fabric hole. Position the stud over the post, matching their shapes. Use the setting tool again to press them together. Tap carefully to avoid damaging the fabric. The stud and post should snap firmly and align with the cap and socket. Test the snap by pressing it closed and pulling it apart gently.

Credit: www.handicraft.com
Using The Snap Fastener Tool
Using the snap fastener tool is simple and effective. It helps attach snaps quickly to fabric. This tool works with the Dritz Snap Fastener Kit. Follow these steps to get the best results.
Aligning The Pieces
Start by placing the snap parts on the fabric. Match the male and female pieces carefully. Make sure they line up straight. Proper alignment prevents snaps from falling off later.
Hold the fabric flat on a hard surface. Avoid wrinkles or folds where you attach the snaps. This helps the snap sit evenly and work well.
Applying Pressure Correctly
Use the snap fastener tool to press the pieces together. Press firmly but not too hard. Too much force can damage the snap or fabric.
Press slowly and steadily. Hold the tool in place for a few seconds. This ensures the snap sets tight and secure.
Tips For Durable Snaps
Durable snaps keep your projects looking neat and lasting longer. Using the Dritz Snap Fastener Kit correctly helps ensure snaps stay secure. Follow these simple tips to avoid common problems and make strong, lasting attachments.
Avoiding Fabric Damage
Choose the right fabric for snaps. Thin or delicate fabrics may tear easily. Place a small piece of interfacing behind the snap area for support. Use a sharp tool to make a clean hole. Avoid forcing snaps onto fabric. This prevents ripping and fraying around the snap.
Ensuring Strong Attachment
Align snap parts carefully before pressing. Use firm, even pressure with the kit’s tool. Check that all pieces fit snugly together. Press slowly to avoid bending or misaligning parts. Test the snap by opening and closing it a few times. A tight fit means a strong attachment that lasts.
Troubleshooting Common Issues
Troubleshooting common issues with the Dritz Snap Fastener Kit helps you get better results. Small problems can stop your project. Fixing them quickly saves time and effort. The kit is simple, but sometimes snaps don’t fit well or feel loose. Knowing how to solve these problems improves your sewing experience.
Loose Snaps
Loose snaps often mean the parts are not pressed tightly. Use the tool to apply firm pressure. Press until the snap feels secure on the fabric. Check the fabric thickness. Too thick fabric stops the snap from closing well. Try using thinner fabric or trim excess layers near the snap. Loose snaps can also happen if the wrong size snap is used. Match the snap size to your fabric and project.
Misaligned Fasteners
Misaligned fasteners cause snaps to miss each other when closing. Mark the spot carefully before placing each snap part. Lay both sides flat on a table to check alignment. Press one side, then match the other side exactly. Use a ruler or fabric chalk to guide placement. Avoid rushing. Take time to line up the pieces. Correct alignment keeps snaps working smoothly and looking neat.
Care And Maintenance
Proper care and maintenance of your Dritz Snap Fastener Kit keeps it working well for a long time. Clean tools perform better and last longer. Simple steps help avoid damage and rust. Regular upkeep saves money and effort.
Cleaning The Tool
After each use, wipe the snap fastener tool with a dry cloth. Remove any fabric fibers or dirt stuck in the parts. Use a small brush to clean hard-to-reach areas. Avoid using water or harsh chemicals that may cause rust. Keep the tool dry to maintain its condition.
Storing The Kit
Store the kit in a cool, dry place away from direct sunlight. Use the original case or a small container to keep all parts together. Avoid placing heavy items on top of the kit to prevent damage. Proper storage stops rust and keeps snaps organized and ready for use.
Frequently Asked Questions
What Materials Work Best With Dritz Snap Fastener Kit?
The Dritz Snap Fastener Kit works well on fabrics like cotton, denim, and canvas. Avoid very thin or delicate materials to prevent damage. Always test on a scrap piece first to ensure secure attachment and fabric compatibility.
How Do I Install Snaps Using Dritz Snap Fastener Kit?
Place the snap parts on the fabric layers, then align the setting tools. Use a hammer to firmly press the snap components together. Ensure the snap is tight and secure before use to avoid loosening.
Can I Reuse Snaps From The Dritz Snap Fastener Kit?
No, snaps from the Dritz Snap Fastener Kit are designed for one-time use. Removing snaps usually damages them, so replace with new snaps for reliable fastening.
How To Maintain Snaps Installed With Dritz Snap Fastener Kit?
Keep snaps clean by wiping them with a damp cloth. Avoid exposure to harsh chemicals or moisture to prevent rust. Regularly check snaps for looseness and re-secure if necessary.
Conclusion
Using the Dritz Snap Fastener Kit is simple and quick. It helps you add snaps to clothes or crafts easily. Just follow the steps carefully for best results. This tool saves time and makes your projects neat. Practice a few times to gain confidence.
Soon, you will enjoy fixing or creating with snaps. Snap fasteners hold well and look clean. Keep your kit ready for any sewing need. Try it today and see the difference yourself.