Are you ready to update your outdoor space but don’t know how to remove your Trex decking with hidden fasteners? Taking apart these boards might seem tricky at first, but with the right steps, you can do it without damaging your deck or tools.
Whether you’re repairing, replacing, or redesigning, understanding how to safely remove Trex decking will save you time and frustration. Keep reading, and you’ll discover simple, clear methods that make the whole process easier than you think. Your deck makeover starts here!
Tools And Materials Needed
Removing Trex decking with hidden fasteners requires specific tools and materials. These tools help to safely and efficiently take apart the deck boards without damage. Preparing the right equipment before starting makes the job easier and faster.
Essential Tools For Removal
A pry bar helps lift the deck boards gently. A drill with a screwdriver bit is needed to remove screws or clips. A hammer can assist in loosening tight boards. A putty knife or trim tool works well to get under fasteners. A utility knife may be useful to cut any sealant or caulk. Measuring tape helps keep track of board sizes during removal.
Safety Gear To Wear
Wear safety goggles to protect your eyes from debris. Gloves prevent splinters and protect your hands from sharp edges. Knee pads offer comfort and protect your knees while working low to the ground. Sturdy shoes help avoid foot injuries from dropped tools or boards. A dust mask keeps dust and particles out of your lungs during removal.
Preparing The Deck For Removal
Preparing your Trex deck for removal takes careful steps. A well-prepared deck surface helps make the removal process safer and easier. You need to clear the deck and find all hidden fasteners. This preparation saves time and avoids damage to the decking boards and framing.
Clearing The Deck Surface
Start by removing all furniture, plants, and decorations from the deck. Sweep away dirt, leaves, and dust to see the deck clearly. Check for nails or screws sticking out that could cause injury. Clearing the surface gives you space to work and prevents accidents.
Locating Hidden Fasteners
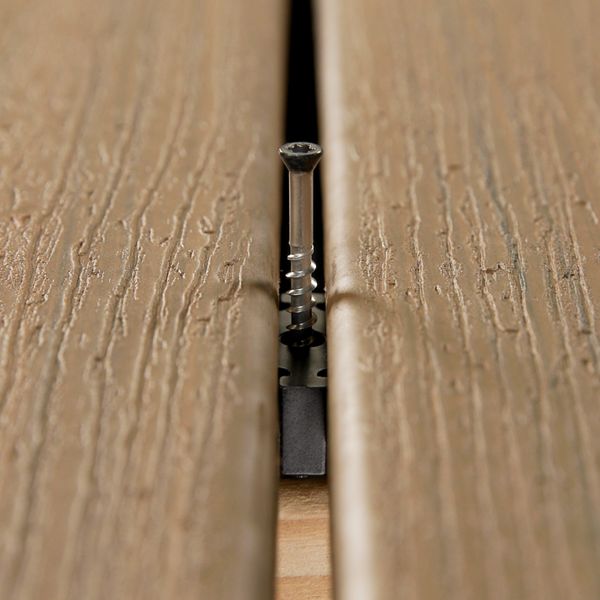
Trex decking uses hidden fasteners that sit between boards. Look closely along each board edge for small gaps or clips. Use a flashlight to spot fasteners in shaded areas. Knowing the fastener locations helps you remove boards without damage. Mark the spots lightly with chalk for easy reference.
Removing The Fasteners
Removing the fasteners from Trex decking with hidden fasteners requires care and the right tools. These fasteners keep the deck boards secure and hidden from view. Removing them carefully helps protect the boards and the deck frame. This section explains how to release the clips and screws safely. It also covers tips for handling difficult fasteners.
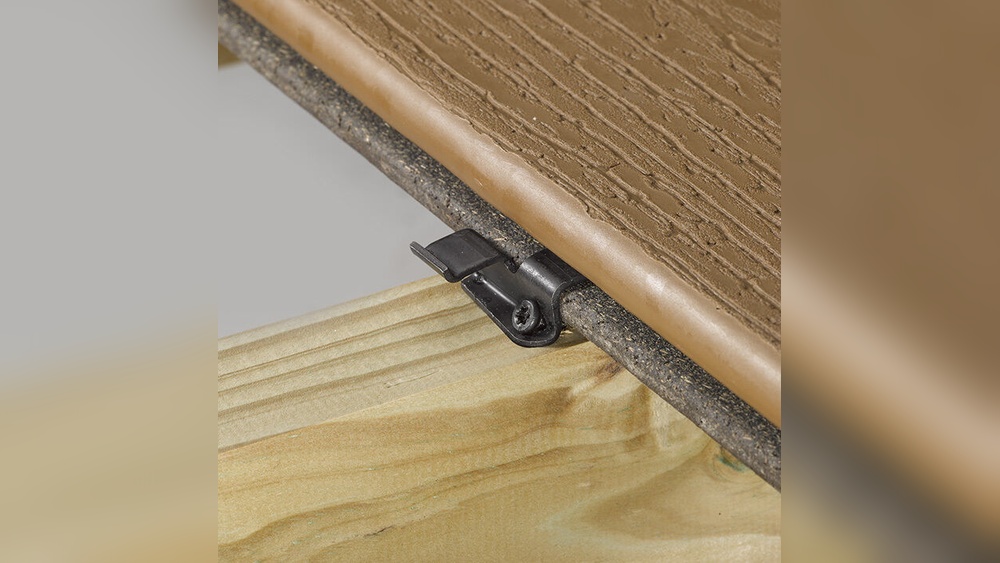
Releasing Clips And Screws
Start by locating the hidden clips between the deck boards. Use a flat pry bar or a special fastener removal tool. Gently lift the clip to release it from the board. Avoid bending or breaking the clip. Next, find the screws that hold the clips in place. Use a drill or screwdriver to remove them. Turn the screws counterclockwise until they come out. Keep the clips and screws for reuse if possible.
Handling Difficult Fasteners
Sometimes fasteners get stuck or rusted. Spray a small amount of lubricant to loosen them. Let it sit for a few minutes. Use a screwdriver with a good grip to turn the screws. Apply slow, steady pressure to avoid stripping the head. If a screw breaks, use a screw extractor tool. Work carefully to avoid damaging the deck boards. Patience is key when dealing with tough fasteners.

Credit: www.fastenmaster.com
Lifting And Removing Deck Boards
Lifting and removing Trex decking boards with hidden fasteners requires care. These boards fit tightly and protect the deck’s surface. You must work gently to avoid damage. The goal is to remove boards without breaking or scratching them. This section guides you through easy steps for safe removal.
Techniques To Avoid Damage
Start by locating the fasteners under the board edges. Use a flat pry bar or a special decking tool. Insert the tool slowly between the board and joist. Apply gentle pressure to lift the board slightly. Work along the board to release all fasteners evenly. Avoid forcing the board upward. This prevents cracking or splintering.
Support the board as you lift it off. Set it down on a soft surface to keep it clean. Keep your tools steady and controlled. Taking time here protects the boards for reuse or recycling.
Managing Stubborn Boards
Some boards may stick due to weather or dirt. Spray a little soapy water around the edges to loosen grime. Let it sit for a few minutes. Use a putty knife to carefully separate stuck areas. Avoid using metal tools that can gouge the wood.
If the board still resists, tap the pry bar gently with a rubber mallet. Work slowly and check progress often. Patience reduces the risk of damage. For very stubborn boards, try lifting from both ends alternately. This balances the force and eases removal.
Cleaning Up After Removal
Cleaning up after removing Trex decking with hidden fasteners is an important step. It helps keep your workspace safe and ready for the next project. Proper cleanup also protects the environment and your property. Take time to clear debris and check the structure underneath.
Disposing Of Old Materials
Collect all decking boards and fasteners carefully. Separate wood and metal parts for recycling if possible. Use heavy-duty bags for small debris and nails. Avoid leaving scraps on the ground to prevent accidents. Check local guidelines for disposing of construction waste. Proper disposal keeps your yard clean and safe.
Inspecting Joists And Frame
Look closely at the joists after deck removal. Check for cracks, rot, or damage in the wood. Use a flashlight to see hidden spots clearly. Fix or replace any weak areas before installing new decking. A strong frame ensures the new deck lasts longer. Inspecting early saves time and money later.

Credit: www.youtube.com
Tips For Reinstallation Or Replacement
Removing Trex decking with hidden fasteners is only part of the project. Reinstallation or replacement takes careful steps. Proper care ensures your deck looks great and lasts long. Follow these tips for a smooth and strong deck rebuild.
Choosing New Fasteners
Select fasteners designed for Trex and composite decking. Use corrosion-resistant materials to prevent rust. Check the size to fit the groove tightly. Avoid cheap fasteners that break or loosen easily. Quality fasteners keep boards secure and stable over time.
Ensuring Proper Alignment
Align boards carefully before fastening. Gaps between boards must be even for water drainage. Use spacers or alignment tools for accuracy. Straight rows improve the deck’s look and safety. Double-check each board before securing it in place.
Credit: www.trex.com
Frequently Asked Questions
How Do Hidden Fasteners Work On Trex Decking?
Hidden fasteners clip the deck boards to the joists without visible screws. They create a smooth surface and secure the boards firmly.
What Tools Are Needed To Remove Hidden Fasteners?
You’ll need a pry bar, drill, screwdriver, and possibly a fastener removal tool. These help safely detach boards and clips.
Can I Reuse Trex Boards After Removing Fasteners?
Yes, Trex boards can be reused if undamaged. Remove fasteners carefully to avoid cracking or splintering the boards.
How Long Does It Take To Remove Trex Decking?
It depends on deck size and fastener type. Typically, removing boards from a small deck takes a few hours.
Conclusion
Removing Trex decking with hidden fasteners is doable with the right steps. Take your time and use proper tools to avoid damage. Start by loosening the fasteners carefully and lifting the boards gently. Keep safety in mind throughout the process.
This method helps keep your deck boards reusable and in good shape. Follow these tips to make the job easier and faster. Now, you can confidently handle your Trex deck removal without stress.