Drilling holes for cabinet hardware might seem simple, but getting it just right makes all the difference between a professional finish and a frustrating mess. If you want your knobs and pulls to look straight, fit perfectly, and last for years, you need the right technique—and that starts with how you drill your holes.
In this guide, you’ll learn exactly what drill bit size to use, how to avoid splintering your wood, and tips to make every hole clean and precise. Ready to transform your cabinets with confidence? Keep reading, and you’ll master the skill that turns any cabinet upgrade into a smooth, successful project.

Credit: www.homedepot.com
Selecting Drill Bits
Selecting the right drill bits is key to installing cabinet hardware neatly and securely. The bits you use affect how clean and precise the holes will be. Choosing the correct type and size prevents damage to your cabinets and hardware. This guide covers the basics of selecting drill bits for cabinet hardware projects.
Standard Vs Metric Sizes
Drill bits come in two main size systems: standard and metric. Standard sizes use inches, such as 1/8″ or 3/16″. Metric sizes use millimeters, like 5mm or 6mm. Cabinet hardware screws often specify one size system. Knowing which system your hardware uses helps you pick the right bit. Mixing sizes can cause loose or tight holes. Always match the drill bit size system to your hardware screws.
Choosing The Right Bit Size
Select a drill bit that matches the screw’s diameter. The hole should allow the screw to fit smoothly without wobbling. If the hole is too small, screws may split the wood or not fit. Too large a hole causes loose hardware that moves or falls off. Check the hardware package for recommended drill bit sizes. Test on scrap wood to confirm a proper fit before drilling your cabinets.
Using Tapered Drill Bits
Tapered drill bits have a wider top and narrower tip. They create cleaner holes with less wood splitting. These bits guide the screw better into the wood. Cabinet hardware installation benefits from tapered bits because they reduce the chance of damaging the surface. Using a tapered bit also helps the screw threads grip firmly. For best results, choose tapered bits sized to your hardware screws.
Measuring For Hardware Placement
Measuring for hardware placement is a crucial step before drilling holes in your cabinets. Precise measurements ensure your knobs and pulls align perfectly, improving both look and function. This process reduces mistakes and saves time during installation.
Start by deciding where to place the hardware on drawers and doors. Follow simple rules and adjust based on your cabinet size. Careful measuring creates a clean, professional appearance for your cabinetry.
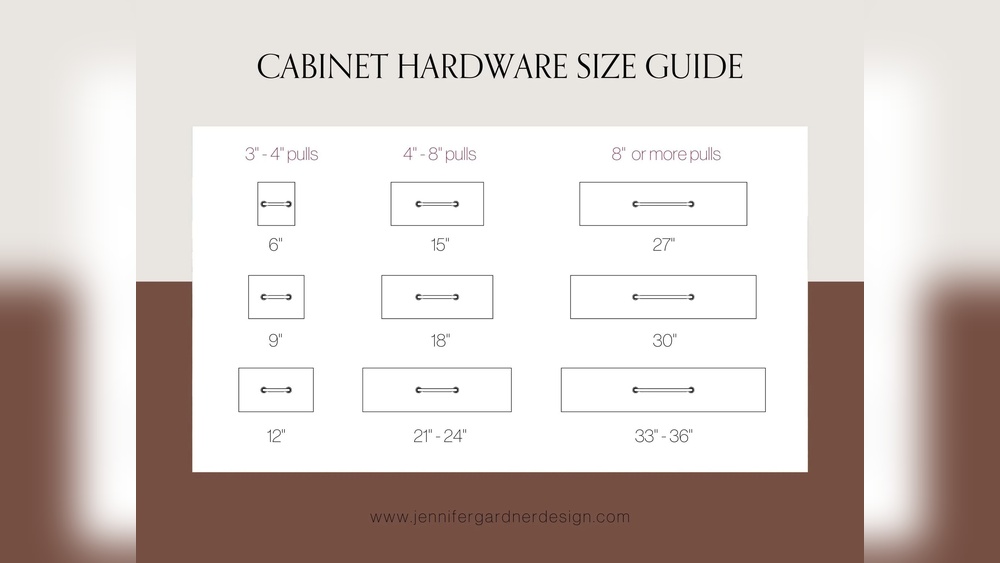
Applying The One-third Rule
The one-third rule helps find the right pull size and position. For drawers, measure the drawer’s width. Divide this by three to get an ideal pull length.
This length feels comfortable to grip and looks balanced. For cabinet doors, use the door’s height. Divide by three to decide pull length and placement.
This rule gives a proportional, neat look. It works well for most cabinet styles and sizes.
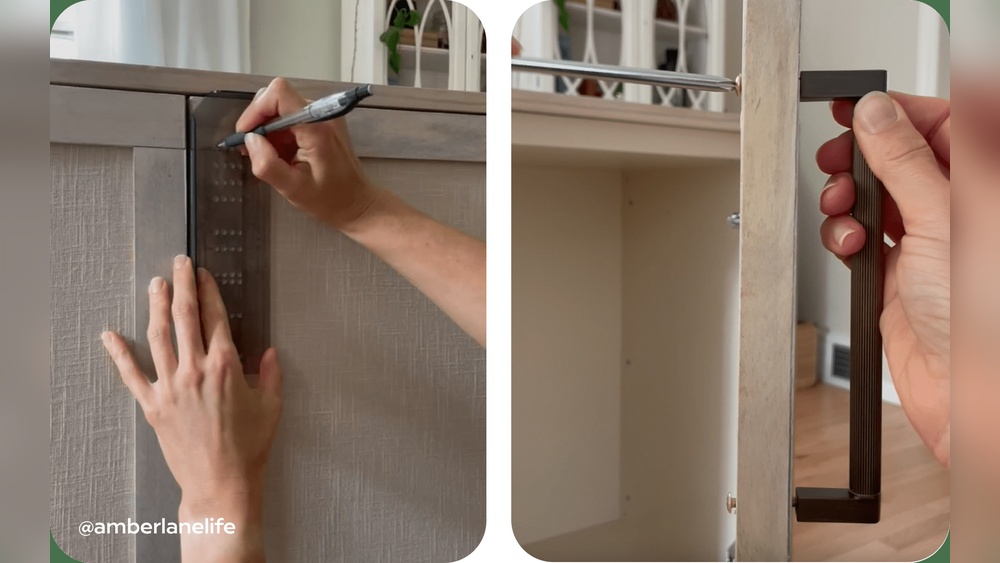
Measuring Drawers
Measure drawer width carefully with a tape measure. Mark the center point lightly with a pencil. From the center, measure left or right by half the pull’s length. Mark the drill points on the drawer face.
Double-check measurements before drilling. Ensure marks are level and evenly spaced. This prevents crooked or misplaced hardware.
Measuring Cabinet Doors
For cabinet doors, measure door height and width. Decide if you want the hardware near the edge or centered. Usually, pulls go about one-third down from the top or up from the bottom.
Mark the spots clearly. Use a level to keep marks straight. Accurate marks help keep doors uniform and tidy.
Adjusting For Wide Drawers
Wide drawers may need longer pulls or two handles. Measure the drawer width and consider using pulls longer than one-third the width.
Place handles evenly spaced from the drawer edges. This ensures easy grip and a balanced look. For extra-wide drawers, two pulls can work better than one.
Adjust placement to fit your design and comfort needs.
Preventing Wood Splintering
Drilling holes for cabinet hardware can cause wood splintering. Splintering damages the wood surface and ruins the cabinet’s look. Protecting the wood is important for a clean, professional finish. Simple steps can stop splinters before they start. These methods keep your project neat and your hardware secure.
Using Masking Tape
Apply a strip of masking tape over the drilling spot. The tape holds wood fibers in place while drilling. It reduces tear-out and splintering around the hole. Mark your drilling point on the tape for accuracy. Drill slowly through the tape for a smoother hole edge. Remove the tape carefully after drilling is complete.
Creating Starter Divots
Use a nail or an awl to make a small divot at the drill point. This divot guides the drill bit and stops it from wandering. It also helps prevent the wood from splintering around the hole. Press gently but firmly to create a clear indentation. This step improves precision and keeps the surface clean.
Clamping Scrap Wood For Backing
Place a piece of scrap wood behind the drilling area. Clamp both the cabinet and scrap wood tightly together. The scrap wood supports the back of the cabinet wood during drilling. It prevents blowout and splintering on the exit side of the hole. Drill through both pieces for a clean, splinter-free hole.
Drilling Techniques
Drilling holes for cabinet hardware requires careful technique. Proper drilling ensures clean holes and secure hardware installation. Using the right methods helps avoid mistakes and damage to the cabinet surface.
These drilling techniques will guide you to achieve precise and neat holes every time.
Drilling At Slow Speeds
Start drilling at slow speeds to maintain control. Slow speeds reduce heat and prevent wood from splitting. They also help the drill bit cut smoothly and accurately. Avoid pushing too hard; let the drill do the work. Slow drilling creates clean holes without rough edges.
Using Brad Point Bits
Brad point bits are best for drilling wood. They have sharp tips that prevent wandering. This design centers the bit exactly where you want the hole. The clean edges of the hole give a professional finish. Using brad point bits makes drilling easier and more precise.
Testing On Scrap Wood
Always test your drill bit on scrap wood before drilling the cabinet. Testing shows if the bit size fits the hardware screw. It helps check the drilling speed and pressure. Practice prevents mistakes on your actual cabinet. This step saves time and avoids damage.
Using Cabinet Hardware Jigs
Using cabinet hardware jigs simplifies drilling holes for knobs and pulls. These jigs guide your drill, ensuring holes are straight and evenly spaced. They save time and reduce mistakes, making installation easier for both beginners and pros.
Benefits Of Jigs
Jigs help keep holes aligned perfectly on cabinet doors and drawers. They improve accuracy, preventing uneven or crooked holes. Using a jig also speeds up the process by marking drill points quickly. This tool reduces the risk of damaging your cabinets. It is especially helpful when installing multiple pulls or knobs with consistent spacing.
Popular Jig Models
Several jigs are popular among DIYers and professionals. The Kreg Cabinet Hardware Jig is well-known for its ease of use and durability. Another favorite is the Milescraft Cabinet Hardware Jig, which offers adjustable settings for different hardware sizes. Some jigs come with templates for common hole patterns. Choose a model that fits your cabinet style and hardware type.
Tips For Accurate Drilling
Always measure twice before drilling. Clamp the jig securely to prevent movement. Use a drill bit that matches your hardware screws exactly. Drill slowly and steady to avoid splintering wood. Test drill on scrap wood to check hole size and placement. Clean debris after each hole for a smooth finish.
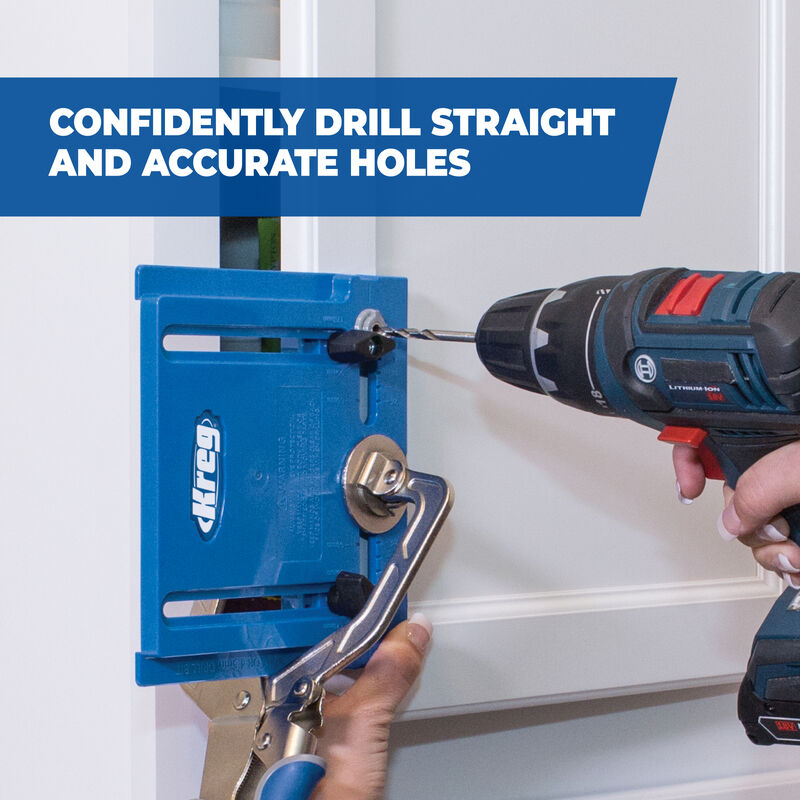
Credit: www.kregtool.com
Installing Cabinet Knobs And Pulls
Installing cabinet knobs and pulls is a straightforward way to refresh your kitchen or bathroom cabinets. Proper installation ensures the hardware looks great and functions well. Follow careful steps to drill holes, align hardware, and secure screws. This process helps avoid mistakes and protects your cabinets from damage.
Aligning Hardware Holes
Mark the exact spots for your hardware holes with a pencil. Use a ruler or measuring tape to keep the marks even and straight. Double-check measurements before drilling to avoid mistakes. A cabinet hardware jig can help keep holes perfectly aligned. Accurate alignment makes your cabinets look professional and polished.
Securing Screws Properly
Insert screws carefully through the drilled holes and into the hardware. Tighten screws just enough to hold the knobs or pulls firmly. Avoid over-tightening, which can strip the screw holes or damage the hardware. Use a screwdriver that fits the screw heads well for better control. Proper screw tension keeps the hardware stable and secure.
Checking For Smooth Operation
Test each knob or pull by pulling and pushing gently. Make sure the hardware feels solid and does not wiggle. Check that drawers and doors open and close smoothly with the new hardware. Adjust screws slightly if you notice any looseness or misalignment. Smooth operation improves cabinet usability and prevents wear over time.

Credit: www.youtube.com
Frequently Asked Questions
What Size Drill Bit To Use For Cabinet Hardware?
Use a 3/16-inch (5mm) drill bit for standard cabinet hardware holes. Always verify with the hardware instructions.
What Is The 1/3 Rule For Cabinet Pulls?
The 1/3 rule for cabinet pulls means the pull’s length should be about one-third the drawer’s width or door’s height. This ensures a balanced, functional, and visually appealing look.
How To Drill Cabinet Holes Without Splintering Wood?
Apply masking tape over the drill spot. Use an awl to create a starter hole. Drill slowly with a sharp brad point bit. Clamp scrap wood behind to prevent splintering at the exit point.
What Kind Of Drill Bit Do I Use To Drill Through Stainless Steel?
Use a cobalt or titanium-coated drill bit for drilling stainless steel. These bits resist heat and stay sharp longer. Drill slowly with steady pressure to avoid overheating and bit damage.
Conclusion
Drilling holes for cabinet hardware takes care and patience. Measure carefully and mark spots before drilling. Use the right drill bit size for clean holes. Test on scrap wood to avoid mistakes. Keep your drill steady and work slowly. Properly drilled holes help hardware fit well and last longer.
Take your time and enjoy the process. Your cabinets will look neat and function smoothly. Simple steps make a big difference in your project.