
Are you ready to transform your cabinets with perfectly aligned hardware without the hassle? The Kreg Cabinet Hardware Jig is your secret weapon to achieving professional-looking results quickly and easily.
Whether you’re updating your kitchen, bathroom, or any cabinetry, this tool takes the guesswork out of measuring and drilling. In this guide, you’ll discover step-by-step how to use the Kreg Cabinet Hardware Jig like a pro, saving you time and frustration while ensuring every knob and pull fits flawlessly.
Keep reading to unlock the simple tricks that will make your next DIY cabinet project a breeze!

Credit: www.highlandwoodworking.com
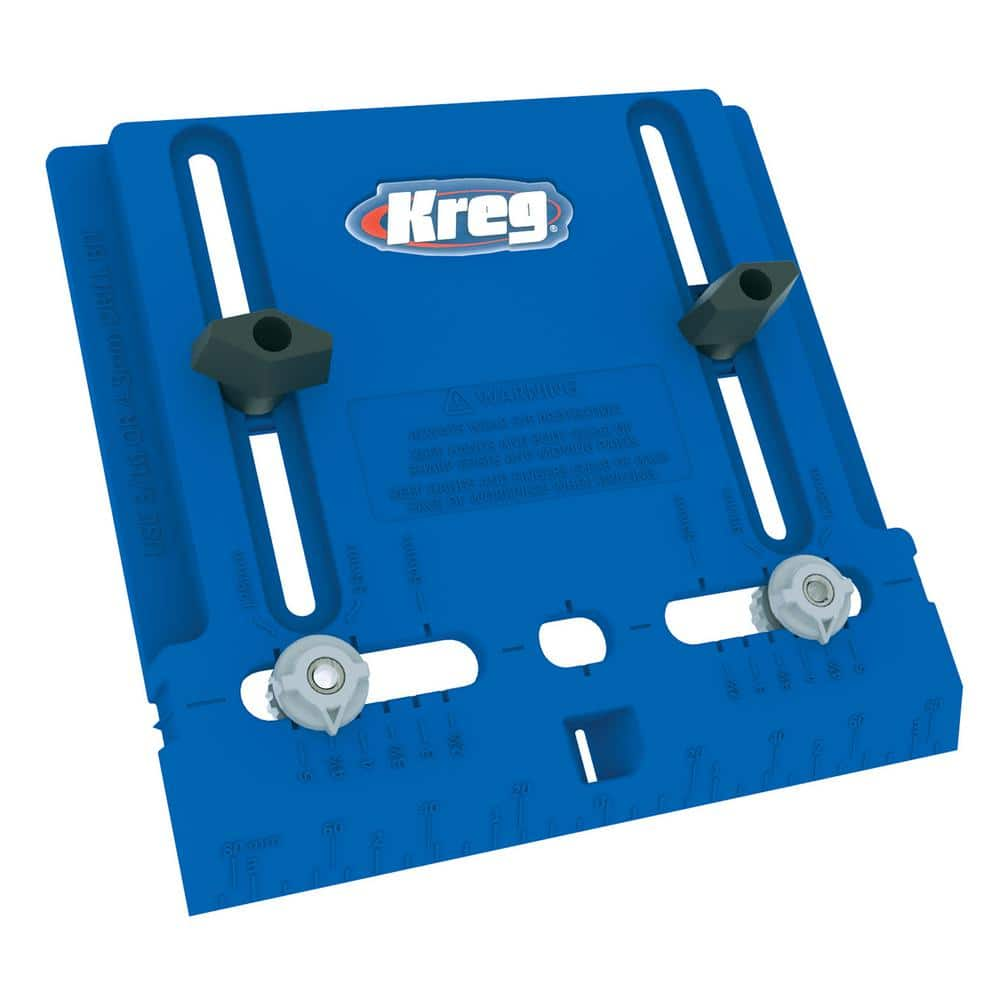
Kreg Cabinet Hardware Jig Features
The Kreg Cabinet Hardware Jig is designed to simplify hardware installation on cabinets. It offers features that help ensure precise and consistent placement of handles and knobs. Each feature plays a vital role in making your project easier and more accurate.
Adjustable Edge Guide
The adjustable edge guide helps position the jig exactly where you want. It slides to match different cabinet door and drawer sizes. This guide ensures holes are drilled at the right distance from the edge. It reduces mistakes and saves time during installation.
Measuring Scales
Clear measuring scales are built into the jig for quick adjustments. These scales show exact measurements for hole placement. You can set the jig for different hardware sizes easily. The scales help maintain uniform spacing across all your cabinet doors and drawers.
Clamp Mechanism
The clamp mechanism secures the jig firmly to the cabinet surface. It prevents the jig from moving while drilling. This stability results in clean, straight holes every time. The clamp is easy to use and fits a variety of cabinet thicknesses.

Credit: www.kregtool.com
Choosing Pull Sizes
Choosing the right pull size is key for a balanced look. The pull should fit the drawer or door well. Too small looks odd. Too big feels heavy and clumsy.
The one-third rule helps pick a good size. It gives a simple way to measure pulls. This keeps the style neat and the grip comfortable.
One-third Rule For Drawers
Measure the drawer width. Divide this by three. This number is the pull length you want. For example, a 15-inch drawer needs a 5-inch pull.
This size gives enough room for your hand. It also looks balanced on the drawer front. Pulls smaller or larger than this can seem off.
One-third Rule For Cabinet Doors
Use the same rule for doors. Measure the door height and divide by three. The result is a good pull length.
This size fits the door well. It looks clean and feels easy to use. Pulls that are too long or short spoil the door’s look.
Considerations For Wide Drawers
Wide drawers may need longer pulls. Sometimes more than one pull works best. This makes opening easier and keeps the style right.
Check the drawer weight and use too. Heavy drawers need sturdy pulls. Choose pulls that fit your needs and the drawer size.
Preparing For Installation
Preparing for installation is a key step before using the Kreg Cabinet Hardware Jig. Proper preparation ensures precise and clean results. It also saves time and reduces mistakes during the process.
Take your time with each task. This will help you place cabinet hardware perfectly. A good start leads to a smooth installation.
Selecting The Right Drill Bit
Choose a drill bit that matches the hardware screw size. The Kreg Jig kit often includes the correct bit. Using the right size prevents damage to your cabinet doors or drawers. A bit too large can cause loose holes, too small can split the wood. Check your pull’s screw diameter before drilling.
Marking Pull Positions
Measure carefully to mark pull positions on each drawer or door. Use a pencil and ruler for accuracy. Follow the “one third” rule: place pulls about one-third the width of drawers. For cabinet doors, measure one-third the height. Mark spots lightly to avoid visible pencil marks. Consistent marking ensures uniform hardware placement across all cabinets.
Setting Up The Jig
Adjust the Kreg Cabinet Hardware Jig to match your mark locations. Set the jig’s stops and guides according to your measurements. Make sure it fits the drawer or door thickness. Tighten all knobs and clamps securely. This keeps the jig steady while drilling. Test on a scrap piece of wood to confirm settings before starting on your cabinets.
Step-by-step Jig Use
Using the Kreg Cabinet Hardware Jig is simple and efficient. This step-by-step guide helps you install cabinet hardware with accuracy. Follow each part carefully to ensure perfect results every time. The jig keeps your drill holes aligned and consistent. It saves time and reduces mistakes during installation.
Clamping The Jig To Cabinet
Place the jig on the cabinet door or drawer face. Adjust the jig to the desired position for your hardware. Use the clamp to secure the jig firmly in place. Make sure it does not move or shift during drilling. Check that the jig is level and aligned before continuing.
Drilling Pilot Holes
Use a drill bit that matches the hardware screws. Insert the drill bit into the jig’s guide hole. Drill straight through the cabinet door or drawer face. Keep the drill steady and apply light pressure. Pilot holes help screws go in easily and prevent wood splitting.
Repeating For Multiple Cabinets
After drilling one cabinet, remove the jig carefully. Move the jig to the next cabinet door or drawer. Clamp it in the same position as before. Repeat the drilling process for consistent hardware placement. This method works well for large projects with many cabinets.
Tips For Perfect Alignment
Perfect alignment is key when installing cabinet hardware. The Kreg Cabinet Hardware Jig helps achieve this easily. Following some simple tips ensures every handle or knob sits straight and looks professional. These tips focus on measuring, drilling, and adapting the jig for various hardware styles.
Consistent Measurements
Measure each cabinet or drawer carefully before drilling. Use a ruler or tape measure to mark exact spots. Keep the same measurement for all cabinets to maintain uniformity. The jig helps repeat these measurements quickly. This consistency prevents uneven hardware placement and improves the cabinet’s appearance.
Double-checking Drill Depth
Set the drill bit to the correct depth before starting. Too deep can damage the cabinet; too shallow may not hold the screw well. Use the depth stop on the jig for accuracy. Test on a scrap piece of wood to confirm the depth. Double-checking protects your cabinets and ensures secure hardware installation.
Using Jig For Different Hardware Types
The Kreg jig works for various hardware, including knobs and pulls. Adjust the jig’s settings based on the hardware size and style. For knobs, center the hole perfectly. For pulls, align both holes evenly using the jig’s guides. This flexibility saves time and keeps every piece looking balanced.
Troubleshooting Common Issues
Troubleshooting common problems with the Kreg Cabinet Hardware Jig helps ensure perfect cabinet installations. Small errors can cause misaligned holes or loose hardware. Fixing these issues quickly saves time and improves your project’s quality.
Understanding how to adjust the jig settings is key to avoiding repeated mistakes. This section explains the main issues and how to solve them step-by-step.
Misaligned Holes
Misaligned holes happen when the jig is not positioned correctly. Check the jig placement before drilling. Use clamps to hold the jig steady on the cabinet surface.
Measure twice to confirm the hole location matches your hardware size. Adjust the jig’s stop or guide if holes are too high or low. Make small changes and test on scrap wood first.
Loose Hardware
Loose hardware often results from holes that are too big or screws that are too short. Use the correct drill bit size recommended by the jig instructions. This ensures tight, secure holes.
Choose screws long enough to grip the cabinet material firmly. Tighten screws carefully to avoid stripping the hole or damaging the hardware. If needed, fill loose holes with wood filler and redrill after it dries.
Adjusting Jig Settings
The jig has adjustable stops and guides for different hardware sizes and placements. Follow the manual to set the jig for your specific pulls or knobs.
Adjust the depth stop to control how far the drill bit goes into the wood. Set the side guides to align the jig with the cabinet edge accurately. Test the settings on scrap material before working on your cabinets.
Regularly check and tighten any jig parts that become loose during use. Proper adjustment ensures consistent, professional results every time.
Benefits Of Using The Jig
Using the Kreg Cabinet Hardware Jig offers many clear benefits. It simplifies the process of installing cabinet hardware. This tool helps you work faster and with better accuracy. The jig supports various project types, making it a valuable tool for beginners and pros alike.
Time Savings
The jig guides your drill, reducing guesswork. It helps you mark and drill holes quickly. You avoid measuring each piece by hand. This speeds up your entire project. Less time spent means you can finish more jobs.
Professional Results
The jig ensures holes are perfectly aligned. It creates even spacing on all cabinets. This consistency improves the look of your work. You get clean, straight holes every time. Your cabinets will look like they were done by a pro.
Versatility Across Projects
The jig fits different cabinet styles and sizes. It works for drawers and doors alike. You can adjust it for various pull lengths. This makes it useful for many home projects. One tool covers many needs, saving space and money.
Credit: www.homedepot.com
Frequently Asked Questions
How To Use Kreg Cabinet Door Jig?
Clamp the Kreg cabinet door jig on the door edge. Align the guide holes. Drill holes using the recommended 3/16″ bit. Insert screws and attach the hardware. Repeat for each door to ensure uniform placement and easy installation.
What Is The 1/3 Rule For Cabinet Pulls?
The 1/3 rule for cabinet pulls means the pull’s length should be one-third the drawer’s width or cabinet door’s height. This ensures balanced aesthetics and comfortable grip for functional use.
What Size Drill Bit For Kreg Cabinet Hardware Jig?
Use a 3/16-inch drill bit with the Kreg Cabinet Hardware Jig for accurate and clean hole drilling.
What Setting On Kreg Jig For 2×4?
Set the Kreg jig’s fence to 1-1/2 inches for 2×4 lumber. Use the 3/8-inch drill bit for pocket holes.
Conclusion
Using the Kreg Cabinet Hardware Jig makes installing hardware simple and precise. It helps you drill perfect holes every time. The jig saves time and reduces mistakes. You can install cabinet pulls and knobs with confidence. Practice a bit before starting your project.
Soon, your cabinets will look neat and professional. Trust the jig to guide your work easily. Enjoy the satisfaction of well-installed hardware in your home.

