Have you ever struggled with tricky fasteners that just won’t snap into place? You’re not alone.
Knowing how to snap fasteners quickly and securely can save you time and frustration, whether you’re fixing clothes, crafting, or working on DIY projects. In this guide, you’ll discover simple steps and insider tips that make snapping fasteners easier than ever.
Keep reading, and you’ll master the skill that turns everyday tasks into smooth, hassle-free experiences.
Credit: so-sew-easy.com
Choosing The Right Snap Fasteners
Choosing the right snap fasteners is key for a successful project. The right fastener ensures your item stays secure and looks good. Different projects need different types, materials, and sizes. Understanding these helps you pick the best snap fastener for your work.
Types Of Snap Fasteners
Snap fasteners come in various types. Sew-on snaps attach with needle and thread. Press snaps are fixed with a special tool or pliers. Magnetic snaps close with a magnet inside. Each type fits different needs and projects.
Materials And Sizes
Snap fasteners are made from metal, plastic, or nylon. Metal snaps are strong and long-lasting. Plastic snaps suit light fabrics and craft projects. Sizes vary from very small to large. Choose size based on fabric thickness and project use.
Matching Fasteners To Projects
Consider the fabric and item use. Heavy fabrics need strong metal snaps. Lightweight fabrics work best with plastic or small snaps. For bags or outerwear, use durable snaps. For baby clothes, soft and safe snaps work well.

Credit: susieddesigns.wordpress.com
Tools Needed For Snapping Fasteners
Snapping fasteners requires the right tools to make the job easy and clean. Using proper tools helps avoid damage and ensures fasteners fit perfectly. Different tools work best for different types of fasteners and projects.
Basic Tools
Basic tools include a hammer and a flat surface. Place the fastener on a hard, stable surface. Use the hammer to press the fastener parts together. This method is simple and works well for light fabrics and small projects.
Also, you need an awl or a small punch to make a hole. This hole guides the fastener and prevents fabric damage. Basic tools are affordable and good for beginners.
Specialized Snap Pliers
Specialized snap pliers are designed for quick and precise fastening. They apply even pressure to snap fasteners. These pliers reduce the risk of bending or breaking fasteners.
Snap pliers come with different dies for various fastener sizes. They are perfect for sewing projects or crafts needing strong, clean snaps. Using these pliers saves time and effort.
Alternative Methods
Alternative methods include using a vise or a clamp. Place the fastener in the vise and press firmly. This method works well if a hammer is not available.
Another way is using a heavy book or block to press snaps together. It takes more time but can work in a pinch. These alternatives suit light-duty projects or home repairs.
Preparing Fabric And Fasteners
Preparing fabric and fasteners is a key step in snapping fasteners correctly. This step ensures the snap stays secure and looks neat. Taking time now saves frustration later. Proper preparation makes snapping easier and lasts longer.
Marking Placement
Start by marking where each snap will go. Use a fabric pencil or chalk. Mark both sides of the fabric for exact alignment. Check the marks twice to avoid mistakes. Accurate marks help place snaps evenly and straight.
Reinforcing Fabric
Thin fabric needs extra strength around the snap area. Add a small piece of interfacing or fabric behind the mark. This prevents tearing and holds the snap firmly. Cut reinforcement to fit inside the fabric layers. Attach it before adding the snap.
Aligning Snap Components
Place the snap parts carefully on the marked spots. The socket and stud must line up perfectly. Hold the fabric flat and steady. Press the fastener parts together gently before fixing. Proper alignment makes snapping and unsnapping smooth.

Credit: so-sew-easy.com
Step-by-step Snapping Process
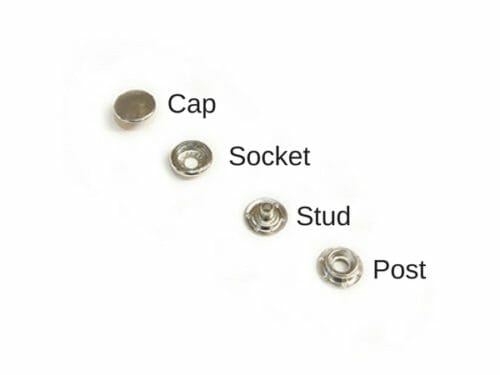
The step-by-step snapping process helps you attach fasteners quickly and correctly. It breaks down the task into simple actions. Follow each part carefully to ensure a strong hold. This guide covers attaching the cap and socket, securing the stud and post, and checking the closure.
Attaching The Cap And Socket
Place the cap on the fabric’s front side. Align the socket piece behind the fabric. Hold both parts firmly together. Use a snap fastener tool or pliers. Press down evenly to join the cap and socket. Check that they fit tightly without gaps.
Securing The Stud And Post
Position the stud on the fabric’s back side. Place the post behind the stud. Keep both pieces aligned and steady. Use your tool to press them together. Make sure the stud and post are secure. They should not move or wiggle after pressing.
Checking The Closure
Snap the two fastened parts together. Listen for a click or feel resistance. Test by pulling gently on the fabric edges. The fastener should stay closed firmly. Open and close the snap a few times. Confirm it works smoothly without sticking.
Tips For Quick And Secure Closures
Snapping fasteners quickly and securely saves time and frustration. This section shares simple tips that help you close fasteners with ease and strength. Follow these steps to get better results every time.
Avoiding Common Mistakes
Check the fastener parts before use. Dirt or damage can stop snaps from closing well. Align both sides carefully. Misalignment causes snaps to break or stay open. Press firmly but gently. Too much force can bend or break the fastener.
Ensuring Durability
Choose the right fastener for your material. Lightweight snaps suit light fabrics; heavy snaps fit thick materials. Secure snaps tightly with the right tools. Loose snaps fall off quickly. Store your items away from moisture to avoid rust or wear.
Speeding Up The Process
Practice snapping on scrap fabric first. This builds confidence and skill. Use a snap tool or pliers for quick, even pressure. Keep fasteners organized by size and type. This saves time hunting for the right piece.
Maintaining Snap Fasteners
Maintaining snap fasteners helps keep them working well and lasting longer. Regular care prevents rust and damage. It also ensures smooth opening and closing. Simple steps can protect your snaps and save money on repairs.
Cleaning And Care
Use a soft cloth to wipe snap fasteners. Remove dirt and dust gently. Avoid harsh chemicals that can cause rust or wear. A little soap with water works well for cleaning. Dry snaps thoroughly to stop moisture buildup. Check snaps regularly for signs of damage or stiffness.
Replacing Damaged Snaps
Remove damaged snaps carefully with pliers or a snap remover tool. Choose replacement snaps that match the size and style. Attach new snaps firmly using a snap press or hand tool. Test the snap to ensure it closes tightly. Replace snaps as soon as you notice problems to avoid fabric damage.
Storage Advice
Store items with snap fasteners in a dry place. Keep snaps away from moisture and humidity. Avoid folding fabric where snaps sit to prevent bending. Use small bags or boxes to protect snaps during storage. Proper storage helps maintain snap function and appearance.
Frequently Asked Questions
What Tools Do I Need To Snap Fasteners?
You need snap fastener pliers or a hand press tool. Also, have snap fastener kits with caps and sockets. These tools help secure snaps firmly and evenly on fabric.
How Do I Prepare Fabric For Snap Fasteners?
Mark the snap placement spots clearly. Use a small hole punch or needle to make holes. This ensures easy insertion and prevents fabric damage when snapping fasteners.
Can Snap Fasteners Be Applied Without Sewing?
Yes, snap fasteners can be applied without sewing. Use no-sew snap fasteners and a hand press or pliers to attach. This method saves time and works on various fabrics.
How Do I Ensure Snap Fasteners Stay Secure?
Apply firm, even pressure when attaching snaps. Avoid fabric bunching and align snap parts correctly. Proper installation prevents snaps from loosening or falling off.
Conclusion
Snap fasteners offer a quick, strong way to join fabrics. Choose the right tools and follow simple steps. Practice a bit to get comfortable with the process. This skill saves time and adds neatness to projects. Keep your workspace clean and organized for best results.
With patience, snapping fasteners becomes easy and fun. Now, you can fix or create items with confidence. Try it out and enjoy the convenience it brings.