Are your brass cabinet hardware looking dull or outdated? You don’t need to replace them to give your cabinets a fresh, new look.
Refinishing brass hardware is a simple and affordable way to transform your space. In this guide, you’ll discover easy steps to bring back that shiny, polished finish you love. By the end, your cabinets will look brand new—and you’ll save money and time doing it yourself.
Ready to see how? Let’s get started!
Tools And Materials Needed
Refinishing brass cabinet hardware requires some basic tools and materials. These help remove old finishes and apply new coats smoothly. Having the right supplies makes the job easier and the results better.
Prepare all items before starting. This saves time and avoids interruptions. Keep everything close by for quick access.
Essential Supplies
- Fine-grit sandpaper or steel wool to smooth surfaces
- Brass cleaner or vinegar for removing tarnish
- Soft cloths for wiping and polishing
- Spray primer to help paint stick
- Spray paint or brush-on paint made for metal
- Clear lacquer or sealant to protect finish
- Small brushes for detail work
- Plastic container or tray for soaking hardware
Safety Gear
- Protective gloves to keep skin safe from chemicals
- Safety glasses to shield eyes from dust and sprays
- Face mask to avoid inhaling fumes or dust
- Old clothes or apron to prevent stains
- Work in a well-ventilated area to reduce fumes
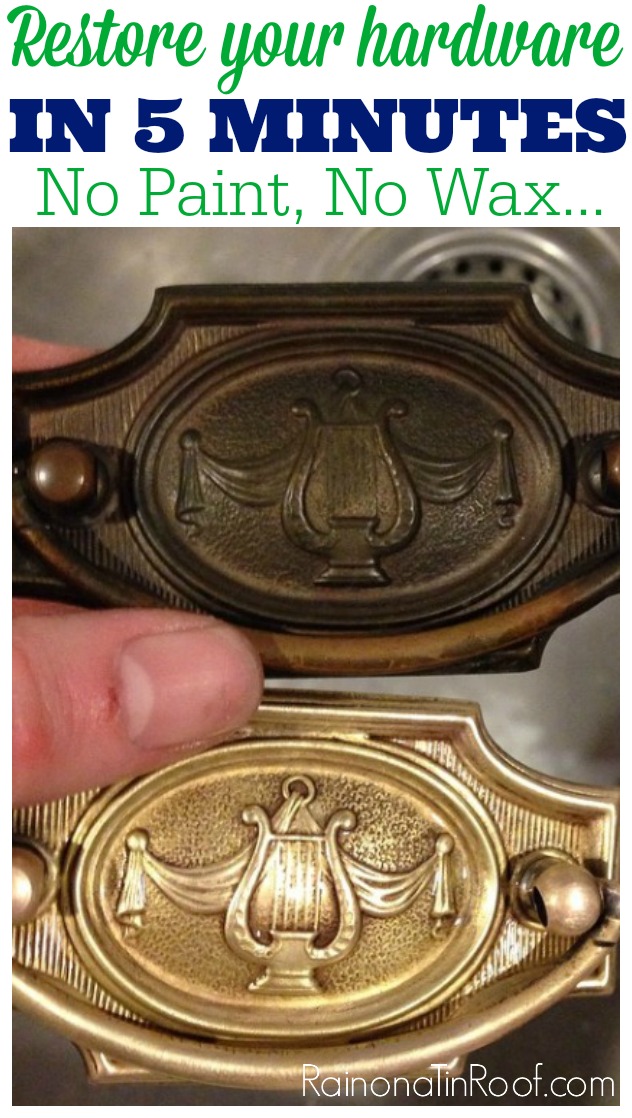
Credit: rainonatinroof.com
Removing Hardware From Cabinets
Removing hardware from cabinets is the first step in refinishing brass pieces. Taking the hardware off carefully protects both the metal and the cabinet surface. It also makes the cleaning and refinishing process easier and more effective.
Handle each piece gently. Avoid rushing to prevent damage. Use the right tools and keep track of each part for smooth reinstallation later.
Proper Detachment Techniques
Start by opening the cabinet door or drawer fully. Use a screwdriver that fits the screws well. Turn screws slowly to avoid stripping them. Keep pressure steady and firm. If screws feel stuck, try a little penetrating oil. Pull hardware straight away once screws are loose. Avoid bending or twisting the pieces.
Labeling For Reinstallation
Label each piece to remember its original spot. Use small sticky notes or masking tape. Write the location clearly on each label. Keep screws and hardware parts together in small bags. Store all pieces safely to prevent loss. This step saves time and confusion later.
Cleaning Brass Hardware
Cleaning brass hardware is the first step to a beautiful finish. Dirt and tarnish hide the metal’s shine. Removing these makes refinishing easier and better. Take your time and clean gently for best results.
Removing Dirt And Grime
Start by wiping the brass with a soft cloth. Use warm, soapy water to remove surface dirt. Avoid harsh chemicals that can damage brass. Dip a soft toothbrush into the soap water. Gently scrub all the small details and edges. Rinse with clean water and dry with a soft towel. Repeat if needed to clear stubborn grime.
Dealing With Tarnish
Tarnish makes brass look dull and dark. Use a natural cleaner like lemon juice or vinegar. Mix lemon juice with baking soda to form a paste. Apply the paste to the brass with a cloth. Rub gently in small circles to lift tarnish. Let it sit for a few minutes. Rinse off with warm water and dry completely. For heavy tarnish, repeat the process carefully.
Stripping Old Finish
Stripping old finish from brass cabinet hardware is an important first step. It removes dirt, tarnish, and previous coatings. Clean brass surfaces help new finishes stick better. This process brings back the brass’s natural shine. It also prepares the hardware for polishing or painting.
Choosing The Right Stripper
Pick a stripper made for metal or brass. Avoid harsh chemicals that can damage brass. Look for non-toxic, biodegradable options. Gel strippers work well because they stay on the surface. This gives the chemical time to work. Test the stripper on a small piece first. Check how well it removes the old finish. Choose one that does the job without harming the metal.
Safe Application Methods
Wear gloves and eye protection before starting. Work in a well-ventilated area or outdoors. Use a brush to apply the stripper evenly. Cover all areas of the hardware. Let the stripper sit for the time listed on the label. Use a plastic scraper or soft cloth to remove loosened finish. Rinse the hardware with warm water after stripping. Dry the pieces completely to prevent rust or water spots.
Polishing Brass Surfaces
Polishing brass surfaces is a key step in refinishing cabinet hardware. It restores shine and removes dullness from the metal. Clean brass looks fresh and bright, giving cabinets a new feel. This process can be done by hand or with tools. Both methods help bring out the best shine on your brass pieces.
Hand Polishing Tips
Start by cleaning the brass with warm, soapy water. Dry it completely before polishing. Use a soft cloth or a microfiber towel for best results. Apply a small amount of brass polish or a natural cleaner like lemon juice and baking soda. Rub gently in circular motions. Keep polishing until the surface shines. Avoid harsh scrubbing to prevent scratches. Wipe off any leftover polish with a clean cloth.
Using Buffing Tools
Buffing tools speed up the polishing process. Use a rotary tool with a soft buffing wheel attachment. Apply a small drop of polishing compound to the wheel. Hold the brass piece firmly and move it slowly against the rotating wheel. Keep the tool moving to avoid overheating. Check the shine often and stop when the desired brightness appears. Clean the hardware with a soft cloth after buffing. This method works well for detailed or larger brass items.
Applying New Finish
Applying a new finish to brass cabinet hardware can breathe new life into old pieces. It improves their look and protects the metal from damage. The process requires care and the right materials. Taking time ensures a smooth and lasting finish.
Selecting Finish Types
Choose a finish that suits your style and needs. Clear lacquer keeps the original brass shine. It protects against tarnish and moisture. Spray paints offer color options like black, white, or metallic. They cover the brass completely. Wax or oil finishes give a soft, natural look. These need regular reapplication for protection.
Step-by-step Application
Start by cleaning the hardware with soap and water. Dry it completely to avoid moisture under the finish. Lightly sand the surface with fine sandpaper for better adhesion. Wipe off dust with a clean cloth. Apply the chosen finish in thin, even coats. Allow each coat to dry fully before adding the next. For spray finishes, hold the can about 8 inches away. Use smooth, sweeping motions to avoid drips. After the final coat, let the hardware dry for 24 hours. This ensures the finish hardens and lasts longer.
Drying And Curing Process
The drying and curing process is a vital step in refinishing brass cabinet hardware. It ensures the finish lasts longer and looks smooth. Proper drying helps the paint or coating to harden fully. This step protects the hardware from scratches and wear.
Skipping or rushing drying can cause peeling or bubbling. Taking time to dry and cure the hardware correctly improves durability. It also enhances the shine and color of the brass finish.
Optimal Drying Conditions
Choose a clean, dust-free area for drying. The temperature should be between 65 and 75 degrees Fahrenheit. Avoid places with high humidity, as moisture slows drying. Good air circulation helps the finish dry evenly. Place hardware on a soft cloth or paper towel to prevent marks. Allow at least 24 hours for drying before handling.
Avoiding Common Mistakes
Do not touch the hardware while it dries. Fingerprints can ruin the finish. Avoid stacking pieces during drying; they may stick together. Do not dry in direct sunlight, which can cause uneven drying. Avoid using heat guns or hair dryers; they can damage the finish. Be patient and give the finish time to cure fully for best results.

Credit: www.thriftydecorchick.com
Reinstalling Hardware
Reinstalling your brass cabinet hardware is the final step in the refinishing process. This step brings your cabinets back to life with a fresh, polished look. Careful reinstallation ensures the hardware functions well and looks great.
Take your time during this stage. Proper alignment and secure fastening will keep your hardware sturdy and easy to use.
Aligning Properly
Start by positioning the hardware exactly where it belongs. Match the holes on the hardware to the holes in the cabinet. This keeps handles and knobs straight and even. Use a level if needed to check alignment. Proper placement avoids damage to the cabinet surface. It also makes opening and closing smooth.
Securing Fasteners
Use the original screws or new ones that fit well. Tighten screws gently with a screwdriver. Avoid over-tightening to prevent stripping the screws or damaging the wood. Make sure the hardware feels firm but not forced. Loose hardware can wobble and wear out faster. Check each piece before moving to the next one.
Maintenance Tips For Longevity
Keeping brass cabinet hardware looking new takes small, regular steps. Proper care helps protect the finish and keeps the brass shiny. Follow these simple maintenance tips to extend the life of your refinished hardware.
Regular Cleaning
Clean brass hardware often to avoid dirt build-up. Use a soft cloth with mild soap and warm water. Gently wipe the surface to remove dust and fingerprints. Avoid harsh chemicals or abrasive cleaners. They can damage the finish. Dry the hardware completely with a soft towel to prevent water spots.
Preventing Tarnish
Tarnish appears when brass meets air and moisture. Keep your hardware dry to slow this process. Apply a thin layer of clear wax or lacquer for extra protection. Use gloves when handling brass to avoid oils from your skin. Store extra hardware in a dry place, wrapped in a soft cloth.

Credit: jenniferrizzo.com
Frequently Asked Questions
How Do I Remove Old Finish From Brass Hardware?
To remove old finish, soak brass hardware in a vinegar and salt solution. Gently scrub with a soft brush. Rinse and dry completely before refinishing.
What Materials Are Needed To Refinish Brass Cabinet Hardware?
You need fine steel wool, brass polish, clear lacquer spray, gloves, and a soft cloth. These help clean, polish, and protect the brass surface effectively.
Can I Refinish Brass Hardware Without Removing It?
Yes, you can refinish brass hardware in place. Clean thoroughly, polish carefully, and apply a protective lacquer without removing the pieces.
How Long Does The Refinishing Process Take?
Refinishing brass hardware typically takes 1-2 hours, including cleaning, polishing, and drying time. Multiple lacquer coats may require additional drying time.
Conclusion
Refinishing brass cabinet hardware is easier than it seems. With a few simple steps, you can make old pieces look new again. Take your time and follow each step carefully. This project saves money and adds charm to your space.
Enjoy the satisfaction of a fresh, polished look. Try it yourself and see the difference it makes.