Have you ever faced the frustration of trying to remove a stubborn fastener and feeling stuck? Whether it’s a screw, bolt, or nail, getting it out can sometimes seem impossible.
But don’t worry—removing fasteners doesn’t have to be a struggle. You’ll discover simple, effective techniques that anyone can use to tackle even the toughest fasteners. Keep reading, and you’ll gain the confidence and know-how to get the job done quickly and without damage.
Your next project just got a whole lot easier!

Credit: www.novafabrication.com
Types Of Fasteners
Fasteners hold things together in many projects and repairs. Knowing the types helps in removing them safely and quickly. Different fasteners need different tools and methods for removal. Understanding their varieties and features is key to success.
Common Fastener Varieties
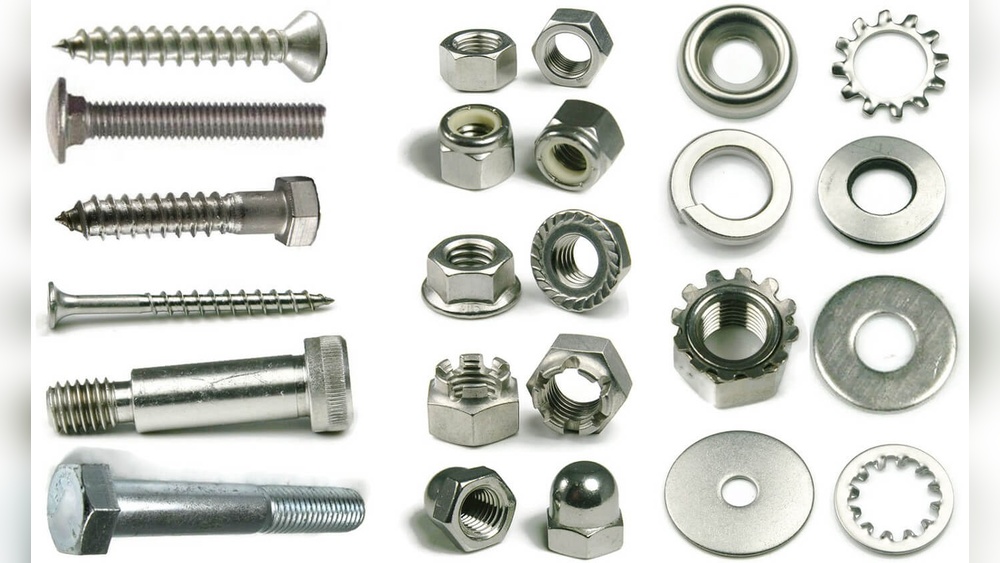
Bolts and screws are the most common fasteners. Bolts usually need a nut to hold tight. Screws thread directly into material. Nails are simple and often hammered in place. Rivets join materials by deforming the end. Clips and pins hold parts without threads.
Each type has unique shapes and heads. Phillips, flathead, Torx, and hex heads are popular. Knowing the head type helps choose the right tool. Some fasteners are hidden under caps or covers.
Material And Size Considerations
Fasteners come in various materials like steel, brass, and plastic. Steel fasteners are strong but may rust. Stainless steel resists rust and lasts longer. Brass fasteners resist corrosion but are softer.
Size matters for removal. Larger fasteners need bigger tools and more force. Smaller fasteners require delicate handling to avoid damage. Length and thread pitch also affect removal technique. Always match the tool size to the fastener for best results.

Credit: www.youtube.com
Tools You Need
Removing a fastener needs the right tools. The tools make the job easier and faster. This section shows the tools you need. It covers both basic and special tools. These tools help with most fastener removal tasks.
Basic Tool Kit
A basic tool kit has a few key items. A screwdriver set is important. It includes flathead and Phillips heads. A wrench or socket set helps loosen nuts and bolts. Pliers are useful for gripping and turning. A hammer can help tap stuck fasteners gently. These tools cover many common fastener types. They fit most home and workshop tasks.
Specialized Tools For Stubborn Fasteners
Some fasteners are tough to remove. Rust or damage makes them hard to turn. For these, special tools help a lot. A breaker bar gives extra leverage for tight bolts. An impact driver uses force to loosen stuck screws. A fastener extractor removes damaged or stripped screws. Penetrating oil helps loosen rusted parts. These tools make tough jobs easier and safer.
Preparing For Removal
Preparing to remove a fastener is important for a smooth process. It helps avoid damage and saves time. Proper preparation makes the removal easier and safer. Two key steps stand out in this stage: cleaning the fastener and taking safety precautions.
Cleaning The Fastener
Cleaning the fastener removes dirt, rust, and grease. Use a wire brush or cloth to clean its surface. This helps tools grip better. Clean fasteners reduce slipping and stripping risks. Remove any debris around the fastener to see it clearly. A clean fastener is easier to turn and less likely to break.
Safety Precautions
Wear safety glasses to protect your eyes from flying debris. Gloves protect your hands from sharp edges and rough surfaces. Use the right tools for the fastener type and size. Avoid using damaged or worn tools. Work in a well-lit area to see clearly. Keep your workspace organized to prevent accidents. Taking safety steps prevents injuries and keeps the job simple.

Credit: diy.stackexchange.com
Step-by-step Removal
Removing a fastener can seem tricky at first. Step-by-step removal makes the process clear and easy. Follow these simple steps to take out fasteners without damage or stress. Each step helps you work safely and efficiently.
Loosening The Fastener
Start by loosening the fastener gently. Use the correct tool that fits the fastener head well. Turn the tool slowly counterclockwise. Avoid forcing it to prevent slipping or breaking. If the fastener is tight, try applying a small amount of penetrating oil. Let it sit for a few minutes to help loosen rust or dirt.
Using The Right Technique
Hold the tool firmly and apply steady pressure. Use short, controlled turns rather than quick, forceful ones. Keep your hand steady to avoid slipping. If the fastener is stuck, try tapping the tool lightly with a hammer. This can help break the bond. Always check that you use the correct size tool for the job.
Handling Stripped Or Damaged Heads
Stripped fasteners need special care. Use a rubber band between the tool and fastener for extra grip. If this fails, try a screw extractor tool. Drill a small hole into the fastener head and insert the extractor. Turn slowly to remove the fastener. Avoid using too much force to prevent damage to surrounding materials.
Preventing Damage
Removing a fastener without causing damage is important for any repair or project. Damaging the fastener or the surrounding material can lead to extra costs and more work. Taking steps to prevent damage keeps tools and parts in good condition. It also saves time and effort.
Applying Proper Force
Use just enough force to loosen the fastener. Too much force can strip the head or break the fastener. Too little force may not move it at all. Apply steady pressure and avoid sudden twists. Use tools that fit the fastener size exactly. This provides better grip and control. Let the tool do the work, not brute strength.
Avoiding Common Mistakes
Do not use the wrong tool for the fastener. This can round off the edges and make removal harder. Avoid using worn or damaged tools. They slip easily and cause damage. Do not rush the process. Take your time to prevent slips and breaks. Clean the fastener and its surroundings before starting. Dirt and rust can hide problems and cause tool slippage.
Dealing With Stuck Fasteners
Stuck fasteners cause frustration and slow down any project. Rust, dirt, or tight threads often trap them. Removing these fasteners safely needs patience and the right approach. Using the correct tools and methods prevents damage to materials and tools.
Applying Lubricants
Spray a lubricant on the stuck fastener. Let it sit for 10 to 15 minutes. Lubricants reduce friction and loosen rust or dirt. Use penetrating oil for best results. Repeat the process if needed. The fastener should turn more easily after lubrication.
Using Heat Or Impact Tools
Heat can expand the metal and break rust bonds. Use a heat gun or small torch carefully. Avoid overheating to protect nearby parts. Impact tools deliver sudden force to loosen tight fasteners. Use an impact driver or hammer with a suitable bit. Combine heat and impact for tough fasteners.
Post-removal Tips
After removing a fastener, some important steps follow. These help keep your project strong and safe. Careful attention now saves time and money later.
Inspecting The Fastener And Surface
Check the fastener for damage. Look for bends, rust, or stripped threads. A damaged fastener may not hold well again.
Examine the surface where the fastener was. Look for cracks, holes, or worn areas. Fix any damage before installing a new fastener.
Replacing Or Reusing Fasteners
Decide if the fastener can be reused. Use it only if it is in good shape. Otherwise, replace it with a new one of the same size and type.
New fasteners ensure a tight and safe fit. Match the material to the original for best results. This keeps your project secure for longer.
Frequently Asked Questions
What Tools Do I Need To Remove A Fastener?
You typically need a screwdriver, wrench, or pliers. Select the tool based on the fastener type. Using the right tool prevents damage and makes removal easier.
How Can I Safely Remove A Stuck Fastener?
Apply penetrating oil and let it sit for 10 minutes. Use proper tools with steady pressure. Avoid excessive force to prevent stripping or breaking the fastener.
Can I Reuse Fasteners After Removal?
Yes, if the fastener is undamaged and clean. Inspect for wear, rust, or deformation before reuse. Replace if any defects are found to ensure safety.
What Is The Best Way To Remove Rusted Fasteners?
Use penetrating oil and tap gently with a hammer. Heat the fastener if needed to expand metal. Always wear safety gear to protect from debris.
Conclusion
Removing a fastener does not have to be hard. Use the right tools and take your time. Always work carefully to avoid damage or injury. Clean the area before and after removal for best results. Practice makes the process easier and faster.
Remember these simple steps for your next project. Safe and steady work leads to success.