Are you looking to control a light from two different switches? Connecting a two-way light switch might seem tricky at first, but it’s easier than you think.
With the right guidance, you can save money and gain the satisfaction of doing it yourself. You’ll find a simple, clear diagram and step-by-step instructions that anyone can follow. By the end, you’ll know exactly how to connect a two-way light switch safely and effectively.
Keep reading to take control of your lighting setup today!
Credit: www.litoelectrical.com
Basics Of Two Way Light Switch
A two way light switch allows control of one light from two locations. It is common in homes and buildings. This setup adds convenience and safety. You can turn the light on or off from either switch.
This system uses special switches and wiring. Understanding the basics helps with installation and troubleshooting. It also saves money by avoiding electrician fees.
What Is A Two Way Switch
A two way switch has three terminals. It connects with another two way switch through traveler wires. These switches work together to control one light or set of lights.
When you flip either switch, it changes the circuit’s path. This action turns the light on or off. The design allows control from two separate spots.
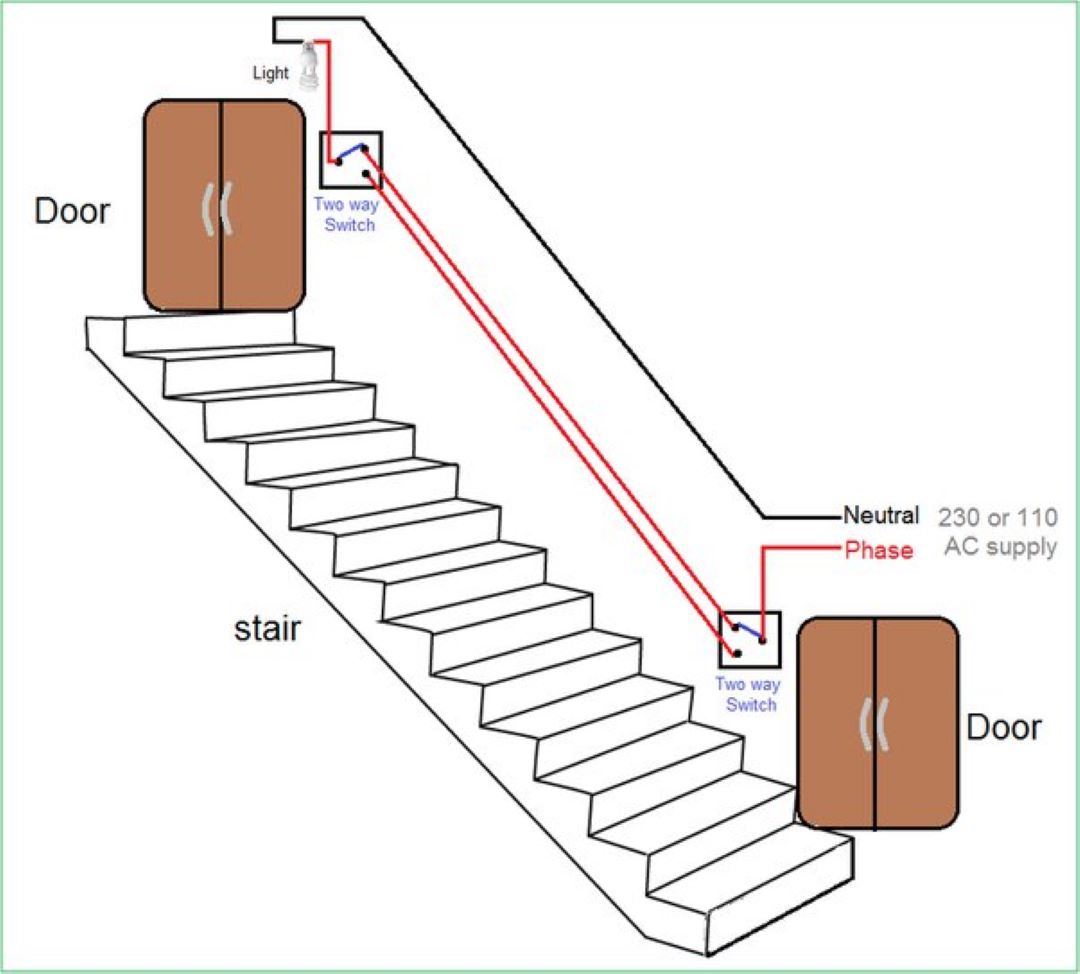
Common Uses In Homes
Two way switches are popular in hallways and staircases. They help control lighting from both ends. Bedrooms with two doors often use this setup too.
They also work well for large rooms with multiple entrances. This setup improves comfort and energy use. No need to walk in the dark or search for switches.

Credit: wiki.diyfaq.org.uk
Tools And Materials Needed
Before starting the wiring of a two-way light switch, gather the right tools and materials. Using the correct items makes the job easier and safer. It helps avoid mistakes and saves time. Knowing what you need also prepares you for each step of the process.
Essential Tools
- Screwdriver set (flathead and Phillips)
- Wire stripper and cutter
- Voltage tester or multimeter
- Needle-nose pliers
- Electrical tape
- Drill with bits (optional)
- Flashlight or headlamp (for dark spaces)
- Wire connectors or wire nuts
Required Electrical Components
- Two-way light switches (also called SPDT switches)
- Electrical cables (appropriate gauge for your setup)
- Light fixture or lamp
- Wall boxes to mount the switches
- Switch plates or covers
- Circuit breaker or fuse for safety
Safety Precautions
Working with electrical switches can be risky without the right safety steps. Before connecting a two way light switch, follow key safety rules. These rules protect you from shocks and accidents. Always be careful and ready before starting any electrical work.
Power Off Procedures
Turn off the power at the main circuit breaker. This stops electricity flow to the switch. Use a voltage tester to confirm no current is present. Never trust the switch alone is off. Double-check for safety before touching any wires.
Using Protective Gear
Wear insulated gloves to avoid electric shocks. Use safety glasses to protect your eyes from sparks. Avoid wearing wet clothes or standing on wet floors. Use tools with insulated handles. These small steps reduce the risk of injury while working.

Credit: www.youtube.com
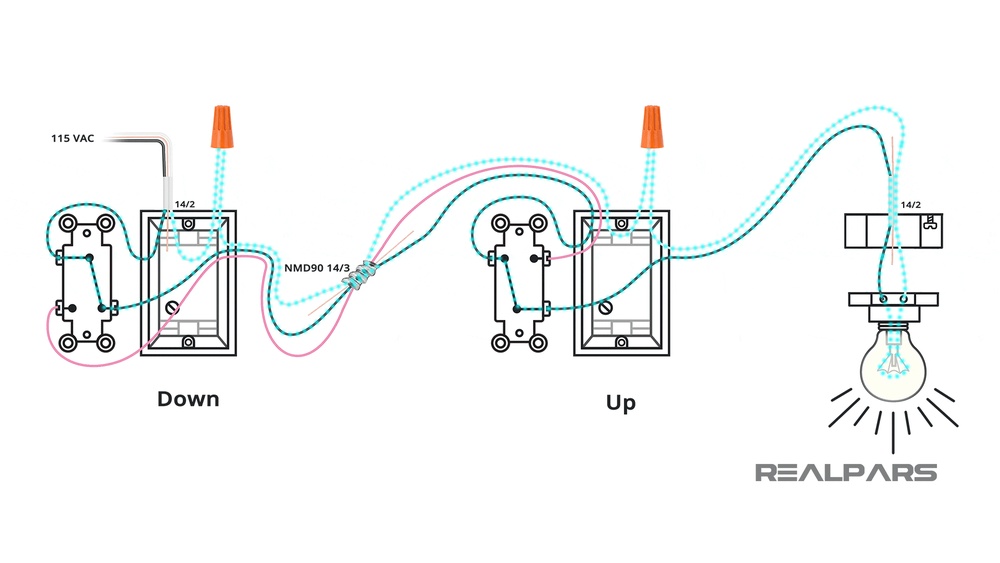
Reading The Two Way Switch Diagram
Reading a two way light switch diagram is key for proper installation. It shows the connections between switches and the light. Understanding the diagram helps avoid mistakes and ensures safety.
The diagram uses symbols and lines to represent parts and wires. Learning these symbols makes the diagram easier to follow. Each line shows how electricity flows through the switches.
Symbols And Labels
The diagram uses simple symbols for switches, wires, and lights. Switches often appear as small rectangles or circles. Labels like L, L1, and L2 mark specific terminals or wires.
The light bulb symbol usually looks like a circle with a cross inside. Lines represent wires connecting the switches and the light. Different line styles may show different wire types or paths.
Wiring Paths Explained
Wiring paths show how the current moves between switches and the light. Two wires connect the two switches, allowing control from either point. These wires are called travellers.
The live wire brings power into the first switch. The switched live wire runs from the second switch to the light. The neutral wire connects directly to the light for completing the circuit.
Following the wiring paths step-by-step helps understand the circuit function. The current can flow through either switch to turn the light on or off.
Step-by-step Wiring Process
Wiring a two-way light switch can seem complex. Breaking it down into clear steps makes it easier to handle. Follow the step-by-step process below to connect your switches safely and correctly. Each step focuses on important parts of the wiring to ensure the switches work properly.
Preparing The Switches
Turn off the power at the circuit breaker. Use a voltage tester to confirm no electricity flows. Remove the switch covers and old switches if present. Identify the terminals on the new two-way switches. Clean the wires if needed for a better connection.
Connecting The Live Wire
Locate the live wire from the power source. Connect this wire to the common terminal on the first switch. Tighten the screw to secure the wire firmly. Ensure the wire does not touch other terminals or wires. This connection controls the flow of power to the switch.
Wiring The Travelers
Identify the two traveler wires between the switches. Connect each traveler wire to the traveler terminals on both switches. These terminals are usually marked or color-coded. Make sure the wires are tight and secure. Travelers allow the switches to control the light from two places.
Attaching The Load Wire
Find the load wire going to the light fixture. Connect this wire to the common terminal on the second switch. Check that the connection is solid and safe. This wire carries power from the switch to the light. Proper connection ensures the light responds to the switches.
Grounding The System
Locate the ground wires in the electrical box. Connect the ground wires to the green grounding screws on the switches. Attach all ground wires together with a wire connector. Grounding prevents electrical shocks and improves safety. Always double-check grounding before finishing.
Testing The Connection
Testing the connection is a key step after wiring a two way light switch. It ensures the switches work correctly and the light responds as expected. This step confirms your installation is safe and functional.
Careful testing avoids damage and electrical hazards. Take your time and follow safety rules closely. Let’s explore how to test the connection safely and check the switch operation.
Powering On Safely
Before turning the power on, double-check all wiring. Make sure no wires are loose or exposed. Use a voltage tester to confirm the power is off before touching wires.
Switch on the circuit breaker slowly. Stand clear of the switch area during this process. Avoid touching wires or terminals while powering up. Watch for any sparks or unusual sounds.
Checking Switch Operation
Test each switch by flipping it on and off several times. The light should turn on and off from both switches. If it does not, recheck your wiring connections.
Listen for any buzzing or flickering. These signs show a poor connection or faulty switch. Fix any problems before finishing the job.
Troubleshooting Common Issues
Troubleshooting common issues helps keep your two-way light switch working well. Many problems happen because of small mistakes during installation or wear over time. Fixing these issues saves time and avoids extra costs.
Check your wiring carefully and test each part step-by-step. Use simple tools like a screwdriver and a voltage tester. Safety first: always turn off the power before working on switches.
Switch Not Working
First, check if the power is on. Sometimes the breaker trips without notice. Next, test the switch itself with a multimeter. A faulty switch will not allow current to pass through. Replace the switch if it shows no continuity. Also, confirm the wires connect to the correct terminals. Wrong wiring stops the switch from working.
Lights Flickering
Flickering lights usually mean a loose connection or a bad bulb. Tighten all wire nuts and terminal screws. Replace bulbs that flicker or dim. Poor contact in the switch can also cause flickering. Clean or change the switch if needed. Ensure the wiring matches the two-way switch diagram exactly.
Loose Connections
Loose connections create sparks and can damage the switch. Turn off power and inspect all wire connections. Make sure wires fit tightly under screws or inside wire nuts. Strip wires properly to get a good grip. Replace damaged wires or connectors. Secure everything firmly to stop future problems.
Upgrading To Smart Two Way Switches
Upgrading to smart two way switches brings modern control to your lighting. These switches connect to your home Wi-Fi. Control your lights from anywhere using a smartphone app. They offer more convenience than traditional switches. Smart switches can work with voice assistants like Alexa or Google Assistant. This upgrade adds comfort and energy savings to your home.
Benefits Of Smart Switches
Smart switches let you control lights remotely. You can turn lights on or off using your phone. Set schedules for your lights to save energy. Many smart switches support voice commands. They also help improve home security by simulating presence. Easy to use and install in most homes. They work well with existing wiring and two way switch setups.
Basic Installation Differences
Smart switches need a neutral wire to work. Not all old homes have this wire in switch boxes. Installation may require checking your wiring carefully. Smart switches replace one or both existing switches. Connect the smart switch to your Wi-Fi network. Use the app to pair and control your switches. Follow the manufacturer’s instructions for safe setup. Professional help is recommended for complicated wiring.
Frequently Asked Questions
What Is A Two Way Light Switch Diagram?
A two way light switch diagram shows how to wire two switches controlling one light. It helps ensure correct connections and safe installation.
How Do You Wire A Two Way Switch?
To wire a two way switch, connect the common terminal to the power source. Then link traveler terminals between switches, and connect the light to the second switch’s common terminal.
Can I Use Two Way Switches For Multiple Lights?
Yes, but each set of two way switches controls only one light or group wired in parallel. For multiple lights, use separate wiring or multi-way switches.
What Tools Are Needed For Two Way Switch Wiring?
You need a screwdriver, wire stripper, voltage tester, electrical tape, and pliers. These tools help safely and accurately complete the wiring process.
Conclusion
Connecting a two-way light switch is simpler than it seems. Follow the diagram step by step for best results. Double-check all wires before turning on the power. Safety matters most when handling electrical work. With practice, wiring switches becomes easier and more confident.
You can control lights from two places smoothly. This guide helps you save time and avoid mistakes. Keep tools and instructions close during the project. Soon, you will enjoy the convenience of two-way lighting control.
