Are you looking to control multiple lights with a single switch or simplify your home’s lighting setup? Learning how to daisy chain light switches can save you time, money, and hassle.
It’s a smart way to connect switches so they work together smoothly without rewiring your entire system. In this guide, you’ll discover clear, step-by-step instructions that anyone can follow—even if you’re not an expert. By the end, you’ll feel confident handling your own lighting projects and creating a smarter, more efficient space.
Ready to make your lighting work better for you? Let’s dive in.
Tools And Materials Needed
Starting a daisy chain light switch project needs the right tools and materials. These help you work safely and finish the job faster. Having everything ready stops interruptions and mistakes.
Use tools that fit your hands and are easy to use. Choose materials made for electrical work to keep your home safe. Let’s explore what you need before you begin.
Essential Tools For Daisy Chaining Light Switches
A screwdriver set with flat and Phillips heads is necessary. Wire strippers help remove insulation from wires easily. A voltage tester checks if wires carry current, ensuring safety. Needle-nose pliers bend and hold wires during connection. Electrical tape secures wire joins and prevents shorts.
Materials Required For Wiring
Use electrical wires with proper gauge for your switches. Switches should match the type you want to daisy chain. Wire connectors or wire nuts join wires firmly together. A junction box holds wire connections safely inside walls. Make sure all materials are rated for household electrical use.
Safety Gear To Protect Yourself
Wear insulated gloves to avoid electric shocks. Safety goggles protect eyes from wire debris or sparks. Use a face mask if working in dusty areas. Always turn off power before starting work. Keep a fire extinguisher nearby as a precaution.

Credit: community.smartthings.com
Safety Precautions
Safety is the top priority when daisy chaining light switches. Mistakes can cause electric shocks or fires. Taking the right precautions protects you and your home. Follow these key safety steps before starting any work on your switches.
Turn Off Power At The Circuit Breaker
Always switch off the power from the main circuit breaker. Do not rely on the wall switch to cut power. Use a tester to ensure no electricity flows to the wires. This step prevents electric shocks while working.
Use Proper Tools And Equipment
Use insulated tools designed for electrical work. Avoid using damaged or worn-out equipment. Wear rubber-soled shoes to reduce shock risk. Keep your workspace dry and well-lit for safety.
Double-check Wire Connections
Ensure all wire connections are tight and secure. Loose wires can cause sparks or short circuits. Use wire nuts and electrical tape to cover exposed wires. This reduces the risk of fires and malfunctions.
Follow Local Electrical Codes
Check local rules and codes before starting the project. Different areas have specific requirements for wiring. Following these rules keeps your installation safe and legal. It also helps avoid future problems during inspections.
Wear Safety Gear
Wear safety goggles to protect your eyes from sparks and debris. Use gloves made for electrical work to protect your hands. Avoid wearing loose clothing or jewelry that can catch on wires.
Basic Wiring Concepts
Basic wiring concepts form the foundation for daisy chaining light switches. Understanding these ideas helps you connect switches safely and correctly. This knowledge ensures the lights work as expected and prevent electrical problems.
Understanding Daisy Chain Wiring
Daisy chain wiring connects multiple switches in a series. The power source runs to the first switch. Then, wires run from one switch to the next. This setup saves wiring and makes installation easier.
Each switch controls a light or group of lights. The current flows through each switch in order. If one switch turns off, the lights after it lose power. This setup works well for multiple lights in one area.
Types Of Switches Used
Single-pole switches are the most common type for daisy chains. They have two terminals to connect wires. These switches turn the light on or off from one location.
Three-way switches allow control of a light from two places. They have three terminals for wiring. This type is useful for long hallways or large rooms.
Four-way switches work with three-way switches to control lights from three or more locations. They have four terminals for wiring. Use these switches in complex daisy chain setups.
Preparing The Switches
Preparing the switches is the first step in daisy chaining light switches. This step ensures safety and makes the installation smoother. Proper preparation helps avoid mistakes and electrical hazards.
Turning Off Power
Start by turning off the power at the circuit breaker. This stops electricity from flowing to the switches. Use a voltage tester to check if the power is really off. Never skip this step. Safety is the top priority.
Removing Existing Switches
Next, remove the faceplates of your current switches. Unscrew the switches carefully from the wall box. Gently pull the switches out to expose the wires. Take note of how wires are connected. Label the wires if needed for easy reinstallation.
Wiring The First Switch
Wiring the first switch in a daisy chain is the key step. It sets the path for all other switches. The process is simple but must be done carefully. Proper wiring ensures safety and smooth operation of the light switches.
This step involves connecting the power source and attaching the load wire. Each connection must be secure and correct. This section explains how to wire the first switch clearly and easily.
Connecting The Power Source
Start by turning off the main power to avoid shocks. Find the black (hot) wire from the power source. Connect this black wire to the common terminal on the switch. Use a screwdriver to tighten the terminal screw firmly. The white (neutral) wire does not connect to the switch directly. It should be connected to the neutral wires bundle in the box. Make sure all wires are stripped about half an inch for a good connection.
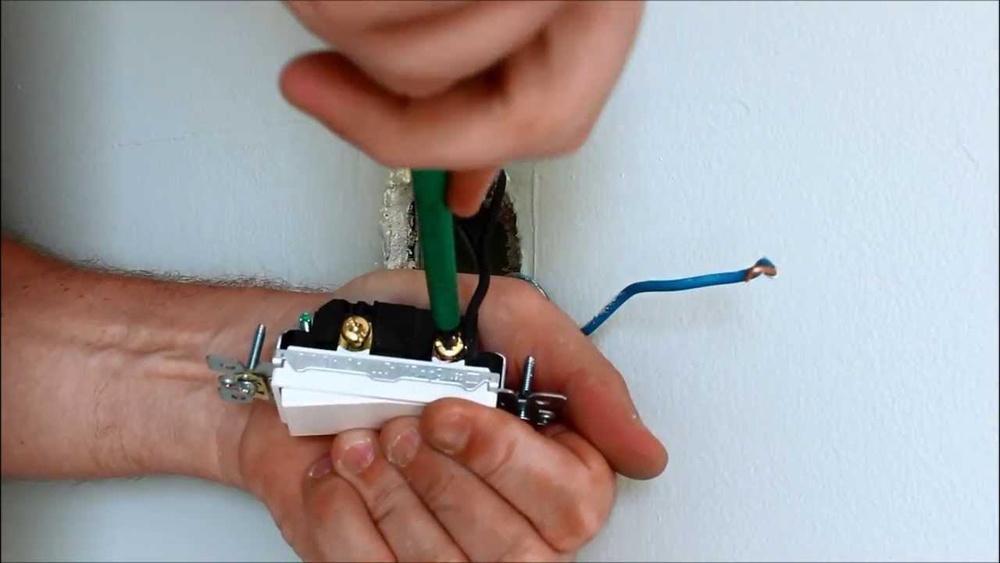
Attaching The Load Wire
Next, locate the wire that goes to the light fixture. This is the load wire, usually black. Connect the load wire to the second terminal on the switch. Tighten the terminal screw securely. The load wire carries electricity from the switch to the light fixture. Double-check all connections before restoring power. This ensures the light will work correctly and safely.

Credit: www.reddit.com
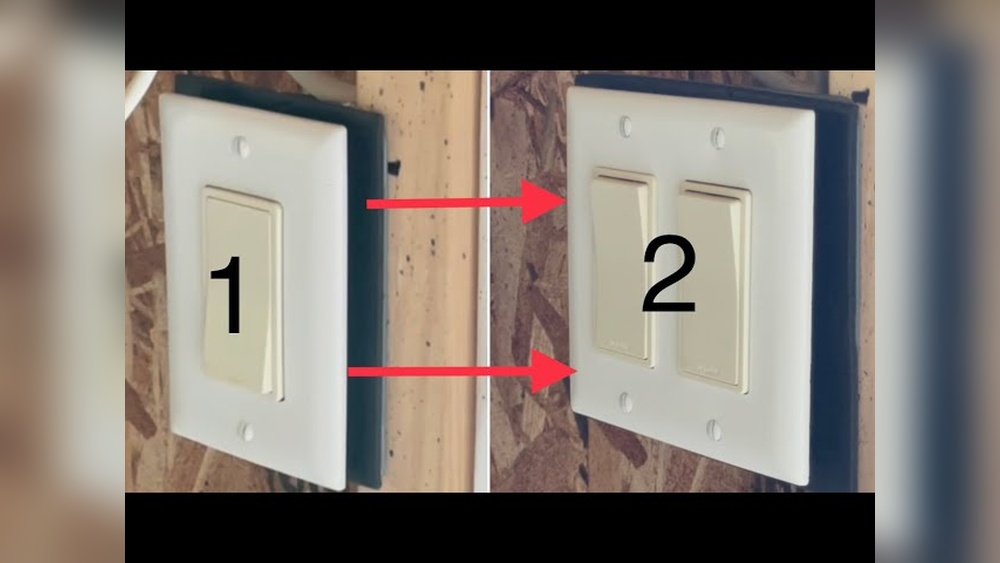
Connecting Additional Switches
Connecting additional switches allows you to control the same light from different places. This setup is common in hallways and large rooms. It makes turning lights on or off very convenient. You can add as many switches as needed by linking them properly.
Understanding how to connect these switches helps you avoid common wiring mistakes. It also ensures your lighting system works safely and smoothly. The process involves careful wiring and secure connections.
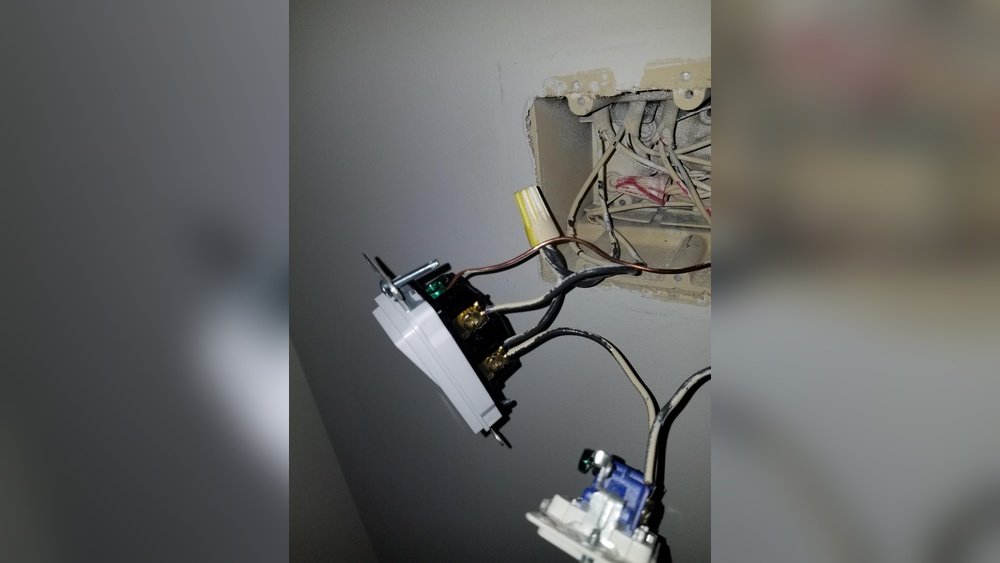
Linking Switches In Series
Start by turning off the power at the circuit breaker. This step is crucial for safety. Use a voltage tester to confirm no power is present. Connect the first switch to the power source using the live wire.
Next, run a wire from the first switch to the second switch. This wire carries the current to the additional switch. Continue this pattern for more switches, connecting each switch in series. Each switch will interrupt or allow current flow.
Use the traveler wires to link the switches. Traveler wires carry current between switches. Ensure you use the same color wires consistently to avoid confusion. Label wires if necessary for future reference.
Securing Wire Connections
Strip the wire ends about half an inch before connecting. Use wire nuts to twist wires tightly together. This prevents loose connections and electrical shorts. Wrap electrical tape around wire nuts for extra security.
Push wires neatly into the switch box to avoid damage. Avoid sharp bends that may break the wire inside. Tighten all terminal screws firmly to secure wires. Double-check each connection before restoring power.
Loose connections cause flickering lights and may create fire hazards. Proper securing ensures your switches work reliably for years. Take time to inspect and secure all wires carefully.
Testing The Setup
Testing the setup is a key step after wiring your daisy chain light switches. This step ensures everything works safely and correctly. It helps catch wiring mistakes early. Proper testing prevents electrical issues and saves time on repairs. Follow clear steps to restore power and check each switch.
Restoring Power
Turn the main circuit breaker back on carefully. Make sure no tools or loose wires touch anything. Watch for sparks or unusual sounds. If anything looks wrong, turn the power off immediately. Safety first. After restoring power, the switches and lights should get power for testing.
Checking Switch Functionality
Test each switch by flipping it on and off. Each switch should control the light as planned. Notice if any switch does not work or feels loose. Lights should turn on and off smoothly. If a switch fails, check your wiring again. Repeat testing until all switches work perfectly.

Credit: diy.stackexchange.com
Troubleshooting Common Issues
Troubleshooting common issues in daisy chaining light switches helps keep your wiring safe and effective. Problems can stop your lights from working or cause flickering. Understanding these issues saves time and frustration.
Check wiring connections first. Loose or wrong connections cause many problems. A simple fix can restore normal function quickly.
Checking For Loose Wires
Loose wires cause flickering or no light at all. Turn off the power before inspecting. Tighten all wire nuts and screws. Ensure wires are fully inserted into connectors.
Testing The Switch Functionality
Faulty switches stop the light from turning on. Use a tester to check each switch. Replace any switch that does not work properly. This avoids unnecessary wiring problems.
Verifying Correct Wiring Order
Incorrect wiring order can confuse the circuit. Follow the daisy chain diagram carefully. Make sure power flows from the first to last switch. Double-check connections to neutral and ground wires.
Inspecting For Overloaded Circuits
Too many switches or lights on one circuit cause overload. Overloads trip breakers or blow fuses. Distribute switches across circuits to avoid this. Use proper gauge wire for the current load.
Frequently Asked Questions
What Is Daisy Chaining Light Switches?
Daisy chaining light switches means connecting multiple switches in series. This setup allows control of one or more lights from different locations efficiently.
How Do You Wire Daisy Chained Switches Safely?
Turn off power before wiring. Connect switches using proper gauge wires. Follow local electrical codes and use insulated connectors for safety.
Can Daisy Chaining Switches Save Wiring Costs?
Yes, daisy chaining reduces the amount of wiring needed. It simplifies installation and lowers material costs, making it budget-friendly.
What Tools Do I Need To Daisy Chain Switches?
You need a screwdriver, wire stripper, voltage tester, electrical tape, and wire connectors to safely daisy chain switches.
Conclusion
Daisy chaining light switches saves space and cuts wiring costs. It lets you control multiple lights with ease. Always follow safety rules to avoid risks. Use the right tools and materials for the job. Testing your work ensures everything functions properly.
Practice patience and take your time during installation. This simple skill can improve your home lighting setup. Try it yourself or ask for help if unsure. Small steps lead to better electrical projects.