Are you ready to hang shelves, pictures, or heavy decorations without worrying about your walls cracking or falling apart? Knowing how to drill using wall anchors is a simple skill that can save you from costly mistakes and frustration.
You’ll discover easy steps to make your drilling strong and secure, even if you’re not a DIY expert. By the end, you’ll feel confident tackling any project that needs extra support. Let’s get started and make your walls work for you!
Credit: www.homedepot.com
Choosing The Right Wall Anchors
Choosing the right wall anchors is key for a strong, secure hold. The correct anchor fits the wall type and holds the weight safely. Picking the wrong one can cause damage or make your item fall. This guide helps you find the best wall anchor for your project.
Types Of Wall Anchors
There are several types of wall anchors. Plastic expansion anchors are common for light loads. They expand inside the wall when you insert the screw. Toggle bolts have wings that open behind the wall. They work well for heavy items on drywall. Molly bolts are metal anchors that expand inside the wall cavity. They offer strong support for medium to heavy loads.
Matching Anchors To Wall Material
Wall material affects anchor choice. Drywall needs different anchors than concrete or brick. Use plastic anchors or toggle bolts for drywall. For concrete or brick, use masonry anchors or sleeve anchors. Wood walls usually need just screws or wood anchors. Match the anchor to the wall for a solid hold.
Weight Capacity Considerations
Check the weight your anchor can hold. Every anchor has a weight limit. Use an anchor that supports more than your item’s weight. Heavy items need stronger anchors like toggle bolts or molly bolts. Light items can use plastic expansion anchors. Never guess—always check the weight rating for safety.
Tools Needed For Drilling
Drilling into walls requires the right tools. Using wall anchors needs careful preparation. Choosing the correct tools makes the job easier and safer. Below, find the main tools to have before starting your project.
Essential Drilling Tools
A power drill is the main tool for drilling holes. Choose a drill with variable speed control. Use drill bits that match the wall anchor size. A measuring tape helps mark where to drill. A pencil is useful for marking exact spots. A level ensures holes are straight on the wall.
Safety Gear To Use
Wear safety goggles to protect your eyes from dust. Use gloves to shield your hands from sharp edges. Ear protection reduces noise from the drill. Wear a dust mask if drilling creates fine dust. Safety gear prevents injuries and keeps you comfortable during work.
Optional Accessories
A stud finder locates wall studs for stronger anchor placement. A vacuum attachment collects dust while drilling. A small hammer helps gently tap anchors into holes. Wall anchors come in different types; some need special tools. Having these accessories can improve the quality of your work.
Preparing The Wall For Drilling
Preparing the wall for drilling is an important first step. Proper preparation makes sure your wall anchors hold strong and your project stays safe. It helps prevent damage and avoids mistakes that cost time and effort. Follow simple steps to get your wall ready for drilling.
Locating Studs And Avoiding Hazards
Start by finding the studs behind the wall. Studs provide strong support for heavy items. Use a stud finder tool to locate them easily. Avoid drilling into electrical wires or plumbing. These hazards can cause serious damage or injury. Tap the wall lightly; a solid sound may show a stud’s position. Stay clear of switches and outlets to be safe.
Marking Drill Points Accurately
Mark the exact spots where you will drill. Use a pencil to make small, clear marks. Measure twice for accuracy. Check the level to keep marks straight. Proper marking prevents mistakes during drilling. It also helps keep your project neat and balanced. Double-check measurements before you start.
Cleaning The Surface
Clean the wall surface before drilling. Remove dust, dirt, and grease with a damp cloth. A clean wall helps drill bits stay sharp longer. It also keeps the hole clear for the anchor. Dry the area fully to avoid slipping tools. Clean surfaces improve the strength of the hold.

Credit: www.picturehangsolutions.com
Drilling Techniques For Wall Anchors
Drilling for wall anchors requires care and the right techniques. Proper drilling ensures the anchor holds strong and the wall stays safe. Using the right methods helps avoid damage to walls and tools. Follow these drilling tips for better results.
Choosing The Right Drill Bit Size
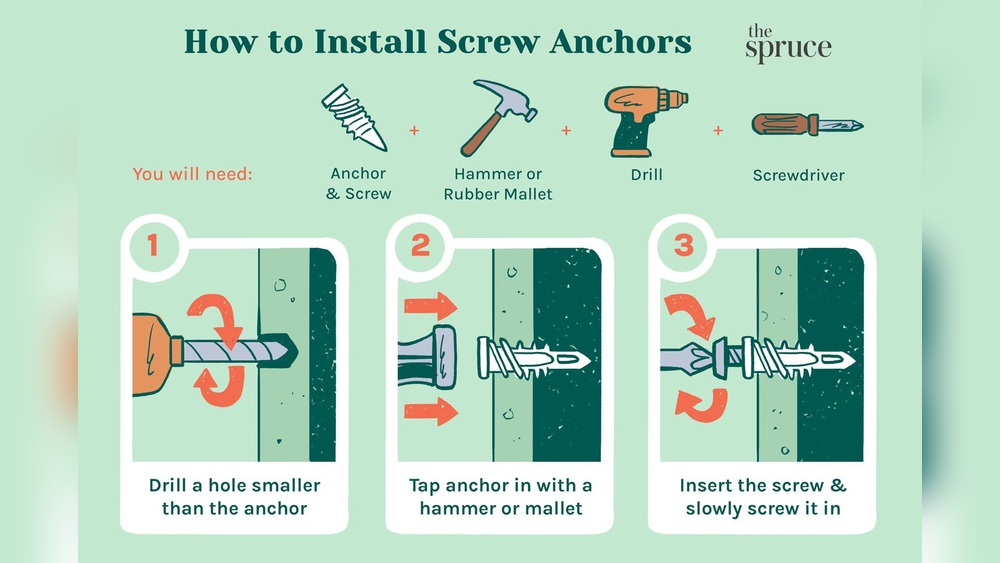
Select a drill bit that matches the anchor size exactly. Too small a bit makes the hole tight and risks breaking the anchor. Too large a bit causes the anchor to fit loosely and fall out. Check the anchor package for the recommended drill bit size. Always double-check before drilling.
Drilling At The Correct Speed
Use a slow to medium speed on your drill. High speed can cause the bit to overheat and damage the wall. Slow drilling keeps control and helps make a clean hole. Let the drill do the work without pushing too hard. This prevents cracks and keeps the hole neat.
Maintaining Drill Stability
Hold the drill steady and straight against the wall. Wobbling creates uneven holes that weaken the anchor hold. Use both hands if needed for better control. Keep the drill perpendicular to the surface. Steady drilling ensures a smooth, precise hole every time.
Installing Wall Anchors Properly
Installing wall anchors properly is key for strong, lasting support. Anchors hold screws tight in drywall or masonry. Poor installation can cause damage or failure. Learning the right steps helps keep your items secure and walls intact.
Inserting Different Types Of Anchors
Plastic expansion anchors need a drilled hole matching their size. Push them gently into the hole until flush with the wall. For toggle bolts, drill a hole large enough for the folded wings. Insert the toggle through the hole, then tighten the screw to open the wings behind the wall. Self-drilling anchors twist directly into drywall without pre-drilling. Turn them slowly and stop when the anchor is flush with the surface.
Ensuring A Secure Fit
Choose an anchor that fits your wall and weight needs. The hole must be the right size—too big or small weakens the hold. Push or screw the anchor until it sits flat against the wall. Test the anchor by gently pulling on it. If it moves or feels loose, remove and try again with a better fit.
Common Installation Mistakes
Drilling too large a hole makes anchors loose and weak. Using the wrong anchor type causes poor support or wall damage. Over-tightening screws can break anchors or strip the hole. Skipping the test pull risks future failure. Follow instructions carefully to avoid these errors and ensure a strong hold.
Mounting Items With Wall Anchors
Mounting items with wall anchors provides strong support on drywall or hollow walls. Wall anchors hold screws tightly and keep items stable. Using the right technique ensures your mounted item stays secure and safe.
Aligning Mounting Hardware
Place the item on the wall where you want it. Mark the spots for screws carefully. Make sure the marks line up with the wall anchors. Proper alignment prevents the item from hanging crooked or falling.
Tightening Screws Safely
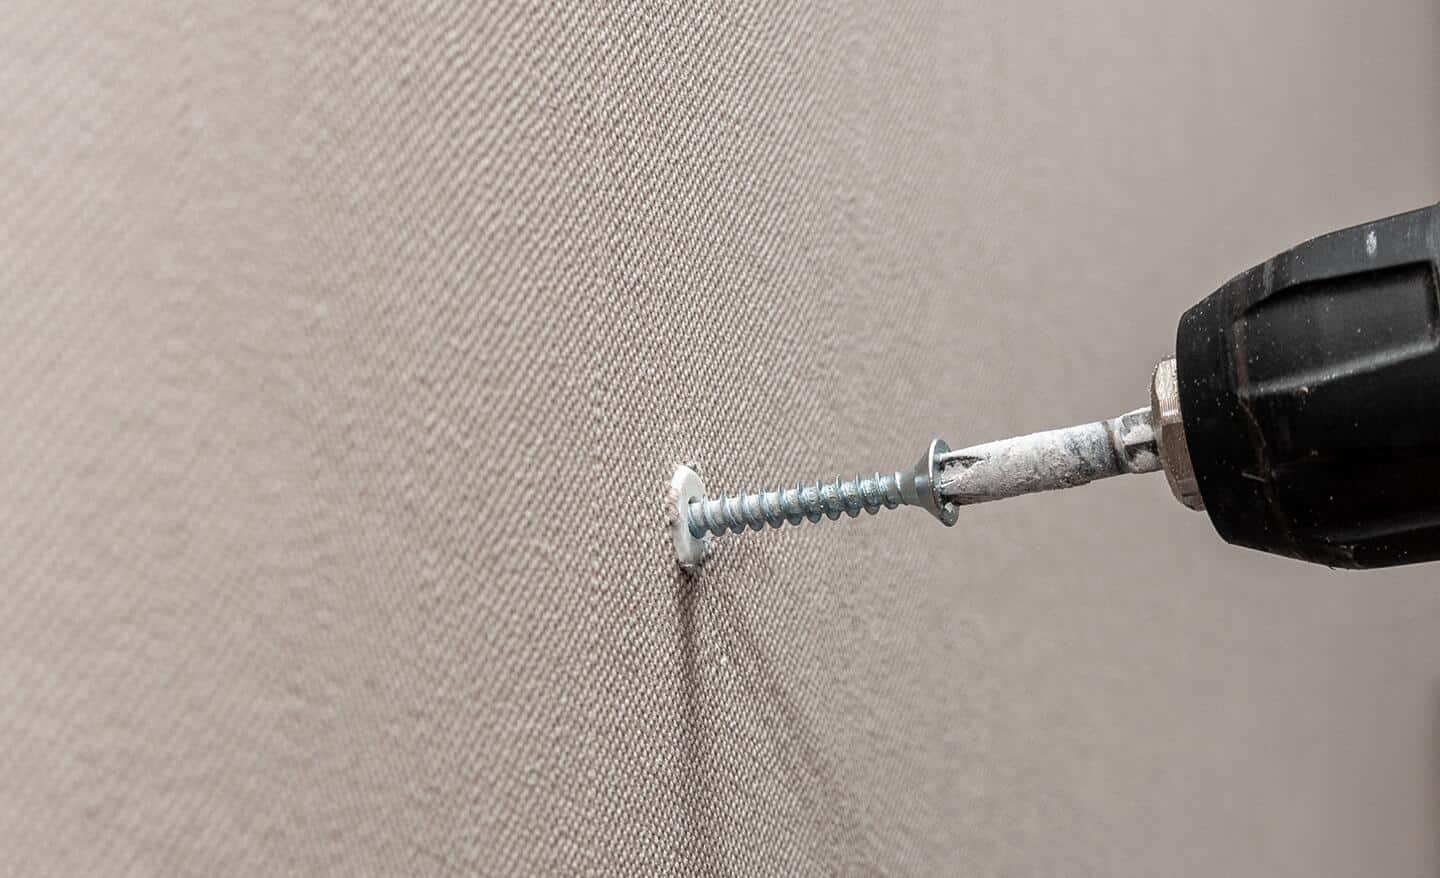
Insert screws into the wall anchors slowly. Use a screwdriver or drill on low speed. Tighten screws until snug but not too tight. Over-tightening can damage the wall anchor or the wall itself.
Testing Stability
Gently pull or push the mounted item. Check if it feels firm and does not move. If it moves, tighten screws a little more. Proper testing avoids accidents and keeps your item secure.
Troubleshooting Drilling Issues
Drilling with wall anchors can sometimes cause problems. These issues may affect the strength of your hold or damage the wall. Knowing how to fix common problems helps keep your project on track.
Dealing With Cracks And Wall Damage
Cracks around the hole can weaken the anchor’s hold. Stop drilling immediately if you see cracks forming. Use filler or spackle to repair small cracks. Let the repair dry completely before trying again. For larger damage, consider using a stronger anchor or a different wall spot.
Fixing Loose Anchors
Loose anchors do not hold weight well. Remove the anchor and check the hole size. The hole might be too big for the anchor. Use a bigger anchor or fill the hole with wood filler. Wait for the filler to dry, then drill a new hole. This keeps the anchor tight and secure.
When To Re-drill
Re-drilling is necessary if the anchor won’t hold. Avoid drilling too close to the old hole. This may cause more wall damage. Choose a new spot a few inches away. Mark the new spot carefully before drilling. This ensures a strong and safe hold.
Maintenance Tips For Long-lasting Mounts
Wall anchors provide strong support for your mounted items. Proper care keeps mounts safe and sturdy for years. Follow these simple maintenance tips to extend their life. Regular checks and careful handling prevent damage and accidents.
Regular Inspection Of Anchors
Check your wall anchors every few months. Look for cracks, looseness, or signs of wear. Tighten screws if they feel loose. Early detection stops bigger problems later. This small step keeps your mounts secure.
Handling Weight Changes
Do not overload the anchors beyond their limit. If you add heavier items, upgrade the anchors. Use stronger types or more anchors for extra support. Avoid sudden weight changes that strain the wall. This keeps mounts safe and prevents damage.
Removing And Replacing Anchors
Remove anchors carefully to avoid wall damage. Use the right tools and gentle force. Replace old or damaged anchors with new ones. Always match the anchor type to your wall material. Proper replacement ensures continued support and safety.

Credit: www.uglyducklinghouse.com
Frequently Asked Questions
What Tools Do I Need To Drill With Wall Anchors?
You need a drill, drill bits, wall anchors, a screwdriver, and a hammer. Choose the right drill bit size matching the anchor for a secure fit.
How Do I Choose The Right Wall Anchors?
Select wall anchors based on wall type and load weight. Use plastic anchors for light loads and metal anchors for heavier items.
Can I Reuse Wall Anchors After Removal?
No, wall anchors usually lose grip after removal. It’s best to use new anchors for a secure hold each time.
How Deep Should I Drill For Wall Anchors?
Drill a hole slightly deeper than the anchor length. This ensures the anchor fits fully and holds firmly in the wall.
Conclusion
Drilling with wall anchors makes hanging items stronger and safer. Always choose the right anchor for your wall type. Mark the spot clearly and drill a hole that fits the anchor well. Push the anchor in gently, then screw in your item carefully.
Take your time and work slowly for best results. Small steps lead to big success. Now, you can hang shelves, pictures, or mirrors with confidence and ease. Practice these tips to improve your skills quickly.