Are you tired of searching for a power outlet near your favorite spot? Imagine turning your existing light switch into a convenient power source without rewiring your entire room.
Adding a power outlet from a light switch might sound tricky, but with the right steps, you can do it yourself safely and easily. In this guide, you’ll discover simple, clear instructions to make your space more functional—no electrician needed.
Keep reading, and you’ll soon have that extra outlet exactly where you want it.
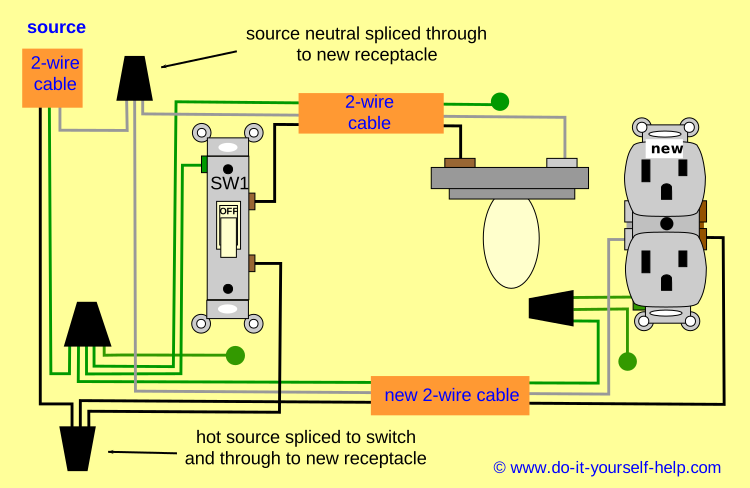
Credit: www.do-it-yourself-help.com
Tools And Materials Needed
Adding a power outlet from a light switch requires specific tools and materials. Using the right items makes the job safer and easier. Prepare everything before starting the work.
Gathering tools and materials ensures a smooth process. It helps avoid delays and mistakes during installation.
Essential Tools
- Screwdriver set for removing switch and outlet covers
- Wire stripper to clean and prepare wires
- Voltage tester to check power status
- Drill for making holes if needed
- Measuring tape for accurate placement
- Needle-nose pliers to bend and hold wires
- Electrical tape for securing wire connections
- Wire nuts to join wires safely
Required Materials
- Power outlet (receptacle) matching your home’s standard
- Electrical box to house the outlet
- Romex or appropriate electrical cable
- Wire connectors for safe connections
- Wall plate cover for a clean finish
- Grounding wire for safety
Safety Gear
- Insulated gloves to prevent shocks
- Safety goggles to protect eyes
- Dust mask if drilling inside walls

Credit: www.youtube.com
Safety Precautions
Safety is the top priority when adding a power outlet from a light switch. Working with electricity can be dangerous without proper care. Taking the right safety steps protects you and your home from harm.
Before starting, understand the risks and prepare well. Follow each safety rule strictly. This helps avoid shocks, fires, or damage.
Turn Off The Main Power
Switch off the main breaker to cut power to the circuit. Test the switch with a voltage tester to confirm no electricity flows. Never trust the switch position alone.
Use Proper Tools And Equipment
Only use tools made for electrical work. Insulated screwdrivers and wire strippers reduce the chance of electric shock. Wear safety gloves and goggles for extra protection.
Check Local Electrical Codes
Follow your area’s electrical rules closely. Codes ensure safe installation and prevent future hazards. Check if a permit or inspection is needed before you start.
Work In A Dry Environment
Keep the workspace dry and clear of water. Wet conditions increase the risk of electric shock. Avoid working in damp rooms or during rain.
Do Not Rush The Job
Take your time to do everything carefully. Rushing leads to mistakes and accidents. Double-check connections and wiring before restoring power.
Locate Existing Wiring
Locating existing wiring is the first step to add a power outlet from a light switch. Knowing where the wires run helps avoid mistakes and saves time. It also ensures safety during installation.
Before starting, turn off the power at the breaker box. This step is crucial to prevent electric shock.
Turn Off Power Supply
Switch off the main breaker or the specific circuit breaker. Use a voltage tester to confirm no current flows in the switch box. Safety comes first in every wiring project.
Remove The Light Switch Cover
Use a screwdriver to take off the switch cover plate. This gives access to the wires inside the switch box. Keep screws safe for reassembly.
Identify Wires In The Switch Box
Look for black (hot), white (neutral), and green or bare (ground) wires. Note their positions and connections. This helps plan where to tap power for the outlet.
Use A Voltage Tester
Test each wire to check which carries current. This confirms the live wire for the outlet connection. Avoid guessing to reduce risks.
Trace Wiring Path
Follow the wires from the switch to the power source. This can be inside walls or ceiling spaces. Use a wire tracer tool if wires are hidden behind drywall.
Turn Off Power
Turning off the power is the first and most important step. It keeps you safe from electric shocks. Never start any electrical work without cutting the power.
Always double-check that the power is off before touching wires or outlets. This step protects you and your home.
Locate The Circuit Breaker
Find your home’s circuit breaker panel. It is usually in the basement, garage, or utility room. Look for the breaker that controls the light switch you want to work on.
Switch Off The Correct Breaker
Flip the breaker to the “off” position. This stops electricity from flowing to the switch and outlet. Make sure it stays off during your work.
Test For Power
Use a voltage tester or a simple lamp to check. Confirm no power reaches the switch or outlet wires. This step ensures your safety.
Remove Light Switch Cover
Removing the light switch cover is the first step in adding a power outlet from a light switch. This step allows access to the wiring inside the wall. It is important to work safely and carefully during this process.
Start by turning off the power at the circuit breaker. This stops electricity from flowing to the switch and keeps you safe. Never skip this safety step.
Gather The Right Tools
Use a flathead or Phillips screwdriver to remove the cover screws. Have a flashlight ready to see inside the switch box. Prepare a small container for holding screws.
Unscrew The Light Switch Cover
Locate the screws holding the cover plate in place. Turn the screws counterclockwise to loosen them. Keep your hand on the cover to prevent it from falling.
Carefully Remove The Cover Plate
Gently pull the cover plate away from the wall. Avoid forcing it to prevent damage to the wall or wires. Set the cover plate and screws aside in a safe spot.
Inspect The Switch Box
Look inside the switch box for wires and space. Check if the box is deep enough to add an outlet. Take note of wire colors and positions for later steps.
Identify Wiring Type
Identifying the wiring type is the first step to add a power outlet from a light switch. This step ensures safety and compatibility with your home’s electrical system. Different wiring setups require different approaches. Knowing the wiring type helps plan the work correctly.
Turn Off The Power
Before checking wires, always switch off the power at the breaker. This prevents shocks or accidents. Use a voltage tester to confirm the power is off. Safety is the top priority.
Open The Light Switch Box
Remove the cover plate and unscrew the switch. Gently pull the switch out to see the wires. Note how many wires and their colors inside the box.
Identify Wire Colors
Look for common wire colors: black, white, and green or bare copper. Black wires usually carry power. White wires are neutral. Green or bare wires are ground. Colors help understand the circuit layout.
Check For A Neutral Wire
Many light switches lack a neutral wire. Without a neutral, adding an outlet is harder. Look for a white wire bundled with others in the box. Its presence allows safe outlet installation.
Inspect The Wiring Configuration
Notice if wires come from the breaker or another switch. Identify if the switch controls a single or multiple lights. This affects how to connect the outlet wiring.
Plan Outlet Placement
Planning the outlet placement is the first step to add a power outlet from a light switch. It helps to decide the best spot for the new outlet. Proper planning saves time and effort during installation.
Think about where you need power most. Consider furniture, appliances, and room layout. The outlet should be easy to reach and useful for your daily needs.
Assess Room Layout And Usage
Look at the room and see where devices will be used. Choose a spot near desks, beds, or seating areas. Avoid placing outlets where furniture blocks access.
Check Existing Wiring And Switch Location
Find the light switch wiring in the wall. The new outlet must connect safely to this wiring. Keep the outlet close enough to avoid long cable runs.
Follow Electrical Code And Safety Rules
Understand local electrical codes before starting. Outlets must be installed at proper heights and distances. Safety comes first in every electrical project.
Plan For Future Needs
Think about extra power needs later. Adding more outlets now can save work later. Plan for chargers, lamps, and other electronics.
Run Electrical Cable
Running electrical cable from a light switch to a new power outlet is an important step. It connects the power source to the outlet safely. Careful planning and correct tools make this job easier and safer.
Before starting, turn off power at the breaker. This protects you from electric shock. Check local electrical codes to follow rules. Use the right cable type for your installation.
Gather The Necessary Tools And Materials
Collect tools like a wire stripper, drill, and voltage tester. Use cables rated for your circuit, usually 14/2 or 12/2 NM cable. Have electrical boxes and outlet receptacles ready.
Plan The Cable Route
Choose a clear path from the switch box to the new outlet. Avoid obstacles like pipes or ducts. Measure the distance and add extra length for bends and connections.
Drill Holes For Cable Passage
Drill holes through studs or joists carefully. Use a drill bit that fits your cable size. Keep holes centered to protect cables from nails or screws.
Run The Cable Through Walls
Feed the cable slowly through drilled holes. Pull enough cable to reach both boxes comfortably. Leave some slack to make wiring easier.
Secure The Cable Properly
Staple the cable to framing within 8 inches of boxes. Space staples every 4 to 6 feet along the run. Avoid damaging the cable jacket while stapling.
Wire The New Outlet
Wiring the new outlet is an important step in adding power from a light switch. It requires care and attention to ensure safety and proper function. This part explains the basic wiring process clearly and simply.
Turn Off Power At The Circuit Breaker
Start by switching off the power to the circuit. Use a circuit breaker to cut electricity to the light switch. This prevents shocks and accidents during wiring.
Connect The Ground Wire
Find the bare copper or green wire. Attach it to the green screw on the new outlet. This wire helps prevent electrical shocks by grounding the outlet.
Attach The Neutral Wire
Locate the white neutral wire coming from the switch box. Connect it to the silver screw on the outlet. Neutral wires carry current back to the breaker safely.
Connect The Hot Wire
Identify the black hot wire from the switch. Attach it to the brass screw on the outlet. This wire carries power to the outlet for your devices.
Secure All Connections
Tighten all screws firmly but do not overtighten. Loose connections cause sparks and electrical problems. Ensure wires are wrapped clockwise around screws.
Place The Outlet Into The Box
Gently push the wires back into the electrical box. Fix the outlet in place with mounting screws. Make sure it sits flush with the wall.

Credit: diy.stackexchange.com
Install Outlet Box
Installing an outlet box is the next step after turning off power and planning your work. The box holds the new power outlet securely and protects the wiring. Choosing the right box and placing it correctly is important for safety and function.
Choose The Right Outlet Box
Select a box that fits the wall type and space available. Plastic boxes are common for drywall, while metal boxes suit masonry walls. Make sure the box size matches the outlet and wiring needs.
Mark The Location On The Wall
Use a pencil to mark the outlet box spot below the light switch. Check the height is comfortable for use. Double-check there are no pipes or wires behind the wall here.
Cut The Wall Opening
Cut carefully along the marked lines with a drywall saw. Keep the edges neat and straight for a good fit. Remove any debris from the opening before installing the box.
Attach The Outlet Box To The Wall
Insert the outlet box into the hole. Secure it using screws or built-in clamps. The box must be flush with the wall surface and stable to hold the outlet firmly.
Connect Outlet To Circuit
Connecting an outlet to a circuit is a key step in adding a power outlet from a light switch. This process allows you to use the existing wiring to power the new outlet safely. Proper connection ensures the outlet works well without overloading the circuit.
Before starting, turn off the power at the breaker box. Safety first. Use a voltage tester to confirm the wires have no electricity. This step protects you from shocks during installation.
Identify The Circuit Wires
Open the light switch box carefully. Look for the black (hot), white (neutral), and ground wires. These wires carry electricity to the switch. Use a tester to check which wire is live. Knowing this helps connect the outlet correctly.
Connect The Outlet Wires
Attach the black wire to the brass screw on the outlet. Connect the white wire to the silver screw. The ground wire goes to the green screw. Tighten the screws firmly. Loose connections can cause sparks or failures.
Secure The Wiring And Outlet
Push the wires gently back into the box. Avoid bending or pinching them. Mount the outlet to the box with screws. Attach the cover plate to finish. Turn on the power and test the outlet with a device.
Test The Outlet
Testing the outlet is a crucial step after wiring it from the light switch. This ensures your new power outlet works safely and correctly. It helps avoid electrical problems and keeps you safe from shocks or damage.
Take your time to test the outlet properly. Use simple tools and follow clear steps to check the wiring and power flow. This section explains how to do it right.
Use A Voltage Tester
Start by using a voltage tester to check the outlet. Touch the tester’s probes to the outlet slots. The tester will show if electricity flows to the outlet. No light or beep means no power. This step confirms your wiring is correct.
Check The Outlet With A Plug-in Device
Plug in a small device like a lamp or phone charger. If the device turns on, the outlet works. If not, check your wiring again. This simple test shows the outlet is live and ready to use.
Verify Ground And Neutral Connections
Use a multimeter to check ground and neutral wires. Proper grounding avoids shocks and protects devices. Set the multimeter to measure resistance. Place one probe on the ground slot and the other on a metal part. A low reading means good grounding.
Inspect For Loose Or Exposed Wires
Look inside the outlet box for loose or bare wires. Tighten any loose screws holding wires. Cover exposed wires with electrical tape. This keeps the outlet safe and prevents shorts or sparks.
Replace Switch Cover
Replacing the switch cover is the final step after installing a power outlet from a light switch. It protects the wiring and gives a clean look. This step also ensures safety by covering exposed wires.
Choose a cover that fits the new outlet and switch setup. A proper fit prevents dust and moisture from entering the box. It also helps avoid accidental contact with live wires.
Turn Off The Power
Always turn off the circuit breaker before removing or replacing the cover. This action prevents electric shock. Double-check with a voltage tester to confirm no power is flowing.
Remove The Old Switch Cover
Use a screwdriver to unscrew the existing cover plate. Keep the screws safe for later use. Gently pull the cover off to expose the outlet and switch.
Install The New Cover Plate
Align the new cover plate with the outlet and switch. Insert the screws and tighten them carefully. Avoid over-tightening to prevent cracking the cover.
Check The Installation
Turn the power back on at the breaker. Test the outlet and switch to ensure they work correctly. The cover should sit flush against the wall.
Troubleshooting Tips
Adding a power outlet from a light switch can be a simple task. Sometimes, small issues may arise during the process. Troubleshooting helps fix these problems quickly. This section covers common problems and easy solutions.
Check The Circuit Breaker
The outlet may not work if the circuit breaker trips. Open your breaker panel and look for any switches that are off. Reset any tripped breaker by turning it off, then back on. This often restores power to the outlet.
Verify Wiring Connections
Loose or wrong wiring causes outlets not to work. Turn off the power first. Remove the switch and outlet covers. Check if all wires are tight and connected to the right terminals. Correct any loose or swapped wires carefully.
Test The Outlet With A Voltage Tester
Use a voltage tester to check if the outlet has power. Touch the tester probes to the outlet terminals. No reading means no power is reaching the outlet. Trace back the wiring to find where the power stops.
Confirm The Switch Function
The switch may control the outlet power. Flip the switch on and off while testing the outlet. If the outlet only works when the switch is on, this is normal. If not, the switch or wiring may need fixing.
Inspect For Damaged Components
Old or damaged switches and outlets can fail. Look for cracks, burn marks, or loose parts. Replace any damaged parts to ensure safety and proper function.
Frequently Asked Questions
How Do I Add A Power Outlet From A Light Switch?
To add a power outlet from a light switch, turn off the power first. Then, connect the outlet wiring to the switch’s power source using proper electrical cables. Ensure all connections are secure and follow local electrical codes for safety.
Can I Use The Existing Switch Wiring For An Outlet?
Yes, you can use existing switch wiring if it has a constant power source. Identify the hot, neutral, and ground wires. Connect these correctly to the new outlet, ensuring the circuit is not overloaded and meets electrical standards.
Is It Safe To Install An Outlet From A Light Switch?
Installing an outlet from a light switch is safe when done correctly. Always turn off power before starting. Use proper tools and materials. Follow local electrical codes or hire a licensed electrician if unsure to avoid hazards.
What Tools Are Needed To Add An Outlet From A Switch?
You need a voltage tester, wire stripper, screwdriver, electrical tape, outlet box, and appropriate wires. These tools help ensure safe installation and proper connections when adding a power outlet from a light switch.
Conclusion
Adding a power outlet from a light switch can save space and add convenience. Take safety seriously and turn off the power before starting. Follow the steps carefully and check local rules. Use the right tools and materials for the job.
If unsure, ask a professional to help. With patience and care, you can complete this task successfully. Enjoy the extra outlet without clutter or hassle. Simple changes like this make your home more useful and comfortable.