Have you ever wished you could control your lamp with a simple flick of a switch on the wall? Connecting a light switch to a lamp might sound tricky, but it’s easier than you think.
Whether you want to add convenience, save energy, or just upgrade your space, this guide will walk you through every step. By the end, you’ll have the confidence to make your lamp work exactly how you want. Ready to light up your room on your terms?
Let’s get started!
Credit: www.familyhandyman.com
Tools And Materials Needed
Connecting a light switch to a lamp needs the right tools and materials. Having these ready makes the job easier and safer. You can avoid mistakes and save time by preparing well.
Below are the essential tools and materials for this simple electrical task. Each item plays a key role in completing the connection properly.
Basic Tools
Start with basic tools like a screwdriver and wire stripper. A screwdriver helps open switch covers and secure wires. Wire strippers remove insulation without damaging wires. Pliers assist in bending and twisting wires tightly.
Electrical Materials
Use electrical wires suitable for your lamp and switch. Choose wires that match the power requirements. Electrical tape helps cover wire joints safely. Wire nuts join wires together and prevent shorts.
Safety Equipment
Safety matters most. Use insulated gloves to protect against shocks. Safety goggles keep your eyes safe from sparks or debris. A voltage tester checks if wires carry current before touching them.
Light Switch And Lamp
Select a compatible light switch for your lamp. Confirm the switch fits the lamp’s voltage and wattage. The lamp itself should be ready to connect with proper sockets and wiring.
Safety Precautions
Safety is the top priority before connecting a light switch to a lamp. Taking the right steps keeps you safe from electric shocks and fire risks. Follow these simple safety rules closely. They protect you and your home.
Turn Off The Power
Always switch off the power at the circuit breaker. Do not rely on the light switch alone. Use a tester to check if the wires are live. Never work on electrical parts with power on.
Use Proper Tools And Equipment
Choose insulated tools made for electrical work. Avoid using damaged or worn tools. Wear rubber-soled shoes and stand on a dry surface. Keep your workspace clear and well-lit.
Check The Lamp And Switch Ratings
Match the lamp’s voltage and wattage with the switch rating. Using wrong parts can cause overheating and damage. Read labels carefully to ensure compatibility.
Handle Wires Carefully
Strip wires gently without cutting the metal inside. Twist wire ends tightly to avoid loose connections. Use wire nuts or electrical tape to cover exposed wires. Loose wires increase shock and fire risk.
Follow Local Electrical Codes
Check local rules for electrical installations. Codes protect safety and may require permits. Ignoring codes can lead to fines or unsafe setups. Consult a professional if unsure.
Choosing The Right Switch
Choosing the right switch is key to connecting a light switch to a lamp. The switch controls the lamp’s power. It needs to match the lamp’s type and your needs. Picking the wrong switch can cause problems. It might not work well or could even be unsafe.
Different switches have different functions. Some turn the light on and off. Others can dim the light. Some switches are easy to install. Others need special wiring. Understanding the types helps you make a good choice.
Types Of Light Switches
Toggle switches are simple and common. They move up or down to turn the lamp on or off. Push-button switches use a button to control the light. Rotary switches turn in a circle to change the light’s status. Dimmer switches let you adjust the brightness. Choose a type that suits your lamp and usage.
Voltage And Wattage Ratings
Check the switch’s voltage rating. It must match or exceed your lamp’s power needs. The wattage rating shows how much power the switch can handle. Using a switch with too low a rating can cause overheating. Always pick a switch that is safe for your lamp’s power.
Installation And Compatibility
Some switches fit easily into lamp cords. Others require wall mounting or special tools. Make sure the switch fits your lamp style and wiring. Look for switches designed for lamps to avoid issues. Easy installation saves time and reduces mistakes.
Preparing The Lamp And Switch
Preparing the lamp and switch is the first step in connecting a light switch to a lamp. This stage makes sure all parts are ready and safe for wiring. Proper preparation helps prevent problems later.
Focus on two main tasks: removing the lamp socket and stripping the wires. Each task requires care and attention.
Removing The Lamp Socket
Start by unplugging the lamp to avoid electric shock. Then, unscrew the bulb and any decorative parts covering the socket. Use a screwdriver to remove the socket from the lamp base. Keep track of screws and small parts. Handle the socket gently to avoid damage. Removing the socket exposes the wires inside for connection.
Stripping The Wires
Use wire strippers to remove about half an inch of insulation from each wire. Be careful not to cut the metal wire inside. Expose clean copper wire for a good connection. Twist the wire strands to keep them together. Stripped wires allow secure attachment to the switch terminals. Check that wires are not frayed or broken before continuing.
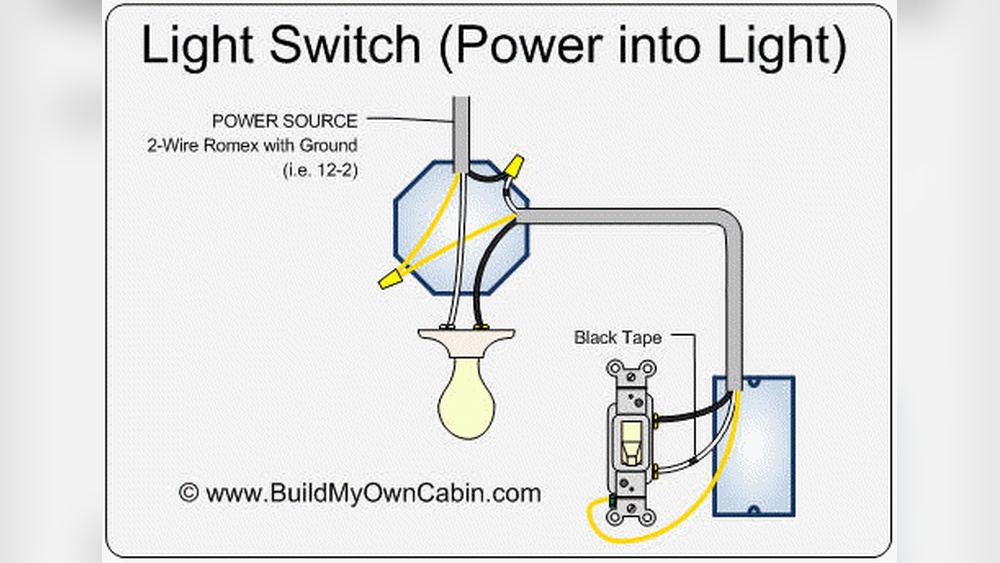
Wiring The Switch
Wiring the switch is a crucial step in connecting your light switch to a lamp. This process controls the flow of electricity, allowing you to turn the lamp on and off safely. Understanding the wiring helps prevent electrical hazards and ensures the switch works correctly.
Connecting The Live Wire
Start by identifying the live wire. It usually has a brown or red color. This wire carries electricity from the power source to the switch.
Attach the live wire to the switch’s live terminal. Tighten the screw securely to hold the wire in place. Loose connections can cause sparks or failure.
Check that no bare wire is exposed outside the terminal. Use electrical tape for extra safety if needed.
Securing The Neutral Wire
The neutral wire often has a blue or black color. It completes the electrical circuit by carrying current back to the power source.
Connect the neutral wire to the lamp socket or the neutral terminal if your switch has one. Secure the wire firmly with the terminal screw.
Do not connect the neutral wire to the switch’s live terminal. This mistake can cause the lamp to stay on or create a shock risk.
Testing The Connection
Testing the connection between a light switch and a lamp is a key step. It ensures safety and confirms the wiring works correctly. This phase avoids future problems and keeps your setup reliable.
Follow simple steps to check the connection. Use basic tools and stay cautious. Testing helps catch wiring mistakes early.
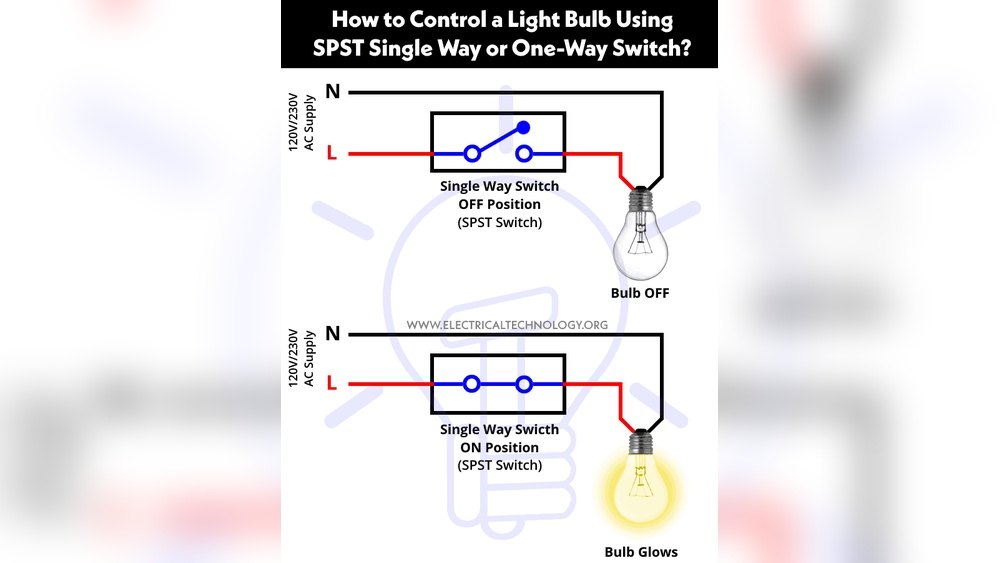
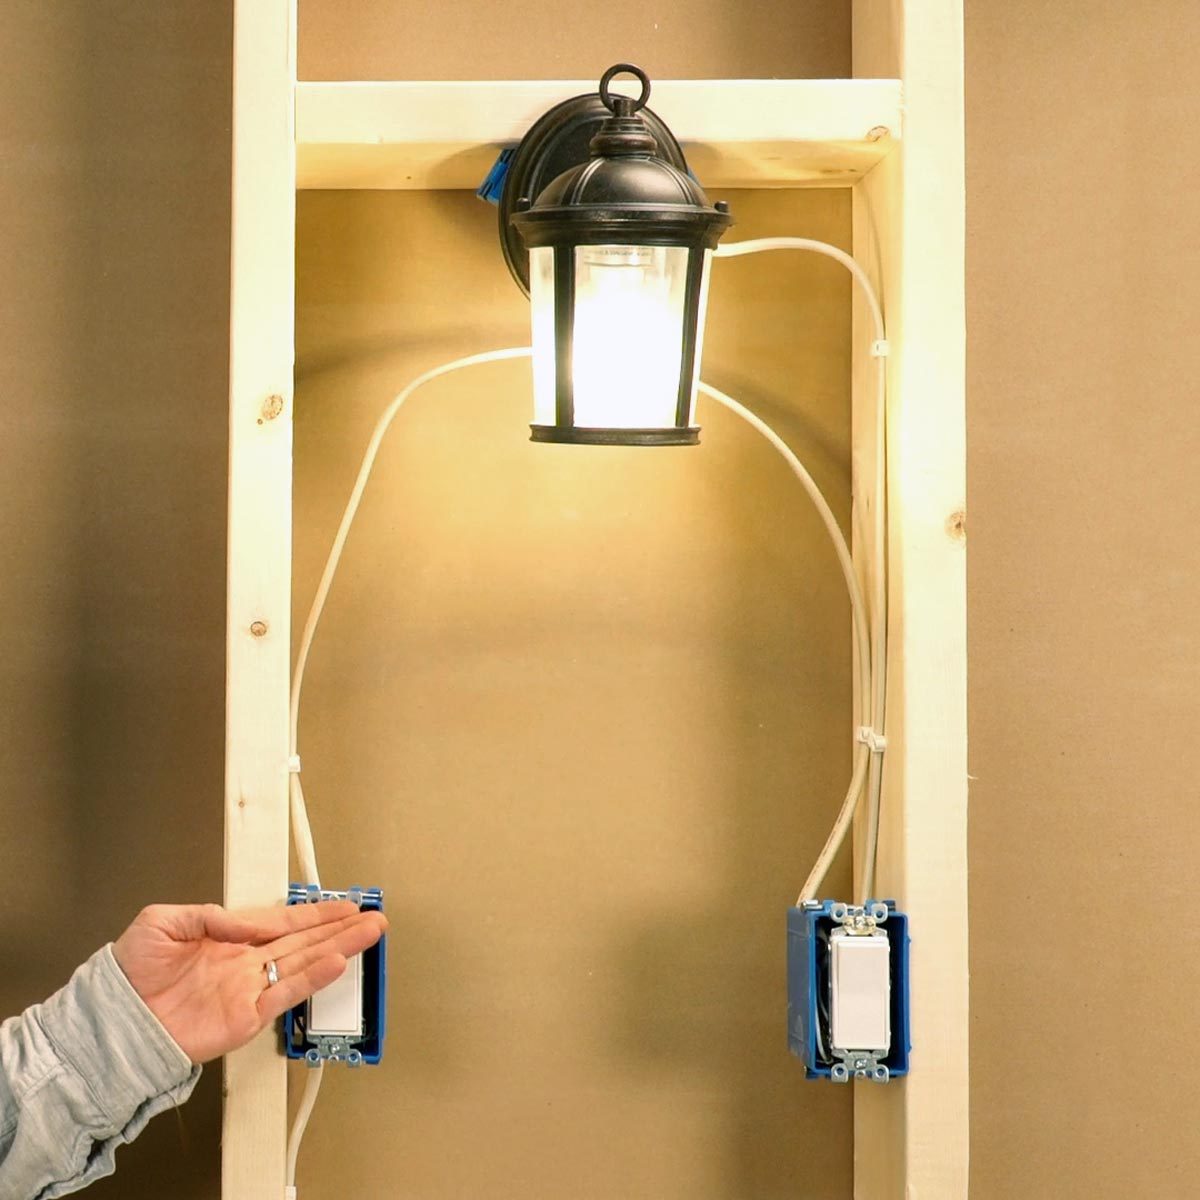
Turn On The Power Supply
First, restore power from the circuit breaker or fuse box. Make sure the power is on before testing. This action powers the switch and lamp.
Operate The Light Switch
Flip the switch to the “on” position. Watch the lamp closely. It should light up if the wiring is correct.
Check For Any Issues
If the lamp does not light, double-check all connections. Look for loose wires or wrong terminals. Fix any problems before trying again.
Use A Voltage Tester
A voltage tester confirms electricity flow. Place the tester on the switch terminals. A reading means power reaches the switch properly.
Test The Lamp Socket
Inspect the lamp socket for power. Insert the tester’s probe carefully. This step ensures electricity reaches the lamp itself.
Final Safety Check
Turn the switch on and off several times. The lamp should respond instantly. This confirms the connection is stable and safe.
Troubleshooting Common Issues
Troubleshooting common issues helps ensure your light switch and lamp work correctly. Simple problems can stop your lamp from turning on or off. Fixing these issues saves time and avoids frustration.
Check The Power Source
Make sure the lamp is plugged in. Confirm the outlet has power by testing with another device. Sometimes the outlet or power strip is off or faulty.
Inspect The Light Bulb
Look at the bulb to see if it is burned out. Replace the bulb with a new one if it looks dark or broken. A bad bulb will not light up even if the switch works.
Test The Switch Connections
Turn off the power before checking wires. Ensure all wires connect firmly to the switch terminals. Loose wires can stop the lamp from working properly.
Use A Multimeter To Check Voltage
A multimeter helps find electrical problems. Test the switch for voltage to see if power flows through it. No voltage means a wiring or switch fault.
Look For Short Circuits Or Damage
Check wires for cuts, cracks, or burns. Damaged wires can cause shorts or no power flow. Replace any damaged wires to prevent risks.
Verify The Switch Type
Use the right switch type for your lamp. Some lamps need specific switches like three-way or dimmer switches. The wrong switch may not work correctly.

Credit: www.youtube.com

Credit: www.youtube.com
Frequently Asked Questions
How Do I Connect A Light Switch To A Lamp Safely?
To connect a light switch to a lamp safely, first unplug the lamp. Use insulated tools and follow wiring diagrams carefully. Ensure the switch and lamp are compatible. Double-check all connections and test before use to avoid electrical hazards.
What Tools Are Needed To Wire A Switch To A Lamp?
You need a screwdriver, wire strippers, electrical tape, and a voltage tester. Additionally, have wire connectors and a compatible light switch. These tools help ensure secure and safe connections when wiring a switch to a lamp.
Can I Use Any Light Switch With A Lamp?
Not all switches work with every lamp. Ensure the switch voltage and current ratings match the lamp’s specifications. Using the wrong switch can cause malfunction or safety issues. Always verify compatibility before installation.
How Do I Test The Switch After Wiring It?
After wiring, plug in the lamp and toggle the switch on and off. Check if the lamp lights up consistently. Use a voltage tester to confirm power flows correctly. This ensures your wiring is correct and safe.
Conclusion
Connecting a light switch to a lamp is easier than it seems. Follow each step carefully and stay safe. Double-check your wires before turning on the power. This small skill can save time and money. Practice makes perfect, so don’t worry if it takes a few tries.
Enjoy the convenience of controlling your lamp with a switch. Simple tools and clear instructions make the job smooth. Now, you can light up any room with ease.