Are you tired of fumbling for separate switches to control your ceiling fan and light? Imagine having one simple switch that lets you manage your fan and light exactly how you want.
Connecting a ceiling fan to a light switch isn’t as tricky as it sounds, and once you know how, you’ll save time and add convenience to your space. In this guide, you’ll discover easy steps to make this connection safely and effectively.
Keep reading—your perfect, hassle-free setup is just a few clicks away.
Tools And Materials Needed
Connecting a ceiling fan to a light switch is a useful home project. It lets you control the fan and light separately. To do this safely and correctly, gather all necessary tools and materials first.
Having the right tools saves time and prevents mistakes. It also helps keep the work safe and smooth. Prepare everything before you start the wiring process.
Basic Electrical Tools
- Screwdrivers (flathead and Phillips) for removing switch plates and securing wires
- Wire strippers to remove insulation from electrical wires
- Voltage tester to check if wires are live
- Needle-nose pliers for bending and twisting wires
- Electrical tape to insulate wire connections
Materials For Wiring
- Ceiling fan with light kit
- Single or double pole light switch, depending on your setup
- Electrical wire (usually 14 or 12 gauge, based on circuit requirements)
- Wire nuts to connect and secure wires together
- Mounting bracket or box for the ceiling fan
Safety Equipment
- Insulated gloves to protect hands from shocks
- Safety goggles to shield eyes from debris
- Flashlight or work light for better visibility
Safety Precautions
Working with electricity can be risky. Safety must come first. Follow key safety steps to avoid accidents and injuries. Preparing well keeps you safe and your home protected.
Turn Off The Power
Always switch off the power at the circuit breaker. Do not rely on the wall switch alone. Use a tester to confirm no electricity flows to the wires. This step prevents electric shocks.
Use Proper Tools And Gear
Wear insulated gloves and use tools with rubber handles. These protect you from electric shocks. Use a sturdy ladder to reach the ceiling safely. Keep your workspace clear and well-lit.
Check Wiring And Components
Inspect all wires for damage or wear before starting. Replace any frayed or broken wires. Verify the ceiling fan and switch are rated for your electrical system. Proper materials prevent fire hazards.
Follow Local Electrical Codes
Check local rules on electrical work before you start. Some areas require a licensed electrician for ceiling fan installation. Follow guidelines to ensure safety and avoid fines. Correct installation protects your home.
Turn Off Power
Turning off power is the first and most important step before connecting a ceiling fan to a light switch. It keeps you safe from electric shock. Never start any electrical work without cutting off the electricity supply.
Take time to make sure the power is off. This prevents accidents and damage to your tools or fan. Safety should be your top priority during any wiring project.
Locate The Circuit Breaker
Find the main circuit breaker panel in your home. It is usually in the basement, garage, or utility room. Look for the breaker that controls the room where the ceiling fan is installed.
Turn Off The Correct Breaker
Switch off the breaker that controls the ceiling fan’s power. Flip the switch to the “off” position. This stops electricity flow to the fan and light fixture.
Verify Power Is Off
Use a voltage tester or multimeter to check the wires. Test the wires at the fan’s mounting box. Make sure there is no current before touching any wires.
Double Check The Switch
Turn the light switch on and off to confirm power is off. The fan and light should not respond. This ensures the breaker is off and safe to work on.

Credit: diy.stackexchange.com
Identify Wiring Types
Before connecting a ceiling fan to a light switch, identifying wiring types is essential. Understanding each wire’s role makes installation safer and easier. Wires carry electricity through your home and have specific colors and functions. Knowing these helps prevent mistakes and electrical hazards.
Live, Neutral, And Ground Wires
The live wire carries electrical power from the main supply to the fan or light. It is usually black or red. The neutral wire completes the circuit by carrying electricity back. This wire is often white. The ground wire prevents electric shock by directing electricity safely into the ground. It is green or bare copper.
Always confirm wire colors with a tester. Wire colors can vary in older homes.
Switch Loop Wires
A switch loop controls power flow to the fan or light from the wall switch. It usually involves two wires running between the switch and the fixture box. One wire brings power to the switch. The other returns power to the fan or light. These wires are often black or red but may have different colors.
Check which wire is live with a voltage tester before working. Properly identifying switch loop wires ensures the fan and light work correctly.
Remove Existing Fixture
Removing the existing fixture is the first step to connect a ceiling fan to a light switch. This step allows safe access to the wiring inside the ceiling box. Taking down the old fixture carefully prevents damage to wires and ceiling parts.
Turn off power at the circuit breaker. This step ensures no electricity flows while working. Safety comes first to avoid shocks or injuries.
Gather Tools And Materials
Prepare a ladder, screwdriver, voltage tester, and a small container for screws. These tools help complete the task efficiently and safely. Have everything ready before starting.
Turn Off The Power
Switch off the circuit breaker connected to the fixture. Use a voltage tester to confirm no power is present. This step avoids electrical accidents during removal.
Remove The Light Bulbs And Shades
Take out all light bulbs carefully. Remove any glass shades or covers. This makes the fixture lighter and easier to handle.
Unscrew The Fixture Base
Locate screws or bolts holding the fixture to the ceiling box. Use a screwdriver to remove them slowly. Support the fixture with one hand to prevent it from falling.
Disconnect The Wiring
Look for wire nuts or connectors joining fixture wires to house wires. Unscrew or twist them gently to separate. Keep track of wire colors for later connection.
Remove The Fixture
Once wires are disconnected, take the fixture down completely. Place it aside carefully. Inspect the ceiling box and wires for damage before installing the new fan.
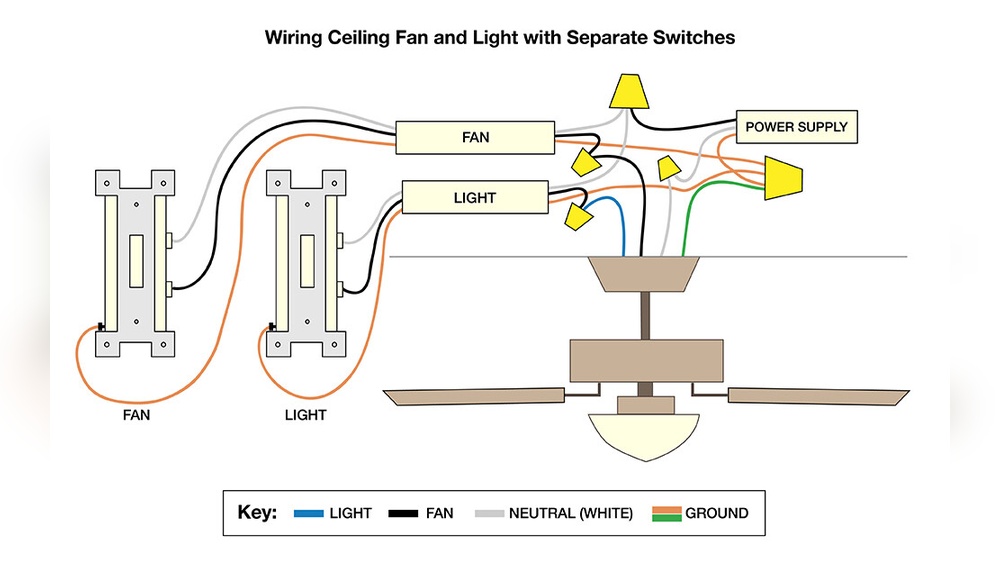
Connect Fan And Light Wires
Connecting the fan and light wires is a key step in installing a ceiling fan with a light. This step controls how the fan and light operate from the wall switch. Careful wiring ensures both parts work safely and smoothly. Follow simple instructions to connect wires to the correct switches.
Connecting Fan To Switch
Start by identifying the fan wire, usually black or blue. This wire controls the fan motor. Connect this wire to the switch wire that controls the fan. Use a wire connector to join them securely. Make sure the connection is tight to avoid loose wiring. This setup allows you to turn the fan on or off from the wall switch.
Connecting Light To Switch
Next, find the light wire, often blue or white with a stripe. This wire controls the light fixture on the fan. Connect it to the switch wire for the light. Use a wire connector to join these wires. Secure the connection tightly for safe operation. This lets you control the fan light separately from the fan motor.
Securing Wire Connections
Double-check all wire connections before finishing. Twist wires together firmly and cover with wire nuts. Wrap electrical tape around the wire nuts for extra safety. Push wires neatly into the electrical box to prevent damage. Proper securing prevents shorts and keeps your fan and light working well.
Mount The Ceiling Fan
Mounting the ceiling fan is a key step in connecting it to a light switch. This step ensures the fan is secure and works properly. Follow these simple instructions to mount your fan safely and easily.
Prepare The Mounting Bracket
Start by attaching the mounting bracket to the ceiling box. Use screws that come with the fan kit. Make sure the bracket is tight and does not move. The bracket will hold the fan’s weight.
Lift The Fan Assembly
Lift the fan motor carefully. Align it with the mounting bracket. Hang the fan motor on the bracket hook or ball. This keeps the fan stable while wiring.
Secure The Fan To The Bracket
Use screws or nuts to lock the fan motor to the bracket. Check that the fan does not wobble. Tighten all fasteners for safety. This step prevents the fan from falling.
Attach The Fan Blades
Fix the fan blades to the motor arms. Use the screws provided with your fan. Make sure each blade is secure and even. Uneven blades cause noise and shaking.
Install The Light Kit
Connect the light kit to the fan if it has one. Follow the instructions from the manufacturer. Secure the light fixture firmly to avoid falling.
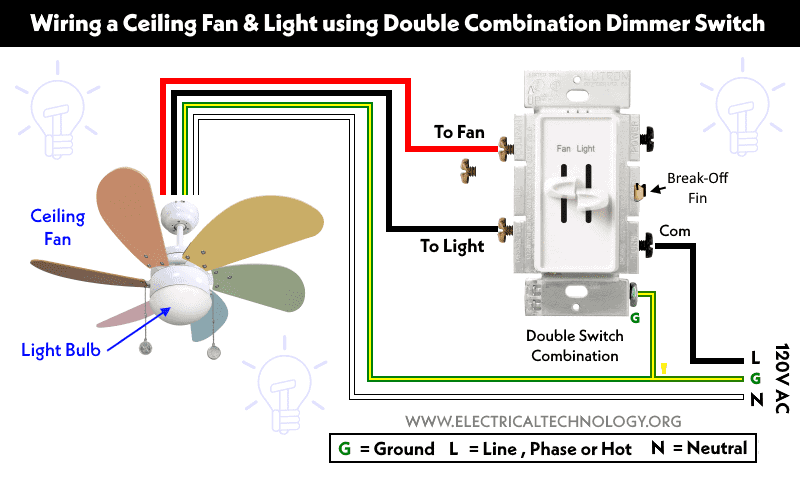
Credit: www.electricaltechnology.org
Restore Power And Test
After connecting your ceiling fan to the light switch, restoring power is the next crucial step. This step lets you check if everything works correctly. Testing ensures safety and proper function of your fan and light.
Careful restoration of power prevents damage and avoids accidents. Follow these simple steps to restore power and test your installation confidently.
Turn On The Circuit Breaker
Locate your home’s electrical panel. Find the breaker that controls the fan’s circuit. Flip the breaker switch back to the “On” position. This restores power to the fan and light.
Use The Light Switch To Test
Flip the wall switch controlling the fan. Check if the fan’s light turns on and off. Then, test the fan’s speed settings if they are connected to the switch. Confirm all functions respond correctly.
Observe For Any Issues
Listen for unusual noises from the fan. Watch for flickering or dimming lights. Check if the fan blades spin smoothly without wobbling. Stop and turn off power if you notice problems.
Troubleshooting Tips
Sometimes, connecting a ceiling fan to a light switch does not work as planned. Troubleshooting helps find and fix common problems fast. This section shares simple tips to solve issues safely and clearly.
Check The Power Supply
Ensure the circuit breaker is on. A tripped breaker stops electricity flow. Use a voltage tester to verify power at the switch and fan wires. No power means no function.
Inspect The Wiring Connections
Loose or wrong wires cause failures. Turn off the power and open the switch box. Confirm each wire matches the correct terminal. Tighten any loose screws and secure wire nuts.
Test The Switch Itself
Switches can wear out. Use a multimeter to check for continuity. Replace the switch if it shows no connection when on. A faulty switch blocks the fan and light.
Look For Faulty Fan Or Light Parts
Sometimes the fan or light has internal issues. Test the fan by connecting it directly to power. Replace bulbs or fan motors if they fail to work properly.
Confirm Correct Switch Type
Some fans need special switches. A dimmer switch may not work with all ceiling fans. Use a standard on/off switch or one designed for fans and lights.
Double Check The Fan’s Manual
Manufacturers include wiring guides. Follow their instructions exactly. Manuals often show wire colors and switch setups to prevent mistakes.

Credit: www.homedepot.com
Frequently Asked Questions
How Do I Connect A Ceiling Fan To A Light Switch?
To connect a ceiling fan to a light switch, turn off power first. Run wiring from the switch to the fan’s junction box. Connect the switch wire to the fan’s light wire, and the power wire to the fan’s motor wire.
Secure all connections and test.
Can I Control Ceiling Fan And Light Separately?
Yes, you can control the fan and light separately by installing a dual switch or a remote control. This requires running separate wires for the fan motor and the light fixture to the switch box or using a compatible remote kit.
What Tools Are Needed To Wire A Ceiling Fan To A Switch?
You’ll need a voltage tester, wire strippers, screwdrivers, wire nuts, electrical tape, and a drill. These tools help you safely connect and secure the wiring from the light switch to the ceiling fan.
Is It Safe To Install A Ceiling Fan Switch Myself?
Yes, if you follow electrical safety guidelines and turn off power at the breaker. Ensure you understand wiring color codes and local codes. When unsure, consult a licensed electrician to avoid hazards and ensure proper installation.
Conclusion
Connecting a ceiling fan to a light switch is a simple task anyone can do. Just follow the steps carefully and use the right tools. Always turn off the power before starting to stay safe. Testing the connections ensures the fan and light work properly.
With some patience, your fan and light will work on the same switch. Enjoy the convenience and comfort this setup brings to your room. Simple wiring can make a big difference in your home. Give it a try and see how easy it is.