Are you worried that your brake lights might not be working properly? Your brake light switch plays a crucial role in keeping you and others safe on the road.
If it’s faulty, your brake lights may fail to turn on, putting you at risk of accidents and traffic tickets. But don’t worry—checking your brake light switch is easier than you think. You’ll learn simple steps to test and inspect your brake light switch quickly.
Keep reading to make sure your brake lights are always ready when you need them most.
Signs Of A Faulty Brake Light Switch
The brake light switch is a small but important part of your car’s safety system. It controls the brake lights and other functions. Signs of a faulty brake light switch are clear and easy to notice. Spotting these signs early can help you avoid accidents and costly repairs.
Watch for unusual brake light behavior. These problems often mean the switch needs attention. Knowing what to check helps keep you safe on the road.
Dim Or Non-working Brake Lights
Brake lights that are dim or do not turn on are a common sign of a bad switch. The switch sends power to the brake lights. When it fails, the lights may glow weakly or not at all. This makes it hard for other drivers to see you stopping.
Brake Lights Staying On
Brake lights that stay on even after releasing the pedal can drain your car battery. A stuck brake light switch may cause this problem. It keeps the lights on, confusing drivers behind you. This issue also wastes power and can lead to other electrical faults.
Issues With Cruise Control
The brake light switch also signals the cruise control to turn off. A faulty switch may prevent cruise control from working properly. It might not turn off when you press the brake. This can make driving unsafe and cause unexpected car behavior.
Tools Needed For Inspection
Checking the brake light switch needs some simple tools. These tools help you find problems quickly and safely. You do not need many items to inspect the switch properly. Just a few basics and an electrical tester make the job easier.
Basic Hand Tools
Basic hand tools include screwdrivers and pliers. A flathead and Phillips screwdriver help remove panels. Needle-nose pliers assist in reaching tight spots. A flashlight is useful for seeing under the dashboard. These tools allow easy access to the brake light switch.
Multimeter For Electrical Testing
A multimeter tests the electrical parts of the brake light switch. It measures voltage, resistance, and continuity. This helps find if the switch works or not. Set the multimeter to the right mode before testing. Using a multimeter ensures accurate and safe inspection.
Locating The Brake Light Switch
Locating the brake light switch is the first step in checking its condition. This small part controls your brake lights and helps keep you safe. Knowing where it sits can save time and avoid confusion. The brake light switch is usually near the brake pedal. It connects to the pedal arm, detecting when you press the brake. Finding it is simple with some basic guidance.
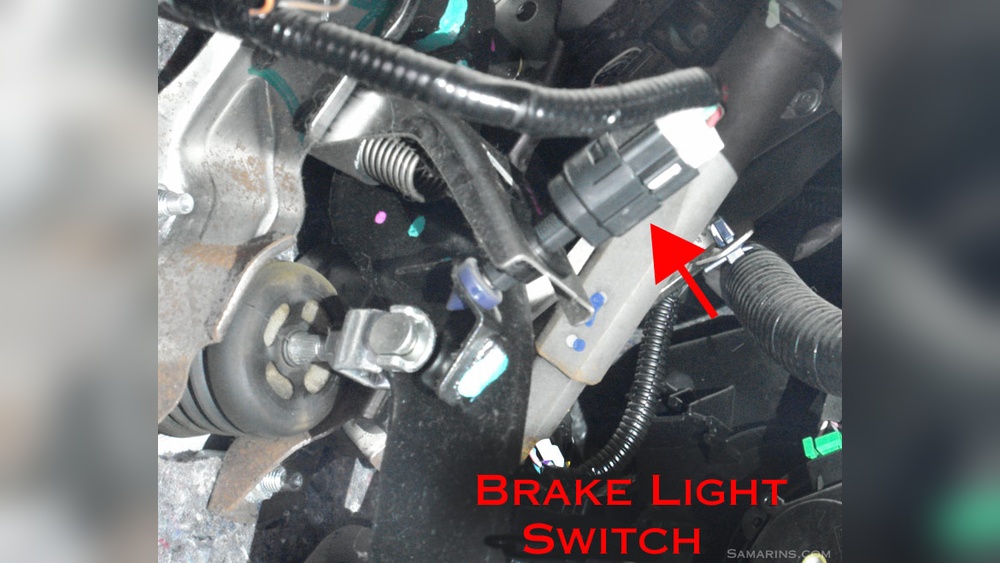
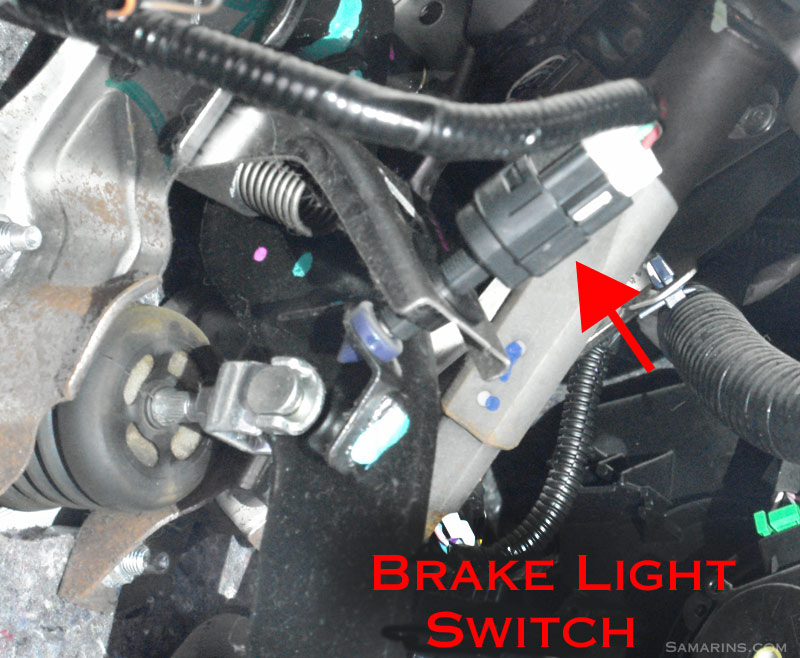
Common Switch Positions
The brake light switch is often mounted above the brake pedal. It sits on the brake pedal bracket or near the pedal arm. In most cars, it looks like a small plastic or metal piece. Some switches are cylindrical, while others are flat. The switch usually presses against the pedal arm or pedal itself. When the pedal moves, the switch activates or deactivates the brake lights. Check around the pedal area for any wires connected to a small device. That’s likely the brake light switch.
Accessing The Switch Safely
Accessing the brake light switch requires caution. Always ensure the car is off before starting. Remove any floor mats or panels blocking the pedal area. Use a flashlight to see better under the dash. Avoid forcing parts or wires to prevent damage. Wear gloves to protect your hands from sharp edges. Keep the area clean to spot the switch easily. Taking these steps helps you reach the brake light switch without trouble.
Visual Inspection Steps
Visual inspection is the first step to check the brake light switch. It helps spot obvious problems fast. This step saves time and avoids unnecessary repairs.
Look closely at the brake light switch and its parts. Small issues can cause the brake lights to fail. Follow these simple steps to inspect properly.
Checking For Physical Damage
Start by examining the brake light switch for cracks or breaks. Look for signs of wear or rust. Check if the switch is loose or out of place. Any damage can stop the switch from working correctly. Replace the switch if you find visible damage.
Inspecting Wiring And Connectors
Next, look at the wires connected to the brake light switch. Check for frayed, broken, or exposed wires. Make sure all connectors are tight and clean. Dirt or corrosion can block electrical signals. Clean the connectors carefully or replace damaged wires to ensure good contact.
Testing The Brake Light Switch Function
Testing the brake light switch function is key for vehicle safety. This small part controls your brake lights. If it fails, drivers behind won’t know you are stopping. Checking the switch ensures it works correctly. It can save you from accidents and traffic tickets.
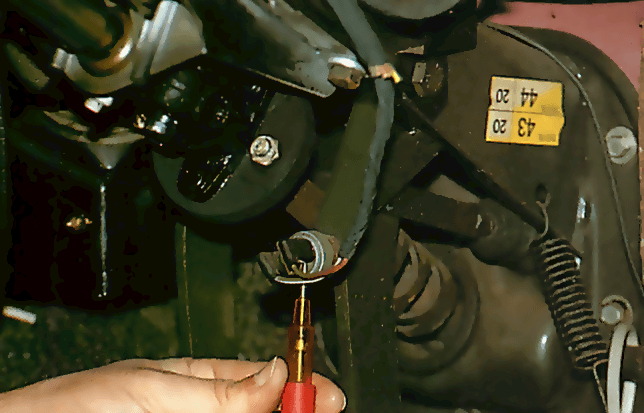
Using A Multimeter To Check Continuity
First, disconnect the brake light switch from the wiring. Set your multimeter to continuity mode. Place the probes on the switch terminals. Press the brake pedal slowly. The multimeter should beep or show zero resistance. This means the switch completes the circuit. No beep or high resistance signals a faulty switch. Repeat several times for accuracy.
Manual Activation And Response Check
Locate the brake light switch near the brake pedal. Press the pedal and watch the brake lights at the rear. Lights should turn on immediately. Release the pedal, and lights must go off. Delayed or no light means the switch may be broken. Press the switch button manually to test response. If lights react properly, the switch works fine.

Credit: www.youtube.com
Replacing The Brake Light Switch
Replacing the brake light switch is a simple task that anyone can do. This switch controls the brake lights, turning them on when you press the brake pedal. A faulty switch can cause brake lights to fail, which is dangerous and may cause accidents or tickets.
With a few tools and basic knowledge, you can replace the switch yourself. This saves time and money compared to visiting a mechanic. Follow these clear steps to remove the old switch, install the new one, and adjust it correctly.
Removing The Old Switch
First, locate the brake light switch near the brake pedal. It usually clips onto the pedal assembly. Disconnect the electrical connector by pressing the tab and pulling it out.
Next, undo the mounting nut or clip holding the switch in place. Carefully slide the old switch out. Keep track of any small parts for reinstallation.
Installing The New Switch
Take your new brake light switch and position it where the old one was. Slide it into the mounting bracket or clip it in securely. Fasten the nut or clip to hold the switch firmly.
Reconnect the electrical connector. Make sure it snaps in and holds tight. Loose connections can cause the brake lights to malfunction.
Adjusting Switch Position
Press the brake pedal slowly to test the switch position. The brake lights should turn on when the pedal moves slightly. If lights stay on or do not turn on, adjust the switch.
Move the switch closer or farther from the pedal until the lights work correctly. Tighten the mounting nut again to fix the switch in place. Check the pedal movement a few times to confirm proper adjustment.
Final Checks After Replacement
After replacing the brake light switch, it is important to perform final checks. These checks ensure the switch works properly and keeps your vehicle safe. A few simple steps can confirm the repair success.
Verifying Brake Light Operation
Press the brake pedal gently. Ask someone to watch the rear brake lights. The lights should turn on immediately when the pedal is pressed. Release the pedal and check that the lights go off. Repeat this test a few times. Consistent light response means the switch works well.
Testing Vehicle Systems Linked To The Switch
The brake light switch affects other vehicle functions. Check if the cruise control turns off when you press the brake. Start the car and see if the brake pedal warning light disappears. Make sure the engine starts only when the brake is pressed, if your car has this feature. These tests confirm the switch is correctly installed and connected.
Credit: www.samarins.com
Credit: www.howacarworks.com
Frequently Asked Questions
What Is The Brake Light Switch And Its Function?
The brake light switch activates brake lights when you press the pedal. It signals drivers behind you to stop, enhancing safety.
How Can I Test If My Brake Light Switch Works?
Check brake lights by pressing the pedal. If lights don’t illuminate, test the switch with a multimeter for continuity.
Where Is The Brake Light Switch Located In A Car?
The switch is usually mounted near the brake pedal arm under the dashboard. It detects pedal movement to activate brake lights.
What Are Common Symptoms Of A Faulty Brake Light Switch?
Common signs include brake lights that stay on or don’t light up, cruise control issues, or difficulty shifting gears.
Conclusion
Checking your brake light switch helps keep you safe on the road. It is a simple task anyone can do with basic tools. Regular checks stop problems before they start. Make sure your brake lights work every time you press the pedal.
This small step can prevent accidents and fines. Take a few minutes to inspect the switch today. Your car and your safety will thank you. Easy and important.