Have you ever wished you could control your lights from two different spots in your home? Adding a three way switch to your existing light can make that possible—and it’s easier than you might think.
Whether it’s for convenience, safety, or just making your space smarter, this simple upgrade can change how you use your lighting every day. In this guide, you’ll discover step-by-step how to add a three way switch without the hassle or confusion.
Ready to take control of your lighting? Let’s dive in and make your home work better for you.
Tools And Materials Needed
Adding a three way switch to an existing light requires the right tools and materials. Having these ready makes the job easier and safer. This section lists all essentials needed for the project.
Basic Electrical Tools
You will need a few simple tools. A screwdriver set, including flathead and Phillips, is essential. Wire strippers help remove insulation from wires safely. A voltage tester checks if wires have current. Needle-nose pliers help bend and hold wires.
Materials For Wiring
Three way switches are necessary for this project. Use switches rated for your home’s voltage. Copper electrical wire with the right gauge is a must. Wire nuts connect wires securely. Electrical tape insulates wire nuts and exposed wire ends.
Safety Equipment
Safety gear protects you during work. Insulated gloves reduce shock risk. Safety goggles protect your eyes from debris. A flashlight helps see in dark spaces. Always turn off power before starting work.

Credit: www.youtube.com
Safety Precautions
Working with electricity requires careful attention to safety. Adding a three way switch to an existing light involves wiring changes. These changes can be risky without proper safety steps.
Taking safety precautions protects you from electric shock and injury. It also prevents damage to your home’s electrical system. Follow these important safety tips before starting your project.
Turn Off Power At The Circuit Breaker
Always switch off the power at the main circuit breaker. Do not rely on the wall switch alone. Use a voltage tester to confirm no electricity flows to the wires. This step reduces the risk of electric shock.
Use Proper Tools And Equipment
Choose insulated tools made for electrical work. Avoid using damaged or worn tools. Wear rubber-soled shoes and use a sturdy ladder if needed. Good tools and gear make the job safer and easier.
Understand Your Wiring Setup
Study the current wiring before making changes. Identify the live, neutral, and ground wires clearly. Mistakes with wire connections can cause short circuits or fires. Use wiring diagrams to guide your work.
Work In A Dry Environment
Never work with electrical wiring in wet or damp areas. Water increases the chance of electric shock. Ensure your hands and the workspace are dry before starting. Safety improves in a clean, dry place.
Wear Safety Gear
Use safety glasses to protect your eyes from sparks or debris. Wear gloves to avoid cuts and light shocks. Protective gear keeps you safe throughout the installation process.
Identify Existing Wiring Setup
Start by checking the current wiring in your switch box. Identify the wires and note their colors and connections. This helps ensure the new three-way switch works correctly with your existing setup.
Understanding Your Current Switch Setup
Before adding a three way switch, identify your existing wiring setup. This step is important to avoid mistakes and ensure safety. Most homes have simple switch wiring that controls one light from one location. Knowing how your current switch works helps plan the new setup.
Turn off power at the circuit breaker before inspecting wires. Use a voltage tester to confirm no electricity flows through the wires. This prevents shocks and accidents during work.
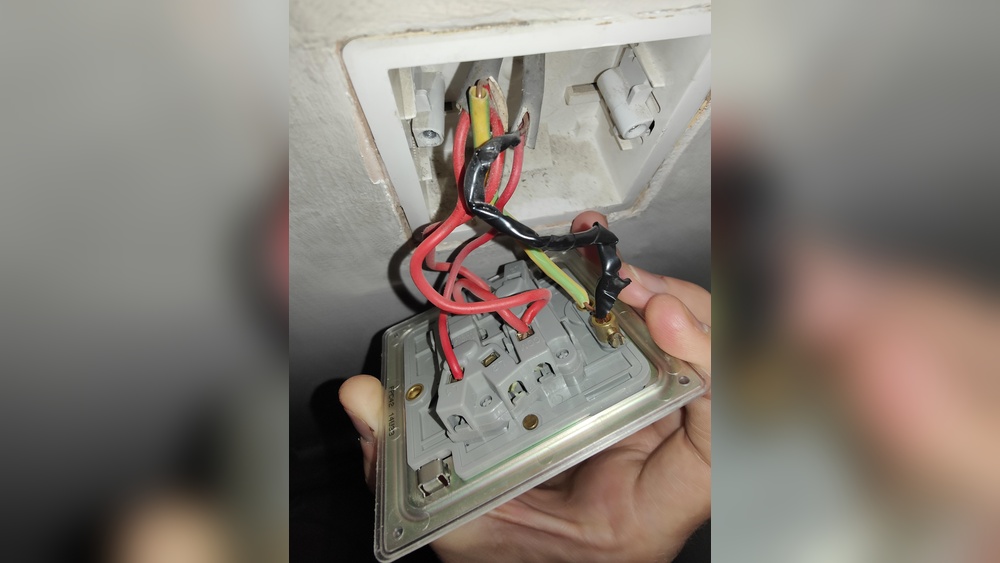
Locate And Identify Each Wire
Remove the switch cover and carefully pull out the switch. Look at the wires connected to it. Usually, there are three types of wires: hot (black), neutral (white), and ground (green or bare copper). The hot wire carries current from the power source.
The neutral wire completes the circuit. The ground wire protects from electrical faults. Mark each wire with tape or a marker to remember their roles. This makes wiring the three way switch easier.
Check For Traveler Wires
A three way switch needs traveler wires between switches. These wires allow control from two locations. Look for two wires connected to the existing switch besides the hot and ground wires. These are usually red and black or both black but wrapped with different colored tape.
If no traveler wires exist, you may need to run new wires. This can require professional help. Knowing if traveler wires are present helps plan the next steps.
Draw A Simple Wiring Diagram
Sketch the wiring setup you find. Include the switch box, wires, and their colors. A diagram helps keep track and avoid confusion later. It also helps when asking for advice or buying materials.
Keep the diagram visible while working. This visual aid simplifies the wiring process for the new three way switch.

Credit: diy.stackexchange.com
Turn Off Power Supply
Turning off the power supply is the first and most important step before adding a three way switch. It keeps you safe from electric shocks while working. Always treat electricity with respect and caution.
Before starting, locate the circuit breaker or fuse box. This is where you can cut the power to the light fixture you want to change. Turning off the correct breaker stops electricity from flowing to the wires.
After switching off the power, double-check that the light is off. Try turning the light on with the existing switch to be sure. If the light does not turn on, the power is off and you can proceed safely.
Locate The Circuit Breaker
Find the main electrical panel in your home. It is usually in the basement, garage, or utility room. Identify the breaker that controls the light circuit you want to work on.
Switch Off The Correct Breaker
Flip the breaker switch to the OFF position. This stops electricity from reaching the light fixture. Label the breaker if needed to avoid confusion later.
Test The Power Is Off
Use the light switch to see if the light turns on. If the light stays off, the power is off. For extra safety, use a voltage tester on the wires before touching them.
Remove Existing Switch
Removing the existing switch is the first step to add a three-way switch. This step prepares the wiring for new connections. It requires care and safety to avoid electrical hazards.
Turn Off Power At The Breaker
Switch off the power to the circuit at the breaker box. This stops electricity from flowing to the switch. Use a voltage tester to confirm no power is present.
Remove The Switch Cover Plate
Unscrew the cover plate using a screwdriver. Take off the plate gently to expose the switch and wires. Keep the screws safe for later use.
Unscrew And Pull Out The Existing Switch
Remove the screws holding the switch in place. Pull the switch out carefully to access the wiring. Do not touch the wires yet.
Label The Wires For Easy Identification
Use tape or markers to label each wire. Note where each wire connects to the switch. This helps during the installation of the three-way switch.
Disconnect The Wires From The Old Switch
Loosen the screws or remove wire nuts holding the wires. Take the wires off the switch terminals carefully. Keep the wires separated to avoid confusion.
Install New Three-way Switches
Installing new three-way switches lets you control a light from two places. This setup is common in hallways and large rooms. It improves convenience and safety. The process involves wiring two switches that work together. Each switch has specific wiring steps to follow. Careful attention helps avoid mistakes and ensures proper function.
Wiring The First Switch
Start by turning off power at the breaker. Remove the existing switch and identify the wires. Typically, you will find a line (power) wire and a traveler wire. Connect the line wire to the common terminal on the three-way switch. Attach traveler wires to the two traveler terminals. Make sure the ground wire is connected to the green screw. Secure the switch in the box and prepare for the second switch.
Wiring The Second Switch
At the second switch location, turn off the power again. Identify the traveler wires coming from the first switch. Connect these traveler wires to the traveler terminals on this switch. Attach the wire going to the light fixture to the common terminal. Don’t forget to connect the ground wire. Once all wires are secured, mount the switch. Test the switches by restoring power and toggling both switches.
Connect Traveler Wires
Connecting traveler wires is a key step in installing a three-way switch. These wires allow two switches to control one light. Proper connection ensures the switches work smoothly together.
Traveler wires usually come in two colors, often red and black. Each traveler wire runs between the two switches. They carry the electrical current back and forth.
Identify Traveler Terminals On Switches
Look for two brass or copper terminals on each switch. These are the traveler terminals. The traveler wires connect here, not the common terminal.
Connect Traveler Wires To First Switch
Attach the red and black traveler wires to the traveler terminals on the first switch. Tighten the screws firmly to secure them. Loose wires cause flickering or failure.
Run Traveler Wires To Second Switch
Run the traveler wires through the wall to the second switch box. Keep the wires neat and avoid sharp bends. This helps prevent damage and makes future repairs easier.
Attach Traveler Wires To Second Switch
Connect the traveler wires to the traveler terminals on the second switch. Match the wire colors to the same terminals as the first switch. Check that connections are tight and secure.
Test The Switches
Testing the switches is a key step after installing a three way switch. This step ensures both switches work correctly and control the light as expected. Proper testing helps avoid safety hazards and saves time fixing mistakes later.
Testing is simple but must be done carefully. It confirms the wiring is right and the switches function together. Follow each step to check both switches thoroughly.
Turn On The Power
Start by turning the power back on at the circuit breaker. This restores electricity to the switches. Never test switches without power. Use caution and make sure no wires are exposed.
Test Switch One
Flip the first switch up and down. The light should turn on and off. Notice if the light changes immediately or flickers. Flickering means a loose connection. Fix it before moving on.
Test Switch Two
Now test the second switch the same way. Flip it up and down. The light must respond just like with the first switch. Both switches should control the light independently.
Check All Switch Positions
Try all possible switch positions. The light must turn on or off in every combination. This confirms the three way switch wiring is correct. Repeat switching slowly to be sure.
Troubleshooting Common Issues
Adding a three way switch to an existing light can sometimes cause problems. These issues can stop the light from working properly. Knowing how to find and fix these problems saves time and effort. This section covers common troubles and how to solve them easily.
Check For Loose Or Incorrect Wiring
Loose wires cause the switch to fail. Turn off power before inspecting. Make sure all wire connections are tight. Check that the wires match the correct terminals. Wrong wiring can prevent the light from working.
Test The Switches For Faults
Switches can wear out or break. Use a tester to check if the switch works. Replace any switch that does not respond. Faulty switches stop the circuit from completing.
Verify The Power Supply To The Switch
Power may not reach the switch. Use a voltage tester to check. No power means a problem in the circuit or breaker. Fix the power source before continuing.
Ensure Proper Grounding
Ground wires protect from shocks. Missing or loose ground wires cause safety risks. Check that the ground wire is connected to each switch box. Secure any loose ground connections.
Look For Damaged Wires Or Components
Old or damaged wires cause shorts or open circuits. Inspect wires for cuts or burn marks. Replace any damaged parts. Safe wiring is key for switch operation.

Credit: www.finehomebuilding.com
Frequently Asked Questions
What Tools Are Needed To Add A Three Way Switch?
You need a screwdriver, voltage tester, wire stripper, electrical tape, and a drill. Safety gear like gloves and goggles is also essential. These tools help safely install and connect the switch to your existing wiring.
Can I Install A Three Way Switch Myself?
Yes, if you understand basic electrical wiring and safety. Turn off power before starting. Follow wiring diagrams carefully. If unsure, consult a licensed electrician to avoid hazards and ensure proper installation.
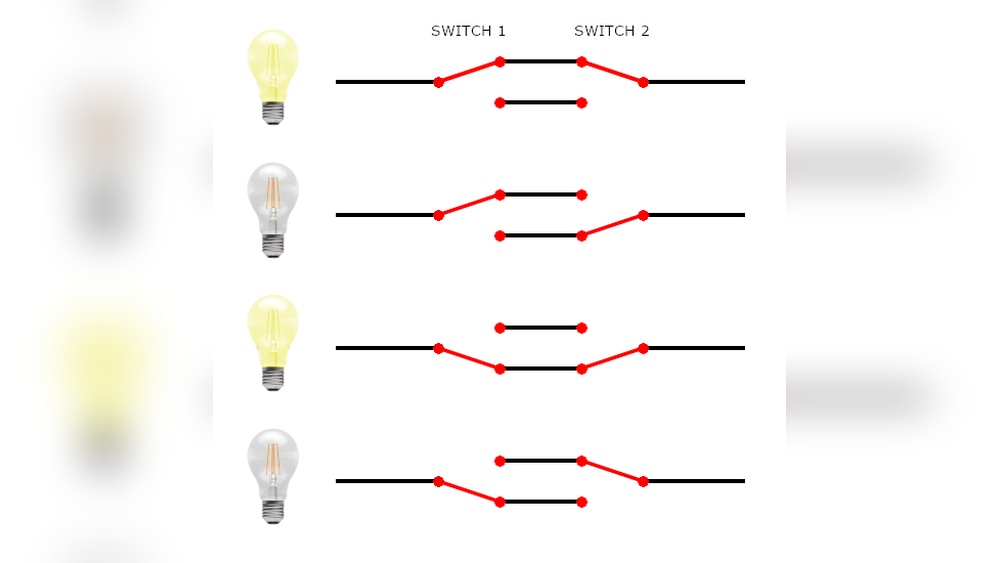
How Does A Three Way Switch Work?
A three way switch controls one light from two locations. It uses traveler wires between switches to change the circuit path. This setup allows you to turn the light on or off from either switch.
Is It Necessary To Turn Off Power Before Installation?
Absolutely. Always switch off the circuit breaker before working on electrical wiring. This prevents electric shock and injury during installation. Verify power is off using a voltage tester before proceeding.
Conclusion
Adding a three way switch to your existing light can improve convenience in your home. The steps are clear and easy to follow. Take your time and double-check your wiring. Safety should always come first. With patience, you can control one light from two places.
This simple upgrade makes daily life a bit easier. Try it out and enjoy the benefits of better lighting control.