Are you looking to install or replace a single light switch but feel unsure where to start? Connecting a light switch might seem tricky, but with the right steps, you can do it yourself quickly and safely.
Imagine flipping your switch and instantly brightening your room with your own handiwork. In this guide, you’ll discover simple, clear instructions that anyone can follow—even if you have no prior experience. Keep reading to gain the confidence and know-how to handle your light switch connection like a pro.
Tools And Materials Needed
Before connecting a single light switch, gather all the tools and materials. Having everything ready makes the process easier and safer. This section lists what you need to complete the job smoothly.
Essential Tools
- Screwdriver (flathead and Phillips) for screws
- Wire stripper to remove insulation
- Voltage tester to check power
- Pliers for gripping and bending wires
- Electrical tape for insulation
- Utility knife to cut wires if needed
Required Materials
- Single-pole light switch
- Electrical wire (usually 14/2 or 12/2 gauge)
- Wire nuts to connect wires safely
- Switch box to hold the switch
- Wall plate cover for a clean finish
:max_bytes(150000):strip_icc()/how-to-wire-and-install-single-pole-switches-1152330-05-2de77af170364a6fb3846f30634a5cd3.jpg)
Credit: www.thespruce.com
Safety Tips Before You Start
Working with electrical switches can be risky without the right precautions. Safety is the first step before starting any electrical work. Taking time to prepare and follow safety tips can prevent accidents and injuries.
Power Off Procedures
Always turn off the power at the circuit breaker. Do not rely on the wall switch alone. Use the breaker panel to cut electricity to the switch you will work on. Confirm the power is off before touching any wires. This step stops electric shocks and helps keep you safe.
Using A Voltage Tester
Check wires with a voltage tester after turning off the power. The tester shows if electricity still flows in the wires. Touch the tester’s probe to each wire. No light or sound means the power is off. Never assume wires are safe without testing first.
Identify The Wires
Identifying the wires is the first important step in connecting a single light switch. Each wire has a specific role and must be handled correctly. Knowing which wire is which ensures safety and proper function. This section explains how to find and understand the different wires in your switch box.
Live, Neutral, And Ground Wires
The live wire carries electricity from the power source to the switch. It is the most important wire for turning the light on or off. The neutral wire completes the electrical circuit by carrying current back to the power source. The ground wire provides a safe path for electricity in case of a fault. It helps prevent electric shocks and should never be ignored.
Color Codes And Functions
Colors help identify each wire quickly and safely. The live wire is usually black or red. The neutral wire is often white or blue. The ground wire is green or bare copper. These colors may vary by region, but these are the most common codes. Always double-check with a voltage tester before touching wires.
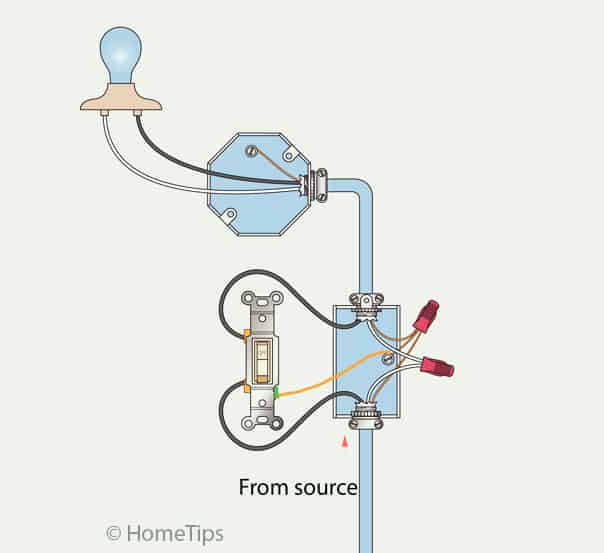
Credit: www.hometips.com
Turn Off The Power
Turning off the power is the first and most important step before connecting a single light switch. This step keeps you safe from electric shock. Always handle electrical work with caution. Never skip this step to avoid accidents.
Locate The Circuit Breaker
Find your home’s circuit breaker panel. It is usually in the basement, garage, or utility room. Open the panel door carefully. Look for the switch labeled for the room or area you will work in. Flip the breaker switch to the “off” position. This stops electricity from flowing to the light switch.
Confirm Power Is Off
Use a voltage tester or a simple light bulb tester. Touch the tester to the wires in the switch box. The tester should show no power. Turn the light switch on and off to double-check. No light or activity means the power is off. This step ensures your safety before you start work.
Remove The Old Switch
Removing the old light switch is the first step to installing a new one. This part requires care and attention to avoid damage or injury. Always ensure the power is off before starting. Follow these simple steps to remove the switch safely and correctly.
Unscrew And Pull Out
Locate the screws holding the switch cover plate. Use a screwdriver to remove them carefully. Place the screws somewhere safe to avoid losing them. Gently pull the switch out from the wall box. Do not force it; wires are still connected behind.
Disconnect Wires Safely
Check that the power is off using a tester. Loosen the screws or release the wire connectors holding the wires. Carefully remove each wire from the switch. Avoid touching wire ends together or metal parts. Keep track of which wire goes where for easy reconnection later.
Connect The New Switch
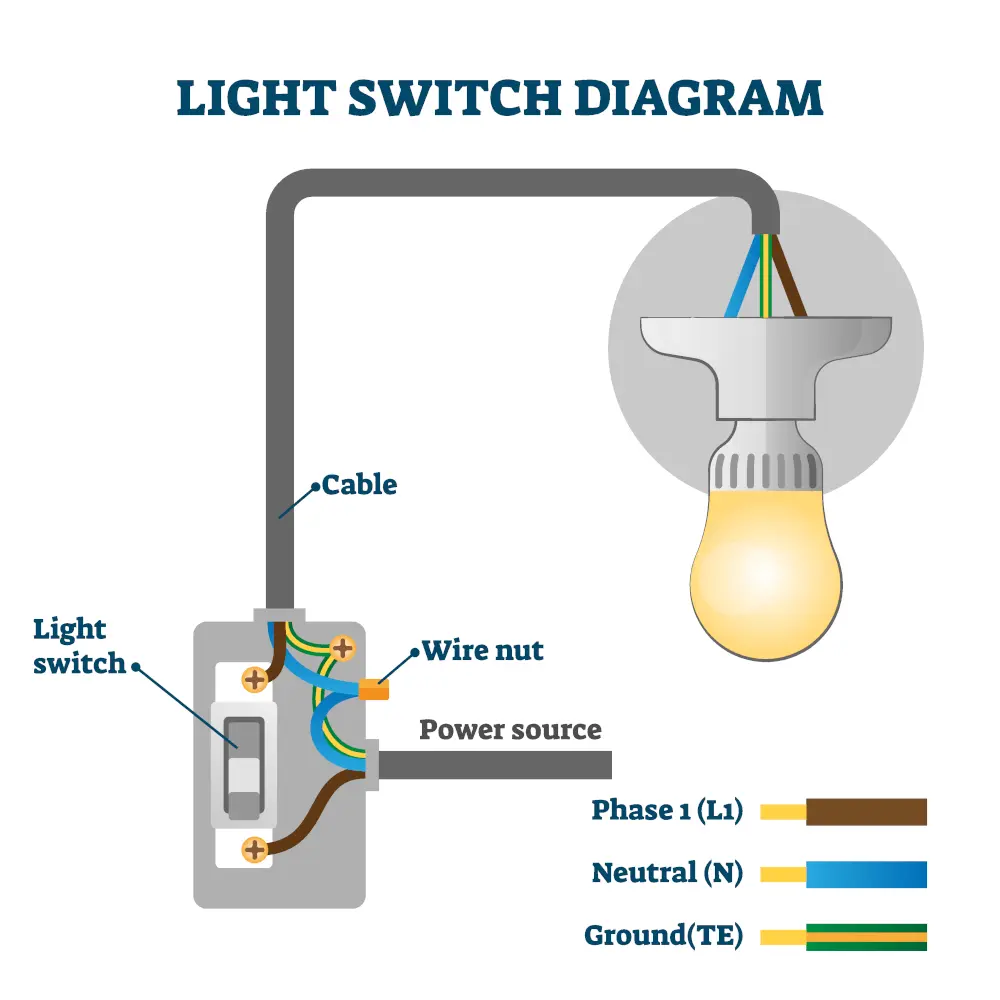
Connecting the new switch is a key step in wiring a single light switch. You must handle each wire carefully. Proper connections ensure the switch works safely and correctly. Follow these steps to connect the wires to the new switch.
Attach Live Wire
The live wire carries electricity to the switch. Usually, it is black or red. Find the live wire in the switch box. Loosen the terminal screw on the switch. Wrap the live wire around the screw clockwise. Tighten the screw firmly to hold the wire.
Attach Load Wire
The load wire sends power to the light. It is often black or red, too. Locate the load wire in the box. Connect it to the second terminal on the switch. Wrap the wire around the screw. Tighten the screw to secure the wire tightly.
Secure Ground Wire
The ground wire protects from electrical shocks. It is usually green or bare copper. Attach the ground wire to the green ground screw on the switch. Wrap the wire around the screw in a clockwise direction. Tighten the screw to keep the wire in place.
Mount The Switch And Test
After wiring the single light switch, it is time to mount and test it. This step ensures the switch is secure and works properly. Proper mounting prevents loose connections and accidents. Testing confirms the switch controls the light as expected. Follow clear steps to finish the installation safely and effectively.
Fixing The Switch In Place
Start by pushing the switch gently into the electrical box. Align the screw holes on the switch with those on the box. Use a screwdriver to tighten the screws firmly. Avoid over-tightening to prevent cracking the switch or box. The switch should sit flush with the wall. Check that it does not wiggle or move.
Restore Power And Test Function
Turn the power back on at the circuit breaker. Flip the switch to see if the light turns on. Test the switch a few times to ensure smooth operation. If the light does not work, turn off the power and check connections. Make sure wires are tight and connected correctly. A working switch means the job is complete and safe.
Troubleshooting Common Issues
Troubleshooting common issues with a single light switch can save time and effort. Problems like a switch not working or flickering lights are often easy to fix. Understanding the cause helps you solve the problem quickly. This section covers common issues and simple solutions to get your switch working again.
Switch Not Working
A switch that does not turn on the light may have a wiring problem. Check if the power is off before inspecting the wires. Make sure the wires are connected to the right terminals. Sometimes, the switch itself can be faulty and needs replacement.
Flickering Lights
Flickering lights often mean a loose or poor connection. Look for loose wires behind the switch or in the light fixture. A weak bulb or incompatible dimmer switch can also cause flickering. Replace bulbs with the correct wattage to fix this.
Loose Connections
Loose connections can cause the switch to work erratically or not at all. Turn off the power before tightening any screws or wire nuts. Ensure all wires are secure and not damaged. Proper connections keep the switch safe and functional.
Credit: futurehousestore.co.uk
Frequently Asked Questions
How Do I Connect A Single Light Switch Safely?
Turn off power at the breaker before starting. Use a voltage tester to ensure no electricity flows. Connect the live (hot) wire to the switch’s terminal. Attach the load wire to the other terminal. Finally, connect the ground wire to the switch’s grounding screw.
What Tools Are Needed To Wire A Single Light Switch?
You need a screwdriver, wire stripper, voltage tester, and electrical tape. A pair of needle-nose pliers helps with wire bending. Always use insulated tools for safety. These tools ensure proper connection and safety when wiring a light switch.
Can I Replace A Single Switch With A Dimmer Switch?
Yes, a dimmer switch can replace a single-pole switch. Ensure the dimmer matches your light bulb type (LED, incandescent). Turn off power before installation. Follow wiring instructions specific to the dimmer for safe and effective operation.
What Wire Colors Are Used In Single Light Switch Wiring?
Typically, black or red wires are hot (live). White wires are neutral, usually not connected to the switch. Green or bare wires are ground. Correctly identifying wires ensures safe and proper switch installation.
Conclusion
Connecting a single light switch is simple with clear steps. Turn off power first to stay safe. Identify wires correctly before making any connections. Use tools carefully and follow instructions closely. Test the switch after wiring to ensure it works.
This basic skill helps you manage home lighting easily. Practice makes the process quicker and less confusing. Keep safety in mind for every electrical task. You can handle this project with patience and care.