Have you ever wished you could control your lights from two different switches? Maybe you want to turn the hallway light on when you enter, and off when you leave, without walking back to the first switch.
Adding another light switch to your existing one can make life easier and more convenient. If you’re wondering how to do it yourself without calling an electrician, you’re in the right place. This guide will walk you through simple steps to add a second switch safely and effectively.
Keep reading, and soon you’ll have full control of your lighting exactly where you want it.
Tools And Materials Needed
Adding another light switch to your existing switch needs the right tools and materials. Using proper items makes the job safer and easier. This section lists what you must have before starting the project.
Essential Tools
- Screwdriver set (flathead and Phillips)
- Wire stripper
- Voltage tester
- Needle-nose pliers
- Drill with bits
- Electrical tape
- Measuring tape
- Level
- Utility knife
Required Materials
- New light switch (single-pole or three-way)
- Electrical cables (14/2 or 12/2 gauge)
- Wire nuts
- Switch box (old work or new work)
- Wall plate cover
- Wire connectors
- Grounding wire
Safety Precautions
Working with electrical switches can be risky. Safety must be the top priority. Taking the right steps prevents accidents and injuries. Follow these safety precautions carefully before adding another light switch.
Power Shutoff
Turn off the power at the circuit breaker. This stops electricity from flowing to the switch. Never rely on the switch itself to cut power. Use a breaker lock or tape it to avoid accidental turning on. Double-check that the power is off before starting work.
Using A Voltage Tester
Use a voltage tester to check for live wires. Test all wires in the switch box. The tester shows if electricity is still present. Always test the tester on a known live wire first. This ensures it works correctly. Only proceed when the tester shows no voltage.
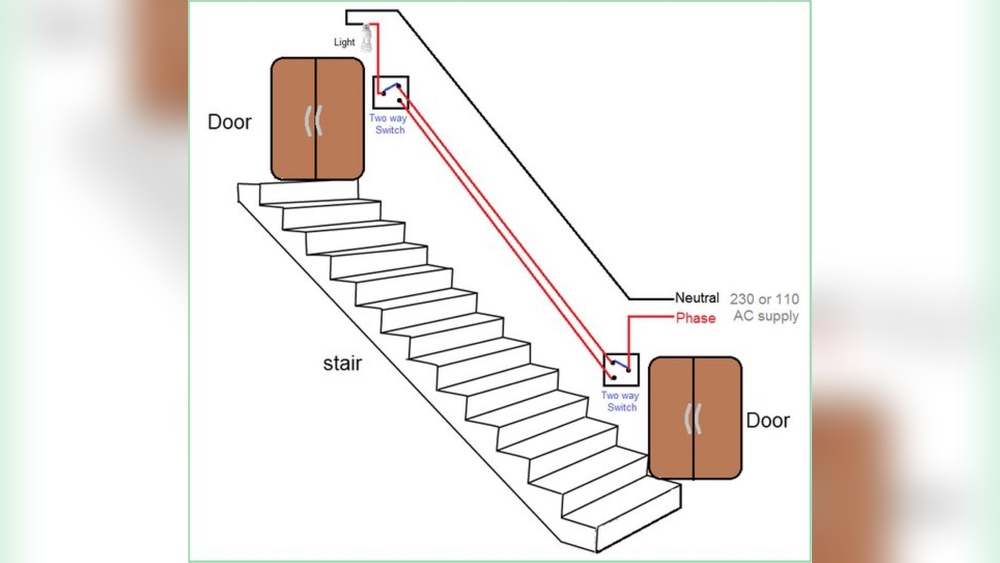
Planning Your Wiring
Planning your wiring is the first step to add another light switch to an existing one. It helps avoid mistakes and ensures safety. Take time to understand the current setup before starting. Knowing what type of switch you have and where wires run saves time and trouble.
Identifying Switch Type
First, check what kind of switch you have. It can be a single-pole, three-way, or four-way switch. Single-pole switches control one light from one place. Three-way switches control one light from two places. Knowing this is important because wiring differs for each type.
Look at the switch and wires carefully. Usually, single-pole switches have two screws plus a ground screw. Three-way switches have three screws plus a ground screw. Use a voltage tester to be safe before touching wires.
Locating Wiring Path
Next, find where the wires run inside the walls. The wires connect the switch to the light and power source. Use a stud finder or wire detector to track wires behind the wall. This helps avoid drilling into wires and damaging them.
Trace the wires from the existing switch box. Note where the cables enter and exit the box. This shows how the current wiring is set up. Knowing the path helps plan where to run new cables for the additional switch.

Credit: diy.stackexchange.com
Removing The Existing Switch
Removing the existing switch is the first step to adding another light switch. This process must be done carefully to keep you safe. It involves two key tasks. First, turning off the power to the switch. Second, unscrewing the switch from the wall. Follow these steps to prepare the switch for wiring a new one.
Turning Off Power
Safety comes first. Locate your home’s circuit breaker panel. Find the breaker that controls the switch you want to remove. Flip the breaker to the “off” position. Use a voltage tester to check the switch. Make sure no electricity flows to it. This step prevents electric shocks during removal.
Unscrewing The Switch
Remove the switch cover plate by unscrewing its screws. Keep the screws safe for later use. Next, unscrew the switch from the electrical box. Gently pull the switch out from the wall. Do not touch the wires yet. Take a clear photo of the wiring before disconnecting anything. This helps you remember the wiring setup.
Wiring The New Switch
Wiring the new switch is an important step in adding a light switch. It connects the new switch to the existing electrical circuit. This part needs care and attention to ensure safety and proper function. Follow each step carefully for a successful installation.
Connecting Wires
Start by identifying the wires in the existing switch box. Usually, you will find a hot wire, a neutral wire, and a ground wire. Use a voltage tester to make sure the power is off. Connect the new switch wires to the matching wires in the box. Attach the hot wire to the switch’s input terminal. Connect the new wire from the switch’s output terminal to the light fixture wire. Always connect the ground wire to the green or bare copper wire.
Using Wire Nuts
Wire nuts join wires securely and safely. Twist the ends of the wires together tightly before placing the wire nut. Turn the wire nut clockwise until it feels firm. Tug lightly on the wires to check if they are secure. Cover any exposed copper wire with electrical tape for added safety. Proper wire nut use prevents loose connections and electrical shorts.
Securing The Switch
Once the wires are connected and covered, place the switch into the electrical box. Align the screw holes and fasten the switch with screws. Do not overtighten, or you may damage the switch. Attach the switch cover plate to finish the installation. Restore power and test the new switch for proper operation.

Credit: www.do-it-yourself-help.com
Testing Your Work
Testing your work is an important step after installing a new light switch. It helps you make sure everything works safely and correctly. This step prevents future problems and keeps your home safe. Follow the steps below to check your installation carefully.
Restoring Power
First, go to your circuit breaker panel. Turn the switch back on to restore power to the light switch. Listen for any unusual sounds or smells near the switch. These can signal a wiring problem. If you notice anything strange, turn off the power immediately. Safety comes first.
Checking Switch Operation
Next, test the new switch by flipping it on and off. Watch the light to see if it responds correctly. Both the original and new switches should control the light. Test each switch several times to confirm reliable operation. If the light does not work properly, recheck your wiring and connections.
Troubleshooting Common Issues
Troubleshooting common issues helps fix problems quickly. Adding a new light switch can cause simple errors. Knowing how to spot and solve these saves time and frustration. Here are two frequent problems and ways to handle them.
Switch Not Working
First, check if the circuit breaker is on. A tripped breaker stops power flow to the switch. Next, ensure all wires connect tightly to the switch terminals. Loose wires cause the switch to fail. Use a voltage tester to confirm power reaches the switch. If no power is present, the issue may be in the wiring or breaker.
Also, verify the switch itself is not defective. Swap it with a new one to test. Sometimes, the problem lies in the switch, not the wiring. Safety first: always turn off the breaker before working on wires.
Flickering Lights
Flickering lights often mean a loose connection. Check all wire connections at the switch and light fixture. Tighten any loose wires carefully. Another cause could be a poor-quality switch. Replace it with a reliable one to see if flickering stops. Sometimes, flickering happens due to incompatible bulbs. Use the right bulbs for your fixture type and wattage limit.
Lastly, electrical interference or voltage drops can cause flickering. If problems continue, consult a professional electrician. Avoid risks with electrical work beyond your skill level.

Credit: www.do-it-yourself-help.com
Tips For A Clean Installation
Keeping your work neat makes adding a new light switch easier and safer. A clean installation helps avoid confusion and future problems. It also saves time when fixing or changing wiring later.
Organizing Wires
Start by separating wires by type and function. Group wires together using cable ties or twist-on wire connectors. Avoid leaving wires tangled or crossing each other. Trim any extra wire length to reduce clutter. Use wire caps to cover exposed ends and prevent shorts.
Labeling Switches
Mark each switch clearly to identify its purpose. Use a label maker or write on tape with a permanent marker. Label both the switch and the corresponding wires. This helps anyone working on the system understand which switch controls what. Clear labels reduce mistakes and improve safety.
Frequently Asked Questions
How Do I Add A New Light Switch To An Existing One?
Turn off the power at the breaker. Run new wiring from the existing switch box. Connect the wires to the new switch following wiring codes. Secure switches and restore power. Test both switches to ensure they work correctly.
What Tools Are Needed To Add Another Switch?
You will need a voltage tester, wire stripper, screwdriver, electrical tape, wire nuts, and a drill. Also, have new electrical wire and a compatible light switch ready. Safety gear like gloves and goggles is recommended for protection.
Can I Add A Switch Without Rewiring The Whole Circuit?
Yes, you can add a switch by tapping into the existing wiring. Use a junction box and proper connectors to extend wires safely. Always follow electrical codes and ensure the power is off before working.
Is It Safe To Add A Light Switch Myself?
Yes, if you understand electrical basics and follow safety guidelines. Always turn off power before starting. Use proper tools and materials. When in doubt, consult a licensed electrician to avoid hazards.
Conclusion
Adding another light switch is a useful and simple upgrade. It lets you control lights from two places easily. Follow safety steps and check your wiring carefully. Take your time and double-check your work. This project saves you time and adds convenience at home.
With patience, anyone can do it safely and well. Give it a try and enjoy better light control today.