Are you ready to transform your outdoor space with a strong, stylish retaining wall? Installing an anchor block retaining wall might sound tricky, but with the right steps, you can do it yourself and save money.
Imagine having a solid wall that not only holds back soil but also adds charm to your garden or yard. In this guide, you’ll discover simple, clear instructions that make the process easy to follow. Keep reading, and by the end, you’ll have everything you need to build a durable retaining wall that stands the test of time.
Your perfect outdoor upgrade is just a few steps away.
Choosing Materials
Preparing the site is the first step to install an anchor block retaining wall. This stage sets the foundation for a strong and stable wall. Proper preparation helps avoid future problems like shifting or cracking.
Start by clearing the area. Remove plants, rocks, and debris. A clean site makes the next steps easier and more accurate. Take your time to prepare well.
Marking The Wall Layout
Use stakes and string to mark the wall’s shape. Measure carefully to get the right length and curve. Double-check the lines before digging. Clear lines guide you through the whole project.
Excavating The Trench
Dig a trench along the marked line. The trench needs to be deep and wide enough for the base and blocks. Remove loose soil and roots. A solid trench keeps the wall steady.
Leveling The Base
Add gravel to the trench bottom. Spread it evenly and compact it well. Check the level with a spirit level. A flat and firm base is key for wall stability.

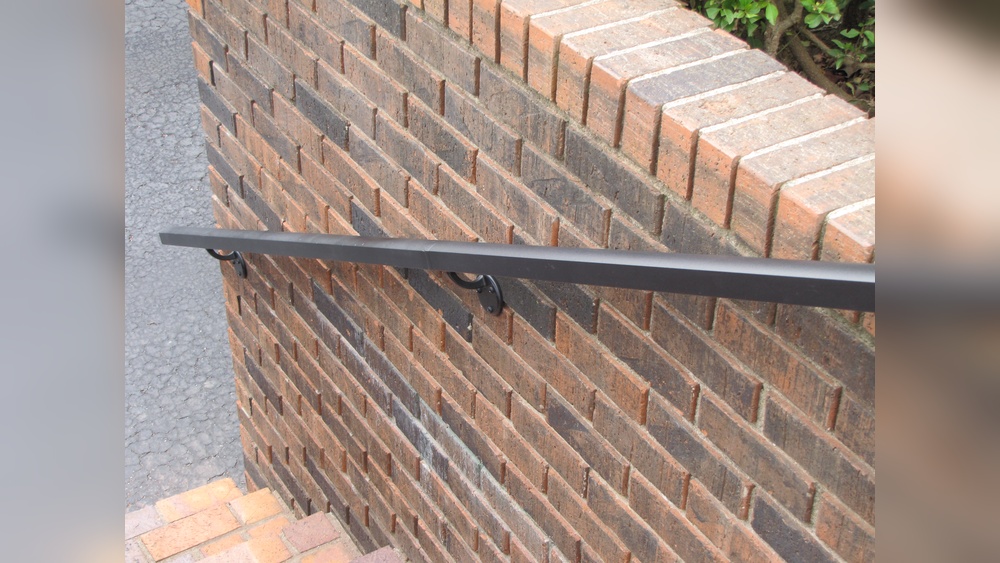
Credit: pristinelandscapingandlighting.com
Preparing The Site
Building a strong base is the first step in installing an anchor block retaining wall. A solid base helps keep the wall stable and prevents it from shifting. It supports the weight of the wall and improves drainage to avoid water damage. The process includes adding gravel and sand, compacting the base, and checking for level. Each step is important for a durable and lasting wall.
Adding Gravel And Sand
Start by digging a trench for the base. The trench should be deep enough to hold the anchor blocks. Fill the trench with a layer of gravel. Gravel helps water drain away from the wall and keeps the base firm. On top of the gravel, add a layer of sand. Sand creates a smooth surface for the blocks to sit on. Make sure the layers are even and spread out properly.
Compacting The Base
Use a tamper or plate compactor to press down the gravel and sand layers. Compacting removes air pockets and makes the base firm. A firm base stops the wall from sinking or moving over time. Press the layers evenly to avoid uneven settling. Repeat compaction until the base feels solid under your feet.
Checking For Level
Use a level tool to check if the base is flat. The base must be perfectly level to keep the wall straight. Check the level in several spots across the trench. If you find low or high spots, add or remove sand to fix them. Take your time to make sure the base is even before placing the blocks.
Building The Base
Placing the first course is the foundation of your anchor block retaining wall. It sets the tone for the entire structure. Accuracy at this stage is critical for stability and appearance. Take time to prepare the base well before laying the blocks. A solid, level base helps prevent shifting later. Follow the steps carefully to ensure a strong start.
Positioning Anchor Blocks
Start by marking the wall’s layout on the ground. Place the first anchor block at the corner or end point. Check that the block sits flat on the base. Adjust the soil or gravel underneath to keep it level. Use a level tool to confirm the block’s evenness. Proper positioning prevents future movement and keeps the wall straight.
Aligning Wall Blocks
Lay the next blocks next to the anchor block. Align their front faces in a straight line. Use a string line to guide the alignment. Keep small gaps between blocks for drainage and settling. Check each block with a level for height and tilt. Consistent alignment creates a neat, professional look.
Securing The First Layer
Secure the first course by pressing the blocks into place. Tap gently with a rubber mallet to settle them. Fill gaps between blocks with gravel or sand for stability. Avoid shifting blocks after placement. The first layer must hold firm as the base for all others. Take your time to get it right.
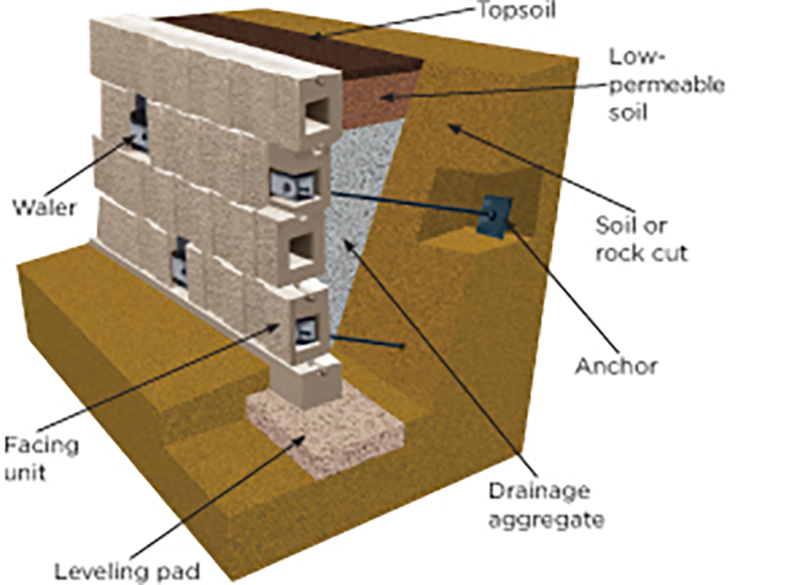
Credit: anchordiamond.com
Placing The First Course
Stacking additional layers on your anchor block retaining wall builds strength and height. Each new layer must align perfectly with the one below. Proper techniques improve stability and wall durability. Attention to detail ensures your wall stands firm for years.
Applying Adhesive
Use a quality adhesive designed for retaining blocks. Apply a thin, even layer on the top of the lower block. This holds the new block firmly in place. Adhesive prevents shifting and keeps the wall stable during pressure changes. Avoid using too much glue to maintain clean joints.
Staggering Blocks
Place each new block so its joints do not line up with the blocks below. This pattern, called staggering, adds strength. It distributes weight evenly across the wall. Staggered blocks create a stronger bond and reduce cracks. Always check alignment before setting each block.
Incorporating Drainage
Drainage prevents water buildup behind the wall, which can cause damage. Leave small gaps between some blocks to allow water flow. Add gravel or drainage pipe behind the wall layers. Proper drainage reduces pressure on the wall and extends its life. Always plan drainage paths during stacking.
Stacking Additional Layers
Installing drainage is a key step in building an anchor block retaining wall. Proper drainage prevents water buildup behind the wall. This helps keep the wall stable and stops damage from water pressure. Drainage also reduces soil erosion and extends the wall’s life.
Adding Drain Pipes
Start by placing a perforated drain pipe at the base of the wall. The pipe collects water that seeps through the soil. Lay it on a layer of gravel to improve water flow. Cover the pipe with more gravel to keep soil out. Make sure the pipe slopes slightly away from the wall. This helps water move out naturally.
Backfilling With Gravel
Use clean, coarse gravel for backfilling behind the wall. Gravel allows water to flow easily and prevents soil clogging the drain pipe. Fill the space behind the wall with gravel up to about one foot below the top. Compact the gravel gently to avoid settling later. Avoid using clay or fine soil as backfill material.
Ensuring Proper Water Flow
Check that water flows freely through the gravel and into the drain pipe. The pipe should lead to a safe drainage area, like a storm drain or dry well. Avoid blocking the pipe outlet with debris or soil. Proper flow stops water from pooling behind the wall. This keeps the wall strong and long-lasting.
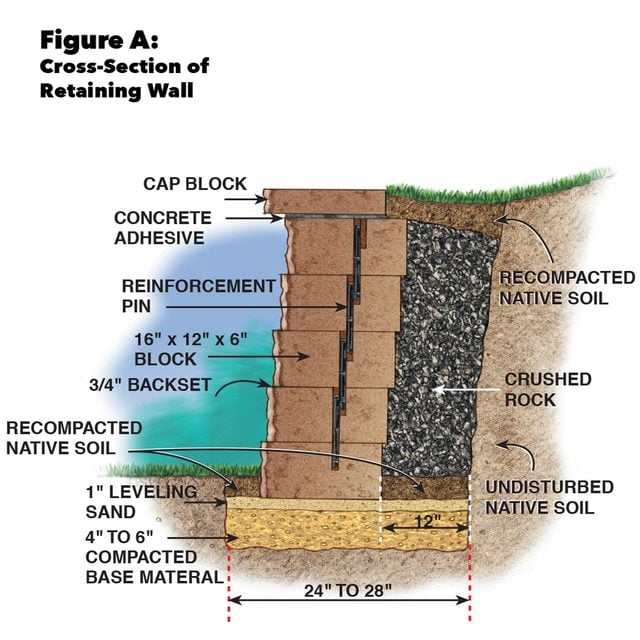
Credit: www.familyhandyman.com
Frequently Asked Questions
What Tools Are Needed To Install An Anchor Block Retaining Wall?
You need a shovel, level, tamper, masonry saw, drill, and anchor bolts. These tools ensure accurate placement and secure installation of the retaining wall blocks.
How Deep Should The Base Trench Be For The Wall?
The base trench should be at least 6 to 8 inches deep. This depth provides a stable foundation and proper drainage for the retaining wall.
Can I Install An Anchor Block Wall On A Slope?
Yes, anchor block walls are ideal for slopes. They provide strong support and prevent soil erosion when installed correctly.
How Long Does It Take To Install The Retaining Wall?
Installation typically takes one to three days. Time varies based on wall size, site conditions, and DIY or professional help.
Conclusion
Installing an anchor block retaining wall takes careful steps and patience. Follow each step closely to build a strong, lasting wall. Use the right tools and materials for best results. Check your work often to avoid mistakes. With proper care, your wall will stay stable for years.
Enjoy the extra space and protection it provides. Taking time to do it right makes all the difference. This project can improve your outdoor area easily. Keep safety in mind throughout the process. You now have the basics to start building confidently.