Are you ready to turn your living room into a personal theater? Hooking up an Apple TV to a wall projector is easier than you think.
Imagine watching your favorite movies and shows on a big, clear screen right at home. This guide will walk you through every step, making sure you get it right the first time. Whether you’re new to this or just need a quick refresher, by the end, you’ll have your setup working perfectly.
Let’s dive in and make your viewing experience unforgettable!
Choosing The Right Projector
Choosing the right projector is key for a great Apple TV experience. The projector must match your room size and lighting. It should support Apple TV features for clear and bright images. Knowing the basic projector types helps pick the best one. Brightness and resolution affect the picture quality. Connectivity options ensure smooth connection with Apple TV. Let’s explore what matters most when choosing a projector.
Projector Types For Apple Tv
There are three main projector types: LCD, DLP, and LCoS. LCD projectors offer good colors and are cost-friendly. DLP projectors provide sharp images and smooth motion. LCoS projectors combine the best of LCD and DLP for high quality. Each type works well with Apple TV. Choose based on your budget and picture preference.
Resolution And Brightness Considerations
Resolution defines the image sharpness. A projector with at least 1080p resolution fits Apple TV well. Higher resolutions like 4K give better detail for movies and shows. Brightness is measured in lumens. Rooms with some light need projectors with 2000 lumens or more. Dark rooms allow projectors with lower brightness. Pick a projector with good balance of resolution and brightness.
Connectivity Options
Apple TV connects via HDMI. The projector must have an HDMI input port. Some projectors offer multiple HDMI ports for extra devices. Wireless options like AirPlay can also work but need compatible projectors. Check if the projector supports audio output for speakers. Reliable connectivity ensures smooth streaming and good sound.
Selecting The Ideal Wall
Selecting the ideal wall for your Apple TV wall projector is crucial. The right wall ensures clear images and great viewing experience. It affects brightness, sharpness, and overall picture quality. Consider several factors before making a choice. This section helps you find the perfect wall.
Screen Size And Viewing Distance
Measure your room size and seating distance first. The screen size depends on how far you sit from the wall. A bigger screen works well if you sit farther away. For small rooms, choose a smaller screen to avoid eye strain. Match the screen size with your room for comfort.
Wall Surface Preparation
Choose a smooth, flat wall for the best image. Rough or textured walls distort the picture. Clean the wall to remove dust and dirt. Paint the wall with matte white or light gray paint. Avoid shiny or glossy paint to reduce glare. Proper preparation improves color and clarity.
Ambient Light Control
Control the light in the room to enhance picture quality. Bright light washes out the image from the projector. Use blackout curtains or blinds to block sunlight. Turn off or dim lamps near the wall. A darker room helps the projector display sharper and vivid images.
Mounting The Projector
Mounting the projector correctly is key to a clear and stable image. It also keeps your setup neat and safe. The right position avoids shadows and glare on your screen. This guide helps you place and adjust your Apple TV wall projector for the best view.
Projector Placement Tips
Place the projector at the right height and distance from the wall. Check the projector’s manual for the ideal throw distance. Avoid placing it too close or too far from the wall. Keep the projector away from direct sunlight or bright lights. These can wash out the picture. Make sure the projector’s lens is aligned with the center of the screen.
Using Wall Mounts And Brackets
Choose a strong wall mount designed for your projector’s weight. Use a stud finder to locate solid mounting points in the wall. Secure the mount firmly with screws and anchors. Attach the projector to the mount carefully. Ensure it is stable and won’t wobble. Cable management helps keep wires neat and prevents damage.
Adjusting For Keystone And Focus
Turn on the projector and display a test image. Use the keystone correction to fix any trapezoid distortion. Adjust the focus ring until the image is sharp and clear. Small changes can make a big difference. Keep checking from your usual viewing spot. Make sure the picture looks good from there.

Credit: www.youtube.com
Connecting Apple Tv To The Projector
Connecting Apple TV to a wall projector allows you to enjoy movies, shows, and apps on a big screen. The process is simple and requires a few key steps. Follow these instructions to set up your Apple TV with your projector for a smooth viewing experience.
Hdmi Cable Setup
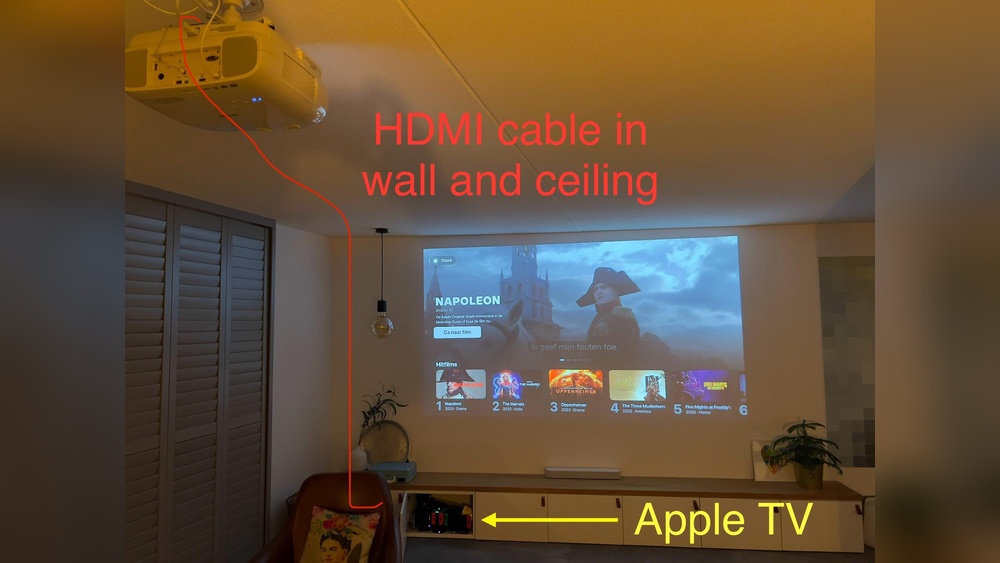
Use an HDMI cable to link your Apple TV to the projector. Plug one end into the Apple TV’s HDMI port. Connect the other end to the HDMI input on the projector. Make sure the cable is securely attached on both ends. This cable carries both video and audio signals clearly.
Using Adapters And Converters
Some projectors lack HDMI ports. In that case, use an adapter or converter. For example, if your projector has a VGA input, get an HDMI to VGA adapter. Connect the Apple TV to the adapter, then link the adapter to the projector. Check the adapter’s power needs and provide power if required. This setup ensures compatibility between devices.
Power Supply And Cable Management
Plug your Apple TV into a power outlet using its power cable. Also, connect the projector to power. Arrange cables neatly to avoid tangling or tripping hazards. Use cable ties or clips to keep wires organized. Proper cable management improves safety and keeps your setup tidy.
Optimizing Audio Setup
Optimizing the audio setup is key for the best Apple TV wall projector experience. Good sound improves movies, shows, and games. Choose the right audio option to match your space and needs. Let’s explore how to get clear, rich sound from your setup.
Built-in Projector Speakers Vs External Audio
Built-in projector speakers are simple and easy to use. They work well in small rooms or quiet spaces. Sound quality is often basic and lacks deep bass. External audio systems give richer, louder sound. They fill bigger rooms with clear audio. Using external speakers boosts your viewing experience dramatically.
Connecting Sound Systems
Most projectors have audio output ports for external speakers. Use HDMI ARC or optical audio cables for best sound. Connect your soundbar, home theater, or stereo system to the projector. Adjust volume and settings on the sound system for clear sound. This setup gives more control over sound quality and power.
Wireless Audio Options
Wireless speakers connect easily to Apple TV or your projector. Bluetooth and Wi-Fi are common ways to link devices. Wireless audio removes cable clutter and lets you place speakers freely. Make sure your speaker supports your Apple TV model. Wireless sound can be very convenient and flexible.

Credit: www.reddit.com
Configuring Apple Tv Settings
Configuring your Apple TV settings is key to a great viewing experience. Proper setup helps the projector show clear pictures and play good sound. Adjusting network and streaming options ensures smooth video playback. Follow these simple steps to optimize your Apple TV for a wall projector.
Display Resolution And Aspect Ratio
Set the display resolution to match your projector’s native resolution. This gives the sharpest image without stretching or blurring. Choose the correct aspect ratio, usually 16:9, for widescreen content. Avoid using unsupported resolutions to prevent screen issues. Check settings under “Video and Audio” to find these options.
Audio Output Settings
Select the right audio output to match your projector or speakers. Use HDMI audio output for the best sound quality. Adjust volume and sound format to avoid distortion. Enable Dolby Digital or Surround Sound if your system supports it. These settings are in the “Audio and Video” menu.
Network And Streaming Preferences
Connect your Apple TV to a strong Wi-Fi or Ethernet network. A stable connection reduces buffering and playback problems. Set streaming quality to automatic or adjust it based on your internet speed. Turn on subtitles or closed captions if needed. These preferences help deliver a smooth and clear streaming experience.
Troubleshooting Common Issues
Setting up your Apple TV with a wall projector can sometimes lead to small problems. These issues can stop your device from working well. Knowing how to fix common problems helps keep your movies and shows playing smoothly. This section covers quick fixes for usual troubles.
No Signal From Apple Tv
Check all cable connections. Loose or damaged cables cause no signal issues. Use the right HDMI port on the projector. Make sure the Apple TV is powered on. Restart the Apple TV and projector. Try a different HDMI cable if the problem stays. Select the correct input source on the projector menu.
Audio Sync Problems
Audio and video not matching can spoil your watching experience. Restart the Apple TV and projector. Check audio settings on Apple TV for sync options. Lower audio delay in projector settings if available. Use an external speaker system with sync controls if needed. Keep software updated on both devices to avoid bugs.
Image Quality Adjustments
Image might look blurry or too dark. Adjust projector focus and zoom settings carefully. Change brightness and contrast on your projector menu. Choose the right resolution in Apple TV settings. Clean the projector lens for clearer images. Avoid bright light in the room for better viewing. Position the projector at the correct distance from the wall.

Credit: www.youtube.com
Maintenance And Care
Keeping your Apple TV wall projector in good shape helps it last longer. Regular care improves picture quality and device performance. Small steps prevent big problems later.
Cleaning The Projector Lens
Dust and fingerprints blur the image. Use a soft, dry cloth to wipe the lens gently. Avoid using liquids or harsh chemicals. Clean the lens regularly to keep the picture sharp.
Updating Firmware
Firmware updates fix bugs and add features. Connect the projector to Wi-Fi for updates. Check for updates in the settings menu often. Keeping firmware current helps the device run smoothly.
Storage Tips
Store the projector in a cool, dry place. Avoid direct sunlight and high humidity areas. Use a protective cover to keep dust off. Proper storage stops damage and extends device life.
Frequently Asked Questions
How Do I Connect Apple Tv To A Wall Projector?
Use an HDMI cable to connect Apple TV’s HDMI port to the projector’s HDMI input. Ensure both devices are powered on and set to the correct input source.
What Cables Are Needed For Apple Tv Wall Projector Setup?
You need an HDMI cable for video and audio. Optionally, use a power extension cord for flexible Apple TV placement near the projector.
Can I Use Wireless Airplay With A Wall Projector?
Yes, if your projector supports AirPlay or is connected to an Apple TV. This allows wireless streaming without HDMI cables.
How To Power Apple Tv When Mounted Near A Projector?
Use a nearby power outlet or an extension cord. Ensure the power source is stable to avoid interruptions during playback.
Conclusion
Hooking up an Apple TV to a wall projector is simple and quick. Just follow the steps carefully for the best results. Make sure all cables fit tightly and the devices are powered on. Adjust the projector settings for a clear picture.
Enjoy your favorite shows and movies on a big screen. This setup brings home entertainment to a new level. Stay patient and check connections if you face issues. Watching content this way makes any room feel like a theater. Give it a try and see the difference yourself.