Are you ready to transform your space with beautiful wood paneling but unsure how to attach it securely to your plaster walls? You’re not alone.
Plaster walls can be tricky to work with, and getting the paneling to stay put without damage takes the right approach. In this guide, you’ll discover simple, step-by-step techniques to anchor wood paneling safely and effectively. By the end, you’ll feel confident tackling your project and creating a stunning, lasting finish that enhances your home’s character.
Keep reading—you’re just moments away from mastering this essential skill.
Tools And Materials Needed
Anchoring wood paneling to plaster walls requires the right tools and materials. This ensures a secure fit and a smooth finish. Having everything ready before starting saves time and effort. Below are the key items needed for the job.
Essential Tools
- Drill with various drill bits
- Screwdriver or power driver
- Stud finder to locate wall studs
- Level to keep panels straight
- Measuring tape for accurate cuts
- Hammer for tapping nails or anchors
- Utility knife for trimming panel edges
- Pencil for marking measurements
Recommended Fasteners
- Masonry screws for plaster and lath walls
- Panel nails for attaching wood panels
- Plastic wall anchors to secure screws
- Construction adhesive for extra hold
- Wood screws for fastening panels to studs
Preparation Supplies
- Drop cloth to protect floors and furniture
- Sandpaper to smooth rough plaster areas
- Cleaning cloth to remove dust from walls
- Putty knife for patching holes or cracks
- Wood filler to repair panel imperfections
- Masking tape to hold panels temporarily
Preparing The Plaster Wall
Preparing the plaster wall is the first step to anchoring wood paneling securely. It ensures the paneling holds well and lasts a long time. Taking time to prepare the surface helps avoid problems later.
Cleaning The Surface
Start by removing dust and dirt from the plaster wall. Use a soft brush or vacuum to clear loose debris. Wipe the wall with a damp cloth to remove grease or stains. A clean surface helps anchors stick better and prevents damage.
Checking For Damage
Examine the plaster for cracks, holes, or loose spots. Small cracks can weaken the hold of anchors. Repair any damage with plaster patch or filler. Let the repairs dry completely before moving on. Solid walls make strong support for wood paneling.
Marking Anchor Points
Measure and mark where you will place the anchors. Use a pencil to make small marks on the wall. Space the marks evenly for balanced support. Check that marks align with the wood paneling studs or framing. Proper anchor placement avoids shifting or falling panels.
Choosing The Right Anchors
Choosing the right anchors is key to a strong wood paneling installation on plaster walls. Plaster walls can be brittle and may crack under stress. The right anchors hold the panels securely without damaging the wall. This section explains how to pick anchors that fit your wall and panel needs.
Types Of Wall Anchors
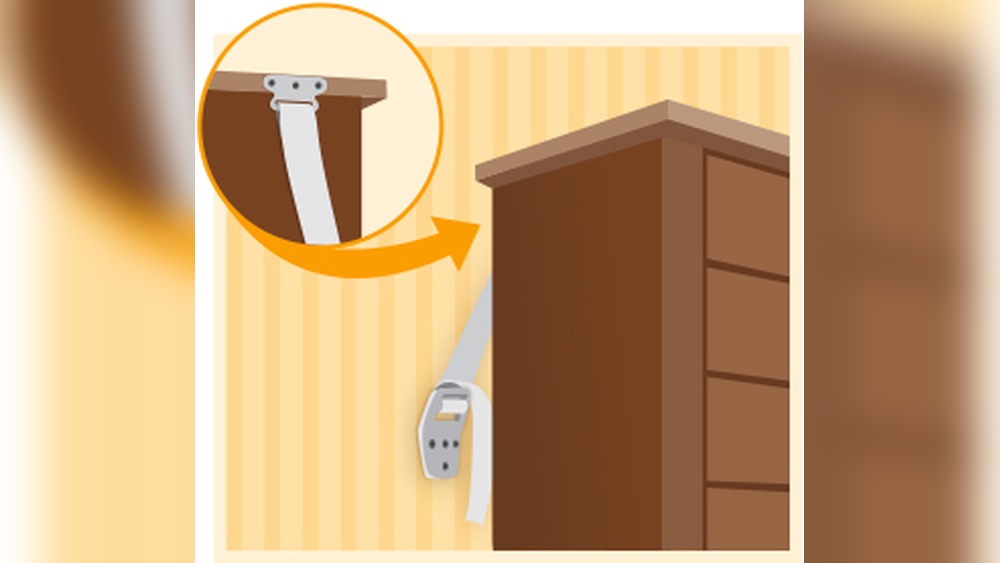
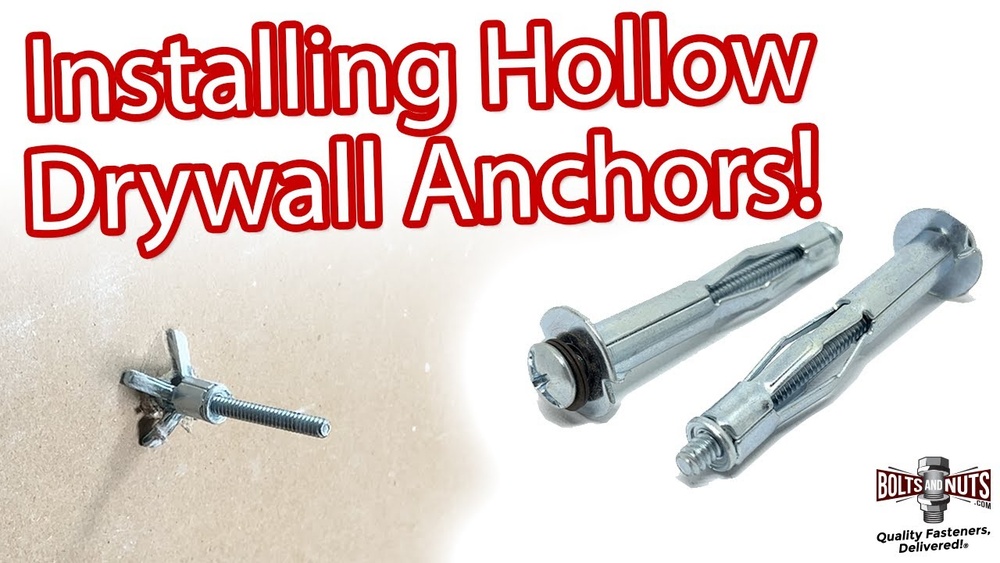
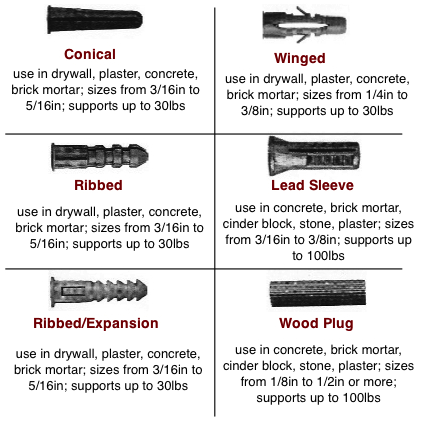
Several wall anchors work well with plaster walls. Plastic expansion anchors expand inside the hole to grip the plaster. Metal hollow wall anchors spread out behind the wall for strong support. Toggle bolts have wings that open behind the wall for heavy loads. Choose anchors based on how much weight your paneling will carry.
Anchor Strength And Load Capacity
Each anchor has a weight limit called load capacity. Use anchors that can hold more than the weight of your wood panels. Weak anchors may pull out or cause damage. Check the package or product description for the load capacity. Strong anchors keep paneling safe and stable over time.
Matching Anchors To Wall Conditions
Not all plaster walls are the same. Some have lath or metal mesh behind them. Others are thick or thin. Test your wall by drilling a small hole first. Select anchors made for your wall type. For thin plaster, use lightweight anchors. For thicker plaster with lath, toggle bolts work better.
Credit: www.do-it-yourself-help.com
Drilling And Installing Anchors
Drilling and installing anchors in plaster walls requires care and the right tools. Plaster can crack or crumble if not handled properly. This section guides you through the best way to drill holes and secure anchors for wood paneling.
Selecting Drill Bits
Choose drill bits designed for masonry or plaster. These bits have a special tip to break through hard surfaces. Avoid using wood or metal bits, as they can damage plaster. Pick a bit size that matches the anchor size for a tight fit.
Drilling Techniques For Plaster
Start drilling slowly to avoid cracking the plaster. Use a low speed and steady pressure. Drill straight into the wall, not at an angle. Clear dust from the hole often to keep the drill bit cool and clean. Stop drilling as soon as you reach the backing material behind the plaster.
Installing Anchors Safely
Insert anchors gently into the drilled holes. Tap them lightly with a hammer if needed. Do not force anchors to avoid wall damage. Use anchors that fit well to hold the wood paneling firmly. Tighten screws slowly to prevent cracking the plaster around the hole.
Mounting The Wood Paneling
Mounting wood paneling on plaster walls requires care and precision. Proper mounting ensures the panels stay secure and look great for years. This process involves aligning the panels correctly, securing them to anchors, and checking their stability.
Aligning Panels
Start by placing the first panel at the corner or edge of the wall. Make sure it is straight and level using a spirit level. Align each panel tightly against the previous one. Avoid gaps between panels for a smooth finish. Take your time to keep all panels even.
Securing Panels To Anchors
Use wall anchors to hold the panels firmly on plaster walls. Drill pilot holes through the panel into the plaster wall anchors. Insert screws through the panel into the anchors carefully. Do not overtighten screws to avoid damaging the plaster or panel. Secure each panel at multiple points for strong support.
Checking For Stability
After securing the panels, check each one for stability. Push gently on the panel to test for movement. Tighten any loose screws if needed. Make sure the panels do not wobble or shift. Stable paneling looks better and lasts longer on plaster walls.

Credit: www.thewoodveneerhub.com.au

Credit: www.angi.com
Frequently Asked Questions
How Do You Prepare Plaster Walls For Wood Paneling?
First, clean the wall surface thoroughly to remove dust and debris. Then, repair any cracks or holes with plaster filler. Sand the surface smooth and ensure it’s dry before anchoring wood paneling for a secure hold.
What Anchors Work Best For Plaster Walls?
Toggle bolts and molly bolts are ideal for heavy wood paneling. Plastic expansion anchors work for lighter panels. Choose anchors that penetrate the plaster and grip the wall studs firmly for stability and safety.
How Far Apart Should Wood Paneling Anchors Be Placed?
Anchors should be spaced every 16 to 24 inches along the panel edges. This spacing ensures even weight distribution and prevents panel warping. Always align anchors with wall studs for maximum support.
Can You Install Wood Paneling Without Studs On Plaster Walls?
Yes, by using heavy-duty anchors like toggle bolts. These spread the load behind the plaster. However, securing panels to studs is more stable and recommended for heavy wood paneling.
Conclusion
Anchoring wood paneling to plaster walls takes care and the right steps. Use proper anchors to hold the panels firmly in place. Check the wall condition before starting to avoid damage. Take your time and measure carefully for best results.
A well-anchored panel looks neat and lasts longer. This simple process can improve your room’s style easily. Start with the right tools and follow the steps closely. You will enjoy a clean, strong finish that feels solid and looks great.