If you want to turn any room into your personal theater, knowing how to hook up a Dell projector on a wall is a game-changer. Imagine watching your favorite movies, giving presentations, or gaming on a big, crisp display right on your wall.
It’s easier than you think, and this guide will walk you through every step. By the end, you’ll have your projector set up perfectly, making your space more vibrant and functional. Ready to transform your wall into a stunning screen?
Let’s dive in!

Credit: www.homedepot.com
Choosing The Right Wall
Choosing the right wall is key for a clear, bright image from your Dell projector. The wall acts as your screen. Picking the best spot helps your picture look sharp and colors pop. Small details about the wall and room make a big difference in how your projector performs.
Assessing Wall Material
Start with the wall surface. Smooth walls work best for projecting images. Rough or textured walls cause shadows and distort the picture. Painted drywall or plaster walls are great choices. Avoid walls with patterns, wallpaper, or bricks. These can break up the image and reduce clarity.
Finding The Ideal Location
Choose a wall where you can easily place the projector. The wall should be large enough for your image size. Make sure there is space to move the projector back or forth. Check that no furniture blocks the projector’s path. The height of the wall matters too. The projector should sit level or slightly below the screen’s bottom edge.
Considering Ambient Light
Light in the room affects how well the image shows. Pick a wall that faces away from bright windows or lights. Too much light washes out the picture. Darker rooms give the best viewing experience. Curtains or blinds can help control light. Reflective surfaces near the wall can also cause glare. Keep the area around the wall simple and dark for clear viewing.
Gathering Necessary Tools
Gathering the right tools is the first step to hook up a Dell projector on a wall. Having everything ready saves time and avoids frustration. This section covers the essential tools for a smooth setup. Each tool plays a key role in making sure the projector is stable and works well.
Projector Mounts And Brackets
Choose a mount that fits your Dell projector model. The mount should support the projector’s weight securely. Look for adjustable brackets to help position the projector accurately. Fixed mounts keep the projector steady and prevent movement. Make sure the mount comes with all screws and hardware.
Cables And Connectors
Use high-quality HDMI or VGA cables for clear video signals. Check the projector and source device for matching ports. Longer cables help if the projector is far from the device. Consider cable covers to keep wires neat and safe. Make sure all connectors are clean and undamaged.
Drilling And Measuring Tools
A drill is needed for mounting the bracket on the wall. Use a stud finder to locate strong wall support. Measure carefully to place the projector at the right height and angle. A level tool helps keep the mount straight. Mark spots clearly before drilling to avoid mistakes.
Preparing The Projector
Preparing the projector is the first step to a clear and bright display. It involves checking the projector’s ports, adjusting settings, and running tests. This ensures the device works well with your wall setup. Take your time during this phase to avoid problems later.
Checking Ports And Compatibility
Look at the back or side of your Dell projector. Identify all available ports like HDMI, VGA, or USB. Match these with your computer or media device ports. Confirm the cables you have fit the projector and the source device. Use an adapter if the ports do not match. This step is crucial to connect your devices smoothly.
Configuring Display Settings
Turn on the projector and your computer or media device. Go to the display settings on your device. Set the screen resolution to match the projector’s native resolution. This makes the image sharp and clear. Adjust brightness and contrast on the projector if needed. Proper settings help avoid fuzzy or dim images.
Testing The Projector
Project a test image or video onto the wall. Check if the image is clear and fills the space properly. Move the projector slightly to find the best angle. Adjust focus using the projector’s focus ring or button. Confirm that the colors look natural and the sound works if using built-in speakers. Testing ensures a good viewing experience before final installation.
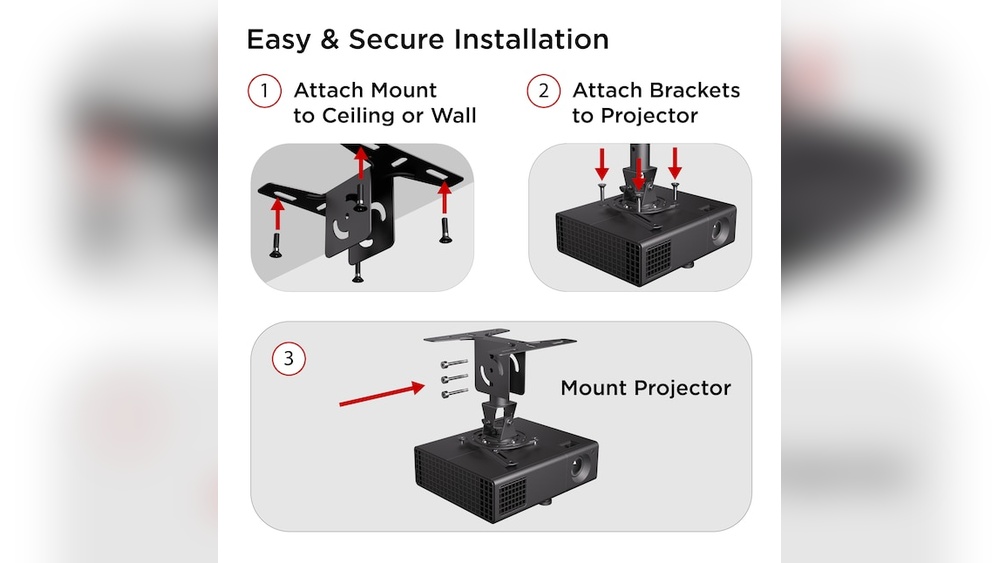
Mounting The Projector
Mounting the projector on the wall is an important step. It keeps the device stable and ensures the best picture quality. Proper mounting helps avoid damage and makes your setup look neat. This section explains how to mount your Dell projector correctly.
Marking Mounting Points
Start by choosing the wall spot for your projector. Use a pencil to mark where the screws will go. Check the projector mount’s holes and transfer them to the wall. Use a level to keep the marks straight. Double-check the marks before drilling.
Installing The Mount On The Wall
Drill holes where you marked earlier. Insert wall anchors if needed for extra support. Attach the mount with screws and tighten them well. Make sure the mount feels strong and does not move. The mount must hold the projector’s weight safely.
Securing The Projector To The Mount
Align the projector’s mounting holes with the mount. Use the screws that came with your mount to attach the projector. Tighten the screws evenly to avoid imbalance. Check that the projector is secure and does not wobble. Adjust the angle for the best image projection.
Connecting To Power And Devices
Adjusting the projection is important for a clear and sharp image on your wall. This step ensures the picture fits well and looks good. Proper adjustment helps you enjoy movies, presentations, or games without strain.
Aligning The Image
Place the projector so the image is centered on the wall. The lens should face straight ahead. Use small movements to shift the image left, right, up, or down. Make sure the edges are not cut off. A well-aligned image fills the screen without spilling over.
Focusing The Lens
Turn the focus ring on the projector lens slowly. Stop when the image becomes sharp and clear. Avoid over-tightening the ring, as it might damage the lens. A clear focus reduces eye strain and improves viewing quality.
Keystone Correction
Use the keystone correction feature to fix image shape. This tool adjusts the image if it looks like a trapezoid. Change the settings until the picture becomes a perfect rectangle. Proper keystone correction keeps the image balanced and professional-looking.

Credit: www.lowes.com
Adjusting The Projection
After mounting and connecting your Dell projector to the wall, final testing is essential. This step confirms everything works as expected. It also helps spot any issues before regular use. Carefully checking image and sound quality ensures a great viewing experience. Troubleshooting common problems early saves time and frustration.
Checking Image Quality
Start by turning on the projector and displaying a test image or video. Look for sharpness and clarity. The image should be bright and evenly lit. Adjust the focus ring until the picture is clear. Check for any distortion or color issues. Make sure the image fits the wall space properly. Use keystone correction if the image looks trapezoid-shaped. Proper alignment is key for the best image quality.
Resolving Common Issues
If the projector does not turn on, check the power cable and connection. No image may mean a loose HDMI or VGA cable. Reconnect cables firmly. If the image is flickering, clean the lens gently. Overheating can cause shutdowns; ensure the projector has good airflow. Reset to factory settings if problems persist. Consult the Dell manual for error codes or lights. Small fixes often solve most problems quickly.
Optimizing Sound And Settings
Adjust the volume directly on the projector or connected device. Use external speakers for better sound if needed. Check audio cables for secure connections. Explore the projector menu to change brightness, contrast, and color settings. Save custom settings for future use. Experiment with different modes to find the best picture for your room. Proper sound and picture balance creates a more enjoyable experience.

Credit: www.amazon.com
Frequently Asked Questions
How Do I Mount A Dell Projector On A Wall?
First, choose a sturdy wall near a power source. Use a compatible mounting bracket and secure it with anchors. Connect the projector to the bracket, adjusting for level and angle. Ensure cables are neatly arranged and connected to your devices.
What Cables Are Needed To Connect A Dell Projector?
Typically, use HDMI or VGA cables for video. Power cables are essential for projector operation. Audio cables may be required if the projector supports sound. Check your projector’s ports and your device’s output to select the right cables.
How To Align A Dell Projector For Best Image Quality?
Position the projector perpendicular to the wall for a clear image. Adjust the lens focus and zoom settings. Use keystone correction to fix any trapezoidal distortion. Test the image with your content to ensure sharpness and proper alignment.
Can I Connect A Dell Projector Wirelessly?
Some Dell projectors support wireless connections via Wi-Fi or Bluetooth. You may need to install software or apps on your device. Wireless setup reduces cable clutter but may introduce slight latency. Check your projector’s specifications for wireless capabilities.
Conclusion
Setting up your Dell projector on a wall is simple and effective. Follow the steps carefully for the best results. Make sure the connections are secure and the projector is stable. Adjust the image size and focus to fit your space.
Enjoy clear and bright pictures for movies or presentations. A well-placed projector can improve your viewing experience greatly. Try it yourself and see how easy it is. Keep these tips in mind for a smooth setup every time.