Are you ready to tackle a project that can save you time and money? Installing a transmission with a floor jack might sound tricky, but with the right steps, you can do it yourself confidently.
Imagine getting your car back on the road faster without waiting for a mechanic. This guide will walk you through the process clearly and safely, so you can avoid common mistakes and feel in control every step of the way.
Keep reading to discover how simple it can be to install your transmission using a floor jack.

Credit: www.martinispa.com
Preparation Before Installation
Preparing before installing a transmission with a floor jack is crucial. Good preparation makes the job easier and safer. It helps prevent mistakes and saves time. Follow key steps to get ready for the task ahead.
Gathering Necessary Tools
Start by collecting all needed tools. You will need a floor jack, jack stands, wrenches, sockets, and screwdrivers. Also, keep a transmission jack or a strong support nearby. Having tools ready avoids interruptions and keeps work smooth.
Selecting The Right Floor Jack
Choose a floor jack that can hold the vehicle’s weight. Check the jack’s lifting capacity on the label. Use a low-profile jack to fit under the vehicle easily. A sturdy, well-maintained jack ensures safety and stability.
Safety Precautions
Wear safety goggles and gloves to protect yourself. Always work on a flat, solid surface. Use jack stands to support the vehicle after lifting it. Never rely only on the floor jack. Double-check that the vehicle is stable before starting work.
Removing The Old Transmission
Removing the old transmission is the first step in installing a new one. This process needs care and the right tools. Safety is very important. Using a floor jack helps to support the transmission while you work. Follow each step carefully for a smooth removal.
Disconnecting Battery And Components
Start by disconnecting the battery. This stops any electrical shocks or shorts. Remove the negative cable first. Then detach wires connected to the transmission. These may include sensors and the shift linkage. Label each wire for easy reconnection later.
Draining Transmission Fluid
Place a container under the transmission drain plug. Unscrew the plug slowly and let the fluid drain out. This prevents spills and mess. Wait until the fluid stops dripping. Replace the drain plug before moving on.
Unbolting Transmission Mounts
Use the floor jack to support the transmission from below. Find all bolts holding the transmission mounts. Use the correct size wrench to loosen and remove them. Keep the bolts safe for reinstallation. Carefully lower the transmission with the jack once all bolts are free.
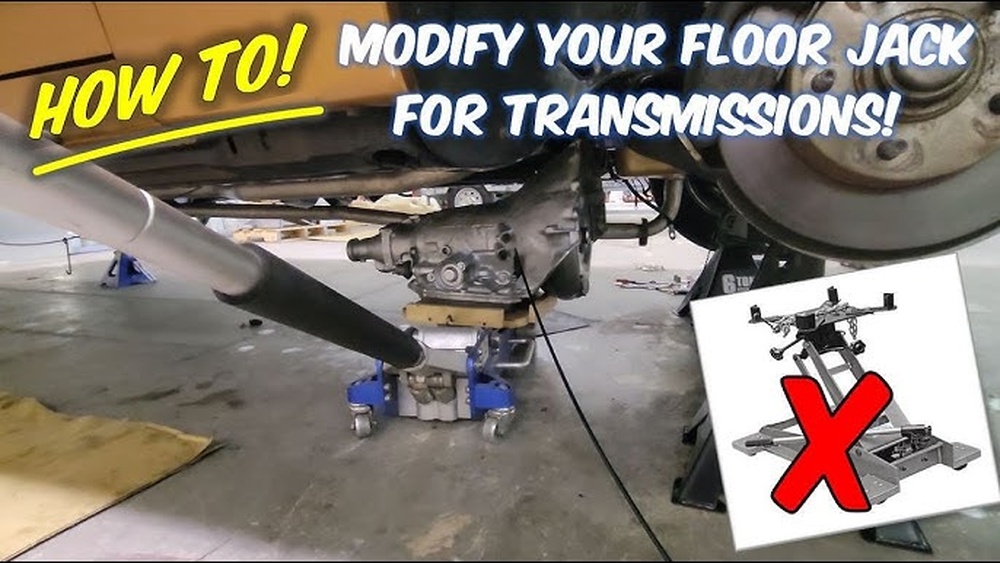
Using The Floor Jack Safely
Installing the new transmission requires careful steps to ensure proper fit and function. Take your time to align parts correctly. This helps avoid damage and ensures smooth operation.
Use the floor jack to lift the transmission steadily. Keep it balanced as you move it into place. Small adjustments make a big difference here.
Aligning Transmission With Engine
Start by matching the transmission input shaft with the engine’s clutch or torque converter. Slowly push the transmission forward. Do not force it. It should slide in with gentle pressure.
Check that the bolt holes on both parts line up perfectly. Misalignment can cause leaks or damage. Adjust the floor jack to move the transmission slightly if needed.
Securing Mounts And Bolts
Once aligned, insert the mounting bolts by hand. Tighten them in a crisscross pattern. This ensures even pressure and proper sealing.
Use a torque wrench to tighten bolts to factory specifications. Over-tightening can strip threads or crack parts. Under-tightening may cause looseness and noise.
Secure the transmission mount to the crossmember. Confirm the mount holds the transmission firmly without strain.
Connecting Electrical And Fluid Lines
Reconnect all electrical connectors carefully. These control sensors and shift mechanisms. Ensure clips snap into place to avoid loose connections.
Attach fluid lines next. Check hoses for cracks or wear. Secure clamps to prevent leaks.
Double-check each connection before lowering the vehicle. Proper connections prevent transmission failure and ensure smooth driving.

Credit: www.youtube.com
Installing The New Transmission
After installing the transmission using a floor jack, performing final checks is essential. These steps ensure the transmission works properly and safely. Careful testing helps avoid future problems and costly repairs.
Refilling Transmission Fluid
Start by refilling the transmission fluid to the correct level. Use the type of fluid recommended by the vehicle manufacturer. Pour slowly to avoid overfilling. Check the fluid level with the dipstick after refilling. Proper fluid levels keep the transmission cool and running smoothly.
Inspecting For Leaks
Look under the vehicle for any signs of fluid leaks. Focus on the seals and connections around the transmission. Tighten any loose bolts or fittings. Leaks can cause serious damage and reduce performance. Fix leaks before moving to the next step.
Test Driving Tips
Start the engine and let it warm up. Shift through all the gears slowly to check smoothness. Listen for unusual noises or vibrations. Take a short drive in a safe area. Pay attention to how the transmission shifts and responds. Stop and inspect again if you notice issues.
Credit: www.blackhawkparts.com
Frequently Asked Questions
How Do I Safely Use A Floor Jack For Transmission Installation?
Always position the floor jack under the transmission’s designated lifting points. Use jack stands to secure the vehicle. Never rely solely on the jack. Ensure the surface is flat and stable before lifting. Safety first prevents accidents during installation.
What Tools Are Needed With A Floor Jack For Transmission Installation?
Besides the floor jack, you need jack stands, a socket set, wrenches, and a transmission jack adapter. A pry bar and transmission fluid are helpful. These tools ensure smooth removal and installation of the transmission.
Can A Floor Jack Support The Transmission’s Full Weight?
A standard floor jack can support the transmission weight if rated correctly. Check the jack’s weight capacity before use. Use a transmission jack adapter for better support and balance during installation.
How Do I Align The Transmission Using A Floor Jack?
Lift the transmission slowly with the floor jack. Align it with the engine bell housing by adjusting the jack’s height. Use guide pins if available. Proper alignment prevents damage and ensures smooth bolt installation.
Conclusion
Installing a transmission with a floor jack is simple and safe. Follow each step carefully and take your time. Always double-check that the transmission is secure before lowering the jack. Using the right tools helps avoid damage and injury. Practice makes the process easier and faster.
With patience and care, you can complete this job yourself. Keep safety as your top priority throughout the work. Now, you have the knowledge to handle this task confidently.


