Are you ready to upgrade your door’s security but unsure how to start? Cutting a deadbolt hole in your door jamb might sound tricky, but with the right steps, you can do it yourself quickly and safely.
Imagine having that extra layer of protection without the hassle of expensive locksmiths or complicated tools. In this guide, you’ll discover simple, clear instructions that anyone can follow. By the end, you’ll feel confident and ready to boost your home’s safety with a perfectly cut deadbolt hole.
Let’s get started and make your door stronger today!
Tools And Materials Needed
Cutting a deadbolt hole in a door jamb requires the right tools and materials. Having everything ready makes the job easier and safer. This section covers what you need to get started.
Essential Tools
Start with a power drill for making holes. A hole saw bit fits the deadbolt size. Use a chisel to clean and shape the hole. A tape measure helps mark exact points. A pencil is needed to mark spots on the door jamb. A screwdriver is essential for installing the lock. Sandpaper smooths rough edges after cutting.
Recommended Safety Gear
Safety glasses protect your eyes from dust and wood chips. Wear work gloves to avoid splinters and cuts. A dust mask keeps you from breathing sawdust. Ear protection helps if your drill is loud. Proper clothing avoids loose fabric getting caught in tools.
Choosing The Right Deadbolt
Select a deadbolt that fits your door jamb thickness. Check the backset size, usually 2 3/8 or 2 3/4 inches. Pick a lock with a strong steel bolt for security. Choose a finish that matches your door hardware. Make sure the deadbolt comes with installation instructions.

Credit: www.reddit.com
Preparing The Door Jamb
Preparing the door jamb is the first step to cutting a deadbolt hole. This part of the door frame must be ready for precise cutting. Careful preparation ensures the deadbolt will fit and work properly. It also helps avoid damage to the door or jamb. Follow each step carefully for a clean and accurate cut.
Marking The Deadbolt Position
Start by marking where the deadbolt will go. Use a pencil and measuring tape. Mark the exact height on the door jamb. Usually, this is about 6 to 12 inches from the door handle. Double-check the mark to be sure. A clear mark guides the cutting process.
Measuring For Accuracy
Measure the deadbolt size before cutting. Measure the diameter of the hole needed. Also, measure the backset, which is the distance from the edge of the door jamb to the center of the hole. Use a ruler or tape for accuracy. Accurate measurements prevent mistakes and save time.
Checking Door Jamb Thickness
Check the thickness of the door jamb. This is important for choosing the right drill bit size. Measure the jamb’s thickness at the point where you will cut. The thickness must match the deadbolt specifications. If the jamb is too thin, the deadbolt may not fit securely.
Drilling The Deadbolt Hole
Drilling the deadbolt hole is a key step when installing a new lock. It requires accuracy and the right tools. This step creates the openings for the lock’s main body and latch. Doing it correctly ensures the deadbolt fits well and works smoothly.
Selecting The Drill Bit
Choose a drill bit that matches the deadbolt size. Usually, a 2 1/8-inch hole saw works best for the face bore. For the edge bore, use a 1-inch spade bit. Make sure the bits are sharp and clean. Dull bits can cause rough holes and damage the door.
Drilling The Face Bore
Mark the spot for the face bore on the door. Drill straight through the door face using the hole saw. Keep the drill steady to avoid splintering the wood. Drill from both sides if the door is thick. This prevents the wood from breaking out.
Creating The Edge Bore
Mark the door edge where the latch will sit. Use the spade bit to drill into the edge bore. Drill until it meets the face bore hole inside. Check that the hole is clean and smooth. This allows the latch to fit snugly and work properly.
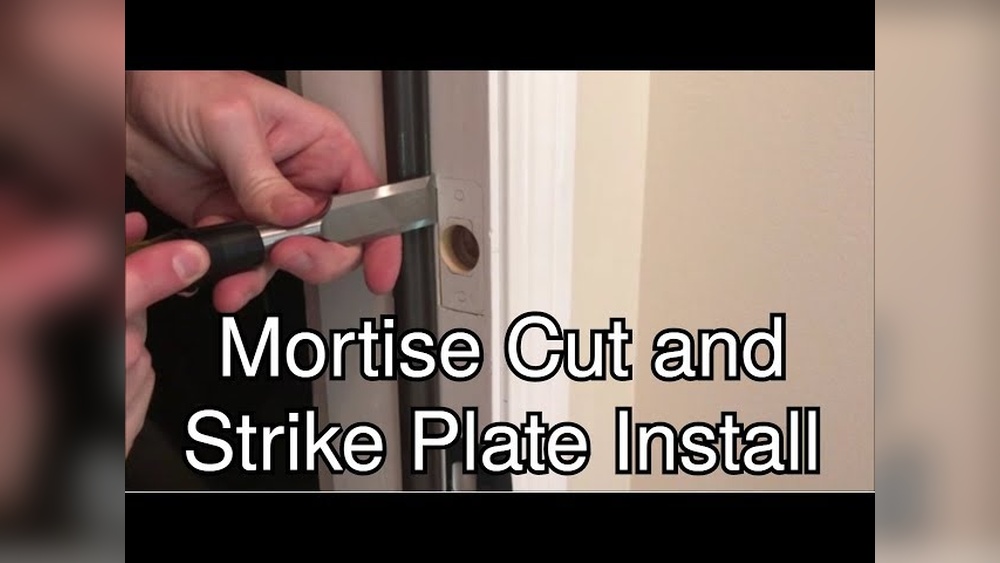
Chiseling The Mortise
Chiseling the mortise is a key step in fitting a deadbolt into a door jamb. This process creates a clean, precise space for the strike plate. A well-chiseled mortise helps the deadbolt work smoothly and securely. Take your time and work carefully to avoid mistakes.
Marking The Mortise Outline
Start by placing the strike plate on the door jamb. Use a pencil to trace around the plate’s edges. Mark the outline clearly. This shape shows where to chisel. Check the lines twice to ensure accuracy before you start cutting.
Removing Wood For The Strike Plate
Use a sharp chisel and a hammer to remove wood inside the outline. Begin by making small cuts along the edges. Then, carefully chip away the wood inside the marked area. Work slowly to avoid splitting the jamb. Remove enough wood so the strike plate sits flush with the surface.
Smoothing The Mortise
After removing the bulk of the wood, smooth the mortise with the chisel. Trim any rough spots and uneven areas. The surface should be flat and even. Test the strike plate fit often. A smooth mortise ensures the deadbolt locks easily and securely every time.
Installing The Deadbolt
Installing the deadbolt is the final step in securing your door. Proper installation ensures your lock works smoothly and keeps your home safe. Pay close attention to each part to avoid future problems.
Fitting The Strike Plate
The strike plate holds the deadbolt in place when locked. Position it over the hole in the door jamb. Make sure it fits flush and aligns with the bolt. Use a chisel to adjust the wood if needed. A tight fit keeps the lock secure and strong.
Securing With Screws
Use long screws to attach the strike plate firmly. Short screws may loosen over time. Drive screws into the solid wood behind the jamb. Tight screws prevent the plate from moving under force. Check that the plate stays aligned as you tighten.
Testing Deadbolt Operation
Close the door and turn the key or thumb turn. The bolt should slide smoothly into the strike plate. No sticking or resistance means correct installation. Open and close the lock several times to confirm. Proper function adds safety and peace of mind.

Credit: www.youtube.com
Common Mistakes To Avoid
Cutting a deadbolt hole in a door jamb requires care and precision. Mistakes can cause damage and make the lock fit poorly. Avoid these common errors to ensure a clean and secure installation.
Misaligned Holes
One of the biggest problems is drilling holes that do not line up. Misaligned holes make it hard to install the deadbolt properly. The bolt may not slide in smoothly or lock securely. Measure twice before drilling and mark your spots carefully.
Over-drilling
Drilling too deep or too wide causes weak door jambs. Over-drilling can crack the wood or make the hole too loose. Use the right drill bit size and stop as soon as you reach the needed depth. Keep the hole clean and neat for a tight fit.
Ignoring Door Material
Different doors need different tools and techniques. Wood, metal, and fiberglass react differently to drilling. Using the wrong drill bit or speed can damage the door. Know your door material before starting. Choose the proper drill bits and adjust your approach.
Tips For A Professional Finish
Achieving a clean, professional finish when cutting a deadbolt hole in a door jamb takes more than just the right tools. Small details make a big difference. Simple steps help protect the wood and improve the final look. These tips keep your work neat and lasting longer.
Using Painter’s Tape
Painter’s tape helps protect the door jamb surface. Place tape around the area before cutting. It prevents splintering and keeps edges sharp. The tape also marks the cut line clearly. Remove the tape carefully after finishing the cut for clean edges.
Cleaning Up Wood Chips
Wood chips can block the lock mechanism. Use a brush or vacuum to remove chips from the hole. Clean edges allow the deadbolt to fit properly. Wiping with a damp cloth removes fine dust. A clean workspace ensures smooth installation and better results.
Regular Maintenance
Check the door jamb regularly for wear. Tighten screws and clean the area often. Lubricate the lock mechanism to keep it working well. Small repairs extend the life of your deadbolt. Proper care keeps the door secure and looking good.

Credit: www.familyhandyman.com
Frequently Asked Questions
How Do I Measure The Deadbolt Hole Size Accurately?
Use a tape measure to check your deadbolt’s diameter and backset. Mark the door jamb precisely before drilling for accuracy and fit.
What Tools Are Needed To Cut A Deadbolt Hole?
You need a drill, hole saw, chisel, measuring tape, pencil, and safety goggles to cut a deadbolt hole cleanly.
Can I Cut A Deadbolt Hole Without Professional Help?
Yes, with proper tools and careful measuring, DIY deadbolt hole cutting is achievable for most homeowners.
How Deep Should The Deadbolt Hole Be In The Jamb?
The hole depth should match the deadbolt’s length plus space for smooth bolt movement.
Conclusion
Cutting a deadbolt hole in a door jamb is easier than it seems. Take your time and follow each step carefully. Use the right tools to make clean, precise cuts. Measure twice to avoid mistakes and keep safety in mind.
With patience, you can improve your door’s security yourself. Practice makes perfect, so don’t rush the process. Soon, you will feel more confident with basic home repairs. Simple tasks like this save money and build useful skills. Keep your workspace neat and stay focused throughout the job.
You’ve got this!


