Your hydraulic floor jack is a powerful tool that makes lifting heavy objects easy and safe. But when the reservoir leaks or malfunctions, it can stop working properly—and that can be frustrating.
If your jack isn’t holding pressure or seems weak, the problem might be in the reservoir. Don’t worry; fixing it is simpler than you think. In this guide, you’ll discover clear, step-by-step instructions to get your floor jack back in top shape quickly.
Keep reading, and you’ll save time, money, and avoid unnecessary replacements. Your next repair starts here.

Credit: espacioeslava.com
Signs Of A Faulty Reservoir
Knowing the signs of a faulty hydraulic floor jack reservoir helps you avoid bigger problems. The reservoir holds the hydraulic fluid that powers the jack. If it fails, the jack stops working properly. Early detection saves time and money.
Common Symptoms
The jack may not lift as high as before. It might feel weak or slow during use. You might hear strange noises when pumping the handle. These signs often point to reservoir issues. The fluid level may drop quickly without obvious leaks.
Leak Detection
Look under the jack for wet spots or puddles. Hydraulic fluid is usually clear or light brown. Check around the reservoir cap and seals. Cracks or damage on the reservoir can cause leaks. Even small leaks reduce the jack’s power and safety.
Performance Issues
The jack may not hold weight steadily. It can slowly lower after lifting. Pumping the handle might feel spongy or inconsistent. These problems often mean air or fluid loss in the reservoir. Fixing the reservoir restores smooth and reliable operation.
Tools And Materials Needed
Fixing a hydraulic floor jack reservoir needs specific tools and materials. Having the right items makes the repair easier and safer. Prepare everything before starting the job to avoid delays and mistakes.
Essential Tools
- Flathead screwdriver for prying open the reservoir cap
- Wrenches or socket set to remove bolts and screws
- Clean cloths for wiping off dirt and oil
- Small funnel to refill hydraulic fluid without spilling
- Plastic container to catch old hydraulic fluid
- Flashlight to see inside the reservoir clearly
Replacement Parts
- New hydraulic fluid that matches the jack’s specifications
- Replacement reservoir seal or O-ring to prevent leaks
- Optional: new reservoir cap if the old one is damaged
- Any damaged hoses or connectors found during inspection
Safety Gear
- Protective gloves to keep hands clean and safe
- Safety glasses to protect eyes from splashes
- Work apron or old clothes to avoid stains
- Well-ventilated area to avoid inhaling fumes
Draining The Hydraulic Fluid
Draining the hydraulic fluid is a key step in fixing a floor jack reservoir. Old or dirty fluid can cause poor jack performance. Removing the used fluid helps prevent damage and keeps the jack working smoothly. This process requires care and the right tools to avoid spills and hazards.
Proper Fluid Disposal
Hydraulic fluid is hazardous to the environment. Never pour it down drains or on the ground. Use a sealed container to collect the old fluid. Take it to a recycling center or hazardous waste facility. This protects water and soil from pollution. Follow local rules for safe disposal.
Draining Techniques
Start by placing the jack on a flat surface. Use a wrench to open the reservoir cap. Position a drain pan under the reservoir. Slowly tip the jack to let the fluid flow out. Avoid tipping too fast to reduce spills. Use a clean cloth to wipe any drips. Close the reservoir once empty. Refill with fresh hydraulic fluid as recommended.

Credit: www.youtube.com
Removing The Reservoir
Removing the reservoir is the first important step in fixing a hydraulic floor jack. It allows access to the inner parts for cleaning or repairs. Take your time. Handle each part carefully to avoid damage. Follow these simple steps to remove the reservoir safely and correctly.
Detaching Components
Start by lowering the jack to release pressure. Then remove any bolts or screws holding the reservoir in place. Use the right tools to avoid stripping screws. Carefully disconnect any hoses attached to the reservoir. Watch out for fluid leaks. Place a cloth under the reservoir to catch spills.
Handling The Reservoir
Lift the reservoir gently from the jack frame. Avoid shaking it to prevent oil spills. Place it on a clean surface. Check for cracks or damage. Clean the outside with a cloth before further inspection. Keep the parts organized to make reassembly easier.
Cleaning The Reservoir
Cleaning the reservoir of a hydraulic floor jack is a key step to keep it working well. Dirt and old fluid can cause problems. Cleaning helps the jack last longer and work safely. This section explains how to clean the reservoir properly.
Removing Debris
Start by opening the reservoir cap carefully. Use a clean cloth to wipe off dirt around the opening. Check inside for any loose debris or sludge. Remove large particles with a small scoop or tweezers. Avoid pushing debris deeper into the reservoir. Keep the area clean to stop contamination.
Using Cleaning Agents
Choose a mild cleaning agent safe for metal parts. Pour a small amount into the reservoir. Use a soft brush or cloth to scrub gently inside. Avoid harsh chemicals that can damage seals or metal. Rinse the reservoir with clean hydraulic fluid or clean water. Make sure no residue remains before refilling with new fluid.
Inspecting For Damage
Inspecting the hydraulic floor jack reservoir is a key step in fixing it. This process helps find problems that stop the jack from working well. Careful inspection can save time and money by spotting issues early. Follow these steps to check for damage.
Checking For Cracks
Look closely at the reservoir for any cracks or breaks. Use a bright light to see small cracks. Cracks can cause leaks and lower the jack’s pressure. Run your fingers along the surface to feel for any rough spots. Even tiny cracks can cause big problems. Replace the reservoir if you find any damage.
Seal And Gasket Condition
Check the seals and gaskets around the reservoir’s openings. These parts keep the fluid inside and prevent dirt from entering. Look for signs of wear, cracks, or hardening. Press the seals gently to test their flexibility. Old or damaged seals can cause leaks and air in the system. Replace any worn seals or gaskets to keep the jack working properly.
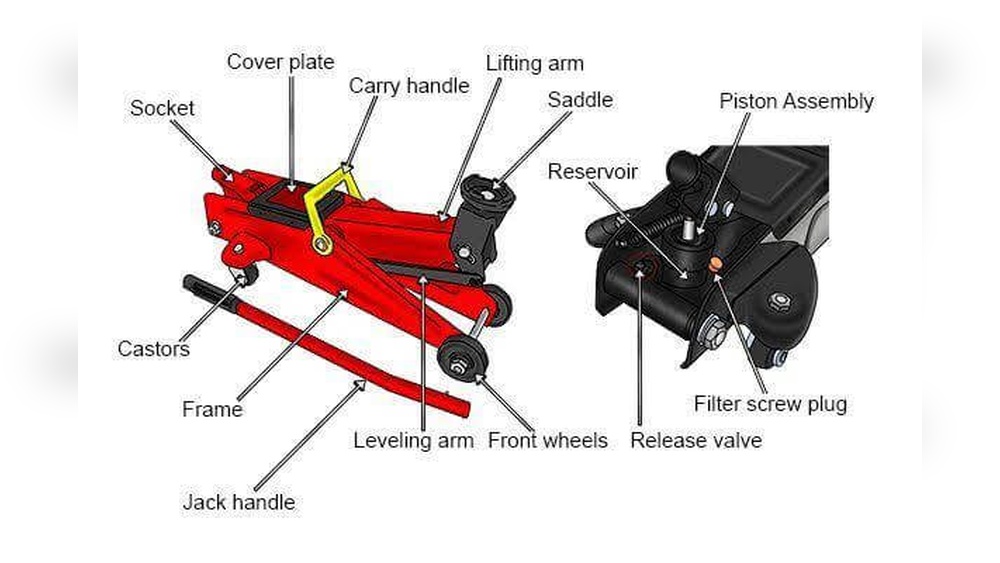
Repairing Or Replacing The Reservoir
The reservoir in a hydraulic floor jack holds the hydraulic fluid. It is vital for the jack’s smooth operation. Damage or leaks in the reservoir can cause loss of fluid and reduce lifting power. Repairing or replacing the reservoir solves these issues and keeps the jack working well.
Patch Fixes
Small cracks or holes in the reservoir can sometimes be patched. Use a strong epoxy or metal patch kit made for hydraulic parts. Clean the area well before applying the patch. Let it dry fully to avoid leaks. Patch fixes work best for minor damage and stop fluid loss quickly.
When To Replace
Replace the reservoir if the damage is large or the metal is rusted. Deep cracks or dents can weaken the reservoir too much. Also, replace the reservoir if patches do not hold or leaks continue. A new reservoir restores full strength and prevents future problems. Replacement parts are often affordable and easy to find.
Credit: fastabiqsehat.com
Refilling And Bleeding The System
Refilling and bleeding the hydraulic floor jack reservoir is a key step in fixing its performance. This process restores the right fluid level and removes trapped air. Both are crucial for smooth jack operation.
Proper refilling ensures the jack lifts without strain. Bleeding gets rid of air pockets that cause spongy or weak lifting. Follow simple steps to complete this task safely and effectively.
Choosing The Right Fluid
Pick the fluid recommended by the jack’s manufacturer. Usually, hydraulic jack oil works best. Avoid using brake fluid or motor oil; these can damage seals and parts.
Clean fluid prevents dirt from entering the system. Always check the fluid’s condition before pouring it in. Use a funnel to avoid spills and keep the reservoir clean.
Removing Air Bubbles
Air bubbles reduce hydraulic pressure and cause poor jack performance. To remove air, open the release valve slowly. Pump the jack handle several times to force air out.
Keep the reservoir cap off during this process. Watch for bubbles escaping and fluid level changes. Close the valve tightly once air stops escaping. Repeat the process if the jack feels weak.
Testing The Floor Jack
Testing the floor jack is a key step after fixing the hydraulic reservoir. It ensures the jack works properly and safely. This process checks if the fluid levels and seals are correct. Testing helps find any leaks or pressure issues early. Proper tests avoid accidents and damage during use.
Operational Checks
Start by placing the jack on a flat surface. Pump the handle slowly to raise the arm. Watch the arm rise smoothly without jerks. Check if the arm holds steady at any height. Lower the arm gently to test fluid flow back. Listen for unusual sounds during pumping. Any noise or hesitation means a problem. Repeat the test several times for consistency.
Safety Verification
Make sure the jack supports weight without slipping. Use a safe test load, not too heavy. Observe the jack under load for leaks or drops. Check the release valve for smooth operation. Confirm the handle locks securely when lowered. Ensure no fluid drips from the reservoir or seals. Safety checks protect users and extend jack life.
Maintenance Tips
Proper maintenance keeps your hydraulic floor jack working well for a long time. Small steps prevent big problems. Follow these tips to care for the reservoir and avoid costly repairs.
Regular Inspection
Check the reservoir often for cracks or leaks. Look for dirt or rust around the cap. Clean the area before opening the reservoir to avoid contamination. Make sure the fluid level stays between the minimum and maximum marks. Replace old hydraulic fluid to keep the jack running smoothly.
Proper Storage
Store the jack in a dry, clean place to stop rust and dirt buildup. Keep the jack lowered when not in use to reduce pressure on the seals. Avoid places with extreme temperatures, which can damage the fluid and parts. Cover the jack to protect it from dust and moisture.
Frequently Asked Questions
How Do I Know If My Hydraulic Jack Reservoir Is Leaking?
Check for fluid puddles beneath the jack and reduced lifting power. Visible oil stains or constant fluid refills indicate a leak in the reservoir.
What Tools Are Needed To Fix A Hydraulic Jack Reservoir?
You need a wrench, screwdrivers, replacement seals, hydraulic oil, and clean rags. These tools help you open, repair, and refill the reservoir effectively.
Can I Use Any Hydraulic Oil For The Floor Jack?
No, always use the manufacturer-recommended hydraulic oil type. Using the wrong oil can damage seals and reduce jack performance.
How Do I Bleed Air From The Hydraulic Floor Jack?
Open the release valve and pump the handle several times. This releases trapped air, restoring smooth jack operation and proper fluid pressure.
Conclusion
Fixing a hydraulic floor jack reservoir is easier than it seems. Follow the steps carefully and take your time. Check for leaks and make sure the reservoir is clean. Use the right hydraulic fluid to avoid damage. Test the jack after repair to ensure it works well.
Regular maintenance helps keep your jack safe and reliable. With a little effort, your floor jack will last longer. Keep tools ready and stay safe during the process. You can handle this repair without needing a professional.