Have you ever tried to remove plastic anchors from your plaster wall and ended up making a bigger mess? If you’re staring at those stubborn anchors right now, wondering how to get them out without damaging your wall, you’re not alone.
Removing plastic anchors can be tricky, but with the right approach, you can do it quickly and cleanly. In this guide, you’ll learn simple, effective steps to take those anchors out smoothly—protecting your wall and saving you time and frustration.
Keep reading, and you’ll be ready to tackle this task like a pro.

Credit: www.wikihow.com
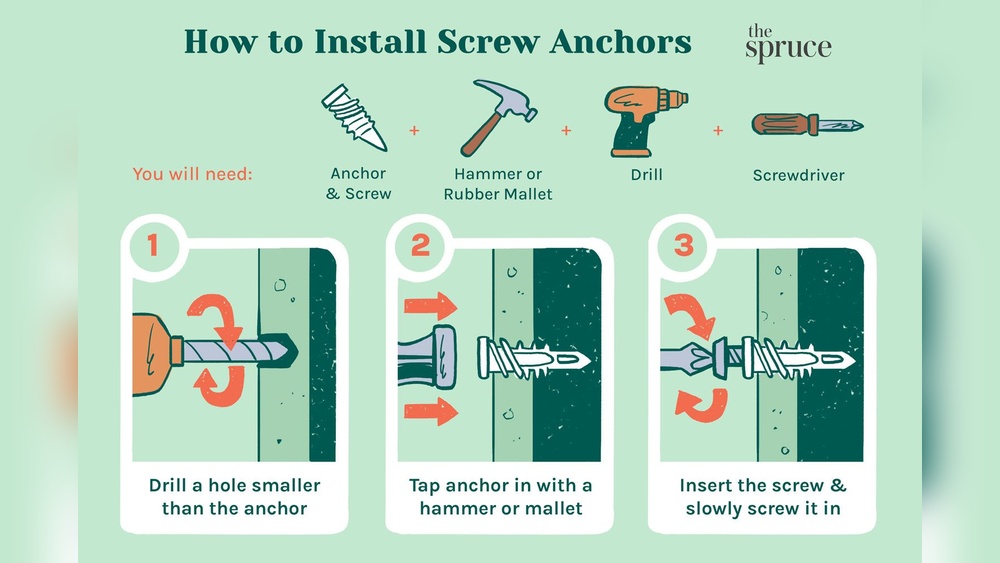
Tools Needed
Removing plastic anchors from a plaster wall needs the right tools. Using proper tools makes the task easier and prevents wall damage. Gather everything before starting to work.
Plastic Anchor Removal Tools
Needle-nose pliers are great for gripping and pulling anchors. They help remove anchors without breaking them inside the wall. Sharp tips allow you to reach tight spots.
Drill With A Small Drill Bit
A drill with a small bit can help loosen anchors stuck deep in plaster. It creates space to pull the anchor out smoothly. Choose a drill bit slightly smaller than the anchor.
Putty Knife Or Flathead Screwdriver
A putty knife or flathead screwdriver helps pry anchors gently. Use it to lift the edge of the anchor from the wall. This tool also helps clean leftover debris.
Wall Repair Supplies
After anchor removal, you will need spackle or wall filler. Use sandpaper to smooth the repaired area. Paint may be needed to match the wall color.
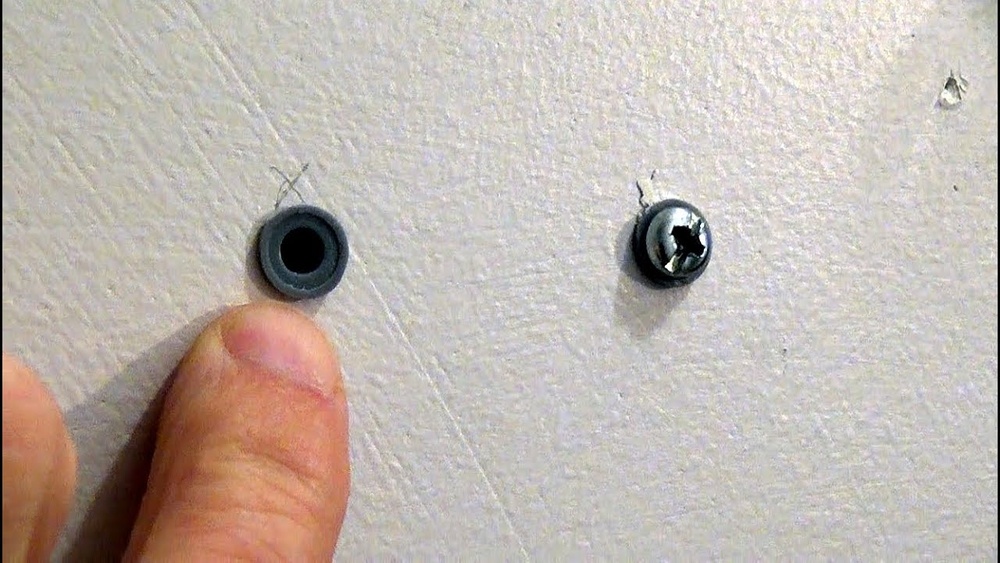
Identify Anchor Type
Identifying the type of plastic anchor in your plaster wall is the first step. Different anchors require different removal methods. Knowing the anchor type saves time and prevents wall damage.
Common Plastic Anchor Types
Plastic anchors come in various shapes and sizes. The most common types are expansion anchors, ribbed anchors, and threaded anchors. Each type grips the wall differently.
Visual Inspection
Look closely at the anchor head and body. Expansion anchors usually have a smooth, cylindrical shape. Ribbed anchors have ridges or fins for better grip. Threaded anchors look like screws but made of plastic.
Check Anchor Size
Measure the anchor’s length and diameter. Small anchors hold light items. Larger anchors support heavier objects. Size helps identify the anchor and choose the right removal tool.
Test Anchor Movement
Gently wiggle the anchor. Some anchors move slightly; others stay fixed. Movement can indicate if the anchor is expansion or threaded type. It guides the next removal step.
Prepare The Wall
Preparing the wall is an important step before removing plastic anchors from plaster. It helps protect the wall and makes the removal process easier. Taking a few simple actions can prevent damage and keep the plaster intact.
Start by clearing the area around the anchor. Remove any dust or dirt that may stop you from seeing the anchor clearly. Clean surfaces give better results and reduce the chance of mistakes.
Next, gather the right tools. Having the proper tools ready saves time and effort. Tools like pliers, a utility knife, and a putty knife work well for this task.
Finally, protect the floor and nearby furniture. Cover them with a cloth or plastic sheet. This keeps your space clean and safe from falling debris.
Clear The Area Around The Anchor
Use a soft brush or cloth to wipe away dust near the anchor. This helps you see the anchor better. It also stops dirt from falling into the hole during removal.
Gather Necessary Tools
Prepare simple tools such as pliers, a utility knife, and a putty knife. These tools help you pull out the anchor gently. Avoid using sharp or heavy tools that can damage the wall.
Protect The Surrounding Space
Place a drop cloth or plastic sheet under the work area. Cover furniture and floors nearby. This keeps dust and debris from making a mess.

Credit: www.hgtv.com
Remove Plastic Anchors Manually
Removing plastic anchors from plaster walls can be tricky. Doing it manually saves time and avoids wall damage. This method works best for simple anchor types and small holes. Patience and care matter most in this process.
Pulling Out Small Anchors
Small plastic anchors often come out easily. Use needle-nose pliers to grip the anchor firmly. Pull straight out with steady, gentle force. Avoid twisting to prevent wall damage. If the anchor resists, try wiggling it slightly. This loosens the grip inside the plaster. Pull slowly until the anchor releases.
Twisting And Prying Larger Anchors
Larger anchors need more care to remove. Start by twisting the anchor with pliers. Turn slowly to break its hold in the wall. If twisting fails, use a flathead screwdriver to pry gently. Insert the screwdriver under the anchor edge. Lift carefully to avoid cracking the plaster. Repeat twisting and prying until the anchor comes free.
Use A Drill For Stubborn Anchors
Removing plastic anchors from plaster walls can be tricky. Some anchors stick tightly and resist simple pulling. Using a drill helps loosen and remove these stubborn anchors safely. This method reduces wall damage and speeds up the process.
Choose The Right Drill Bit Size
Select a drill bit slightly smaller than the anchor’s diameter. This ensures the bit fits inside the anchor without hitting the plaster. A tight fit helps break the anchor free without cracking the wall.
Set The Drill To Low Speed
Use a low drill speed to avoid overheating or damaging the plaster. Slow drilling gives better control and prevents the drill bit from slipping. This careful approach protects the wall surface.
Drill Into The Center Of The Anchor
Place the drill bit in the anchor’s middle. Drill gently to create a hole inside the plastic. This weakens the anchor’s grip and makes it easier to pull out.
Remove The Anchor With Pliers
After drilling, grip the anchor with pliers. Pull straight out with steady force. The drilled hole should loosen the anchor, allowing it to come out easily.
Patch And Repair Holes
After removing plastic anchors from plaster walls, holes remain that need fixing. Patching these holes restores the wall’s smooth look. The process involves filling, sanding, and painting. Each step helps the wall look new again and prepares it for decoration.
Fill With Spackle Or Plaster
Choose spackle or plaster to fill the hole. Use a putty knife to apply it evenly. Press the filler into the hole firmly. Smooth the surface to reduce extra work later. Let it dry fully before moving to the next step.
Sanding And Smoothing
Once dry, sand the area lightly. Use fine-grit sandpaper for best results. Sand until the surface feels even with the wall. Remove dust with a clean cloth. This step ensures the patch blends well with the wall.
Painting For A Clean Finish
Paint over the patched area to match the wall color. Use a small brush or roller for better control. Apply thin layers and let each dry. This seals the patch and hides the repair. The wall looks fresh and seamless afterward.
Prevent Wall Damage
Removing plastic anchors from plaster walls needs care. Preventing wall damage keeps your walls smooth and strong. Small mistakes can cause cracks or holes. Use gentle methods to protect the plaster. Take your time and follow these tips.
Use The Right Tools
Choose tools that fit the job. A pair of needle-nose pliers works well. Avoid large or sharp tools that can break plaster. Soft grips help control pressure. The right tools reduce the chance of damage.
Work Slowly And Gently
Pull anchors out slowly. Fast or hard pulling can crack the wall. Wiggle the anchor slightly to loosen it. Patience saves the plaster from breaking. Small, careful moves protect the surface.
Fill Holes Properly
After removing anchors, fill holes quickly. Use spackling paste or plaster filler. Smooth it carefully with a putty knife. Let it dry before sanding or painting. Filling keeps the wall even and neat.
Test Anchor Removal On A Hidden Spot
Try removing an anchor in an unseen area. This helps avoid surprises on main walls. See how the plaster reacts. Adjust your method if damage appears. Testing saves time and effort.

Credit: www.reddit.com
Tips For Future Anchor Removal
Removing plastic anchors from plaster walls can be tricky. Planning ahead makes future removal easier. Simple steps help protect your walls and save time.
Choose The Right Type Of Anchor
Select anchors designed for easy removal. Some plastic anchors expand and stick tightly. Use anchors that pull out smoothly without damage.
Use Proper Tools For Installation
Install anchors with the correct drill bit size. Avoid making holes too large or too small. This prevents wall damage and eases removal later.
Mark The Anchor Location Clearly
Label the anchor spots with a pencil or tape. Clear marks help find anchors quickly for future removal. Saves time and avoids guesswork.
Remove Anchors Gently
Pull anchors out slowly with pliers. Avoid twisting or yanking hard. Gentle removal keeps plaster intact and prevents cracks.
Fill Holes Properly After Removal
Use plaster or wall filler to patch holes. Smooth the surface with sandpaper after drying. Prepares wall for repainting and keeps it neat.
Frequently Asked Questions
How Do You Safely Remove Plastic Anchors From Plaster Walls?
Use pliers to gently pull the plastic anchor straight out. If it resists, widen the hole slightly with a drill or screwdriver before pulling again. Avoid forcing it to prevent wall damage.
What Tools Are Best For Removing Anchors From Plaster?
Pliers, a screwdriver, and a drill are the best tools. Pliers grip the anchor, screwdrivers widen holes, and drills help loosen stubborn anchors. These tools minimize plaster damage during removal.
Can I Fill Holes After Removing Plastic Anchors?
Yes, use spackling paste or plaster filler to fill holes. Apply smoothly, let dry, then sand for a seamless finish. This restores the wall’s appearance effectively.
Why Do Plastic Anchors Damage Plaster Walls?
Plastic anchors expand inside the wall, causing cracks or chunks to break off. Improper removal can worsen damage, so careful extraction is crucial to protect plaster integrity.
Conclusion
Removing plastic anchors from plaster walls is easier than it seems. Use the right tools and take your time. Gently pull or pry the anchor without damaging the wall. Small holes can be fixed quickly with filler. Patience helps avoid extra repairs or cracks.
Now, your wall looks clean and ready for new decorations. Simple steps, good results. Keep these tips in mind for a smooth fix next time.