If you want to add a deadbolt to your door for better security, the first step is drilling the right hole. It might sound tricky, but with the right guide, you can do it yourself without stress.
Imagine having a strong, safe lock protecting your home, done by your own hands. You’ll learn exactly how to drill a hole in your door for a deadbolt, step by step. By the end, you’ll feel confident and ready to boost your home’s safety quickly and easily.
Keep reading to unlock the secrets to a perfect deadbolt installation!

Credit: www.youtube.com
Tools And Materials Needed
Drilling a hole in a door for a deadbolt needs the right tools and materials. Preparing these before starting makes the job smooth and safe. The tools must fit the door type and the deadbolt size. Safety gear protects you from dust and accidents. This section lists what you need to get the task done well.
Essential Tools
You need a power drill with a 1-inch spade bit for the main hole. A hole saw bit works best for the edge of the door. Use a tape measure and pencil to mark spots. A chisel helps clean the edges of the hole. A screwdriver tightens screws after drilling. Clamps can hold the door steady if needed.
Choosing The Right Deadbolt
Select a deadbolt that fits your door thickness. Most doors need a 2-1/8 inch diameter hole. Check the backset measurement, usually 2-3/8 or 2-3/4 inches. Choose a deadbolt with clear installation instructions. Pick a model with strong metal parts for security.
Safety Gear
Wear safety glasses to protect your eyes from dust and wood chips. Use earplugs if your drill is loud. Gloves can protect your hands from splinters. Work in a well-lit area to see clearly. Keep a first aid kit nearby for minor injuries.
Preparing The Door
Preparing the door is a key step before drilling a hole for a deadbolt. It helps ensure the hole is in the right spot and prevents damage. Taking time to prepare makes the job easier and the lock fit better.
Marking The Drill Points
Start by marking the exact spots where you will drill. Use a pencil and the deadbolt template. Hold the template firmly against the door edge and face. Mark the center points for both the hole in the door edge and the hole on the door face. Accurate marks guide your drill and keep holes straight.
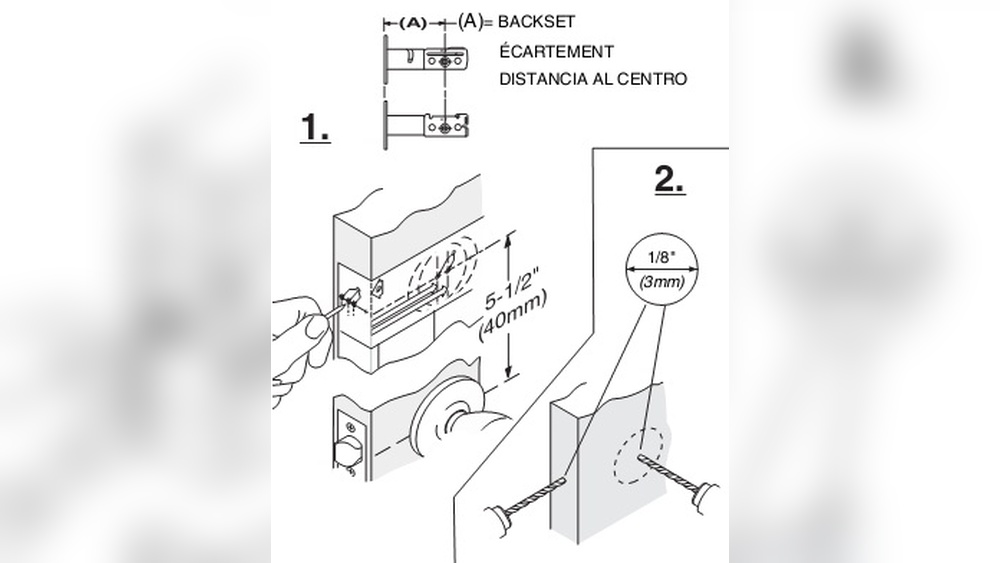
Measuring Backset And Height
Measure the backset, the distance from the door edge to the center of the hole. Common backsets are 2 3/8 inches or 2 3/4 inches. Check your lock’s instructions to match this. Also, measure the height from the floor to the hole center. Standard height is around 36 inches, but adjust as needed for comfort and door style.
Protecting The Door Surface
Protect the door surface before drilling. Place painter’s tape over the drill spots. This prevents wood splintering and keeps the door finish intact. Use a scrap wood piece behind the drill area if possible. It supports the door and stops tear-out on the back side of the hole.
Drilling The Main Hole
Drilling the main hole in a door for a deadbolt is a key step. This hole holds the lock’s body and must be precise. A clean, straight hole makes installation easier and ensures the lock works well.
Careful preparation and the right tools help create a perfect hole. The process starts with choosing the correct drill bit. Then, you drill the face bore, which is the larger hole on the door’s surface. Finally, you follow tips for accurate drilling to avoid mistakes.
Selecting The Drill Bit
Use a hole saw drill bit designed for door locks. Usually, a 2 1/8-inch bit fits most deadbolts. Check your lock’s instructions for exact size. Sharp bits cut cleaner holes and reduce splintering. Choose a bit that fits your drill well.
Drilling The Face Bore
Mark the spot on the door where the hole goes. Place the hole saw bit on the mark. Keep the drill steady and straight. Start drilling slowly to avoid slipping. Drill all the way through the door. Stop and remove the bit carefully.
Tips For Accurate Drilling
Use painter’s tape over the mark to prevent splintering. Drill slowly at first, then increase speed. Hold the drill level to keep the hole straight. Clear wood chips often for a clean cut. Measure twice, drill once to avoid errors.

Credit: www.youtube.com
Drilling The Edge Hole
Drilling the edge hole is a crucial step in installing a deadbolt on your door. This hole holds the latch, which secures the door when locked. Accuracy and care are important here to ensure the deadbolt works smoothly.
Marking The Edge Location
First, measure the height where the deadbolt will sit on the door edge. Usually, this is about 6 to 12 inches above the existing door handle. Use a pencil to mark this spot clearly.
Next, mark the center of the door edge at this height. This mark guides where to drill the latch hole. Double-check the mark to avoid mistakes.
Drilling The Latch Hole
Select a drill bit that matches the size of the latch. Usually, a spade bit or hole saw is best. Drill straight into the door edge at the mark you made. Keep the drill steady to avoid angled holes.
Drill slowly and carefully until you reach the other side of the door. Stop when the hole goes all the way through. This hole will fit the latch mechanism perfectly.
Cleaning The Holes
Remove any wood chips or dust from the drilled holes. Use a small brush or vacuum to clean inside. This helps the latch fit without obstruction.
Check the hole edges for rough spots. Smooth them with sandpaper if needed. Clean holes ensure the deadbolt works smoothly and lasts longer.
Installing The Deadbolt
Installing the deadbolt is the next step after drilling the holes in the door. This process secures your door and improves safety. Proper installation ensures the lock works smoothly and lasts long. Follow each step carefully to fit the parts correctly.
Fitting The Latch
Insert the latch into the edge hole of the door. Make sure the slant of the latch faces the door frame. Push it in until it fits flush with the door edge. Use screws to fasten the latch tightly. This holds the latch firmly in place.
Attaching The Deadbolt Mechanism
Place the exterior part of the deadbolt on the outside of the door. Align it with the drilled holes. Next, fit the interior part on the inside of the door. Connect the two parts using the screws provided. Tighten all screws to secure the lock firmly.
Testing The Lock
Turn the key or thumb turn to check the deadbolt movement. The bolt should slide smoothly into the latch. Lock and unlock several times to ensure proper function. Adjust screws if the lock feels loose or stiff. Confirm the door closes and locks securely.
Troubleshooting Common Issues
Drilling a hole in a door for a deadbolt can be tricky. Problems may happen during the process. Knowing how to fix these common issues saves time and stress. This section covers three main problems and how to solve them.
Misaligned Holes
Holes that do not line up cause the deadbolt to stick or not fit. Check measurements before drilling. Use a template to mark the spot. If holes are off, try to adjust the latch plate or enlarge the hole slightly. Avoid forcing parts into wrong holes. This can damage the door or lock.
Splitting The Door
Drilling can cause the wood to split, especially near edges. Use a sharp drill bit and drill slowly. Place masking tape over the drill point to reduce splintering. Support the door by clamping or holding it firmly. If a split happens, fill it with wood glue or filler. Let it dry before sanding and painting.
Loose Deadbolt Fit
A loose deadbolt makes the door less secure. Check that the hole size matches the lock size. If too big, add wood shims or use a larger mounting plate to fill gaps. Tighten screws well but avoid overtightening. Proper fit ensures smooth lock operation and safety.
Maintenance Tips For Longevity
Proper maintenance keeps your deadbolt working smoothly for years. Small actions help avoid big problems later. Regular care saves money and effort. Follow these simple tips to extend your lock’s life.
Lubricating The Lock
Use a graphite-based lubricant for the keyhole. Spray a small amount inside the lock. Avoid oil-based lubricants; they attract dust and dirt. Lubricate twice a year for smooth operation. This reduces friction and prevents rust.
Checking Alignment Regularly
Check the lock and strike plate alignment often. Misalignment causes difficulty turning the key. Adjust screws if the deadbolt doesn’t slide easily. Proper alignment helps the lock work without force. This prevents damage to the door and lock.
Replacing Worn Parts
Inspect the lock parts for signs of wear. Replace broken or rusty components quickly. Worn parts cause the lock to fail over time. Use parts recommended by the lock manufacturer. Timely replacements keep your door secure and reliable.

Credit: www.familyhandyman.com
Frequently Asked Questions
How Do I Measure The Door For A Deadbolt Hole?
Measure the door thickness and mark the height for the deadbolt. Use a template to mark the hole’s center accurately. Proper measurement ensures the deadbolt fits securely and functions well.
What Tools Are Needed To Drill A Deadbolt Hole?
You need a drill, hole saw bit, spade bit, tape measure, pencil, and chisel. These tools help create precise holes for the deadbolt lock and latch.
How Deep Should The Deadbolt Hole Be Drilled?
Drill the hole to match the deadbolt’s length, usually about 2. 5 inches deep. This depth ensures the lock mechanism fits properly inside the door.
Can I Drill A Deadbolt Hole Without A Template?
Yes, but using a template is recommended for accuracy. Marking measurements carefully will help align holes correctly, preventing installation issues.
Conclusion
Drilling a hole for a deadbolt can be simple with clear steps. Use the right tools and measure carefully before drilling. Take your time to avoid mistakes or damage to your door. Follow safety tips to protect yourself during the work.
A well-installed deadbolt adds security and peace of mind. Practice makes the process easier and less stressful. Now you can improve your door’s safety on your own. Ready to try?