Are you struggling to install your deadbolt because the hole isn’t deep enough? It can be frustrating when your lock doesn’t fit properly or feels loose.
But don’t worry—you can fix this problem quickly and easily. In this guide, you’ll learn simple, step-by-step methods to make your deadbolt hole deeper. By the end, you’ll have a secure lock that fits perfectly, giving you peace of mind and added safety for your home.
Keep reading, and let’s get your door locked tight!

Credit: www.youtube.com
Tools Needed
A drill with the right bit helps make the deadbolt hole deeper. A chisel and hammer may be needed to smooth edges. A tape measure ensures precise depth and placement.
Making a deadbolt hole deeper requires the right tools. These tools help you work safely and accurately. Having them ready makes the job easier and faster.
Each tool has a specific role. Some help cut wood, while others measure or mark the spot. Using the correct tool keeps the door strong and secure.
Power Drill
A power drill is necessary to deepen the hole. Choose one with variable speed for better control. It helps remove wood smoothly and quickly.
Spade Bit Or Hole Saw
Use a spade bit or hole saw to widen the hole. Pick the size that matches your deadbolt. These bits cut cleanly and prevent damage to the door.
Wood Chisel
A wood chisel helps clean up edges and corners. It shapes the hole to fit the deadbolt perfectly. Use it carefully to avoid splinters or cracks.
Measuring Tape
Measure the hole depth accurately with a measuring tape. It ensures the deadbolt fits snugly. Mark the depth clearly before drilling.
Pencil Or Marker
Mark the drill depth and position with a pencil or marker. Clear marks guide your work. They help avoid mistakes and keep the hole centered.
Safety Gear
Wear safety glasses and gloves to protect yourself. Drilling wood can cause splinters and dust. Safety gear keeps your eyes and hands safe.

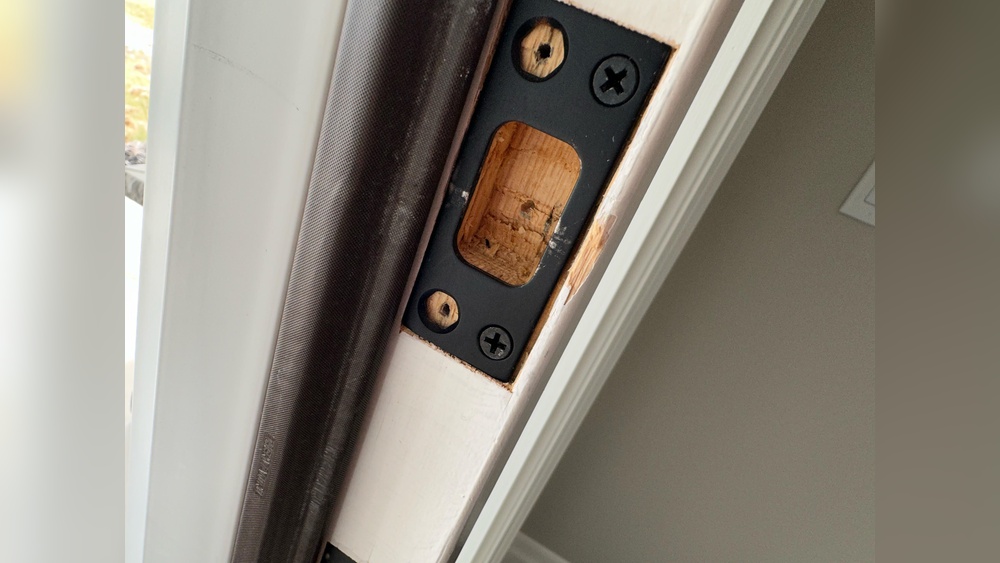
Credit: www.diychatroom.com
Assessing The Existing Hole
Before making the deadbolt hole deeper, start by assessing the existing hole. This step helps you understand the size and condition of the current hole. It ensures you know what tools and methods to use next. Careful assessment prevents mistakes and saves time.
Inspect The Hole Size And Depth
Measure the hole’s diameter with a tape or ruler. Check the depth by inserting a thin stick or a drill bit. Compare the size to the deadbolt requirements. Note if the hole is too shallow or wide. This helps decide how much deeper you need to make it.
Check The Wood Condition Around The Hole
Look closely at the wood around the hole. See if it is cracked, soft, or splintered. Damaged wood can cause problems when installing the deadbolt. Plan to fix or reinforce weak areas before drilling deeper.
Identify The Door Material
Know what type of wood or material your door is made of. Different materials require different drill bits and techniques. For example, hardwood needs stronger drill bits than softwood. This knowledge helps avoid damage during the deepening process.
Marking The Desired Depth
Start by marking the exact depth needed on the drill bit with tape. This helps avoid drilling too deep or too shallow. Clear markings guide you for a precise and safe hole adjustment.
Understanding The Importance Of Marking The Depth
Marking the desired depth is a key step in making a deadbolt hole deeper. It helps you drill accurately and avoid damage. Without a clear mark, you may drill too far or not enough.
Setting the right depth ensures the deadbolt fits securely. It saves time and prevents costly mistakes. This step prepares you for smooth drilling and perfect results.
Tools Needed For Marking Depth
Use a tape measure or ruler to measure the depth. A pencil or marker will help mark the spot clearly. A piece of tape on the drill bit also works well.
The tape acts as a visual stop point. It tells you when to stop drilling. This simple tool keeps your hole precise and clean.
How To Mark The Depth On The Drill Bit
First, measure the depth needed for the deadbolt hole. Wrap a piece of tape around the drill bit at this measurement. Make sure the tape is tight and straight.
Use a pencil to mark the tape edge for extra clarity. This mark shows the drill limit. Stop drilling as soon as this mark reaches the door surface.
Choosing The Right Drill Bit
Choosing the right drill bit is important for making a deadbolt hole deeper. The drill bit must fit the job well to avoid damage. The wrong bit can cause cracks or uneven holes. Picking the correct size and type helps you work faster and cleaner. This saves time and effort.
Understanding Drill Bit Types
There are many drill bit types. For wood doors, spade bits or hole saw bits work best. For metal doors, use a high-speed steel (HSS) bit. Each type cuts differently. Choose the bit that matches your door material.
Choosing The Correct Diameter
The drill bit diameter must match the deadbolt size. Measure the deadbolt hole or check the instructions. Using a bit too small wastes time and can break the bit. A bit too large can ruin the door’s fit.
Depth Marking On Drill Bits
Mark the depth on your drill bit before starting. Use tape or a marker for easy visual control. This prevents drilling too deep or too shallow. Consistent depth makes the deadbolt secure and the door strong.
Drilling Techniques
Drilling a deeper hole for a deadbolt requires the right techniques to ensure accuracy and safety. Using proper drilling methods helps prevent damage to the door and ensures the lock fits perfectly. Focus on control and precision during each step.
Securing The Door
Hold the door steady before drilling. Use clamps or have someone hold it tight. This prevents the door from moving. A steady door helps you drill straight and avoid mistakes. Always check the door’s position before starting.
Drilling Slowly And Steadily
Start drilling at a slow speed. Apply gentle pressure to avoid cracking the wood. Slow drilling keeps the bit from slipping. Keep the drill steady and straight. Take breaks if needed to clear wood dust. This ensures a clean, deep hole for your deadbolt.
Checking The Depth Regularly
Checking the depth regularly is important when making a deadbolt hole deeper. It helps to avoid drilling too much or too little. Careful checks make sure the deadbolt fits well and works smoothly. This step saves time and prevents damage to the door.
Use a measuring tool after every few turns of the drill. This way, you know exactly how deep the hole is. Stop often to measure. It keeps the hole at the right depth for the lock.
Using A Depth Gauge
A depth gauge helps measure the hole’s depth quickly. Insert it into the hole and read the measurement. It gives a clear number so you know when to stop drilling. Depth gauges are cheap and easy to use.
Marking The Drill Bit
Mark the drill bit with tape or a marker at the needed depth. This mark shows when to stop drilling. It helps avoid going too deep. Always check the mark against the hole depth.
Frequent Measuring
Pause drilling every few seconds. Use a tape measure or ruler to check depth. This avoids mistakes and keeps the hole perfect. Frequent checks protect the door’s structure.
Signs The Depth Is Enough
The hole should be deep enough for the deadbolt to fit flush. The lock’s body must sit inside without gaps. If it feels tight or stuck, check the depth again. Proper depth ensures security and smooth locking.
Cleaning The Hole
Cleaning the hole is an important step before making the deadbolt hole deeper. Dirt, dust, and wood chips can block your tools. This makes the drilling process harder and less accurate.
Removing debris ensures a smooth and safe drill. It also protects your tools from damage. A clean hole helps the deadbolt fit better and work properly.
Using A Vacuum To Remove Debris
Start by using a vacuum cleaner to suck out loose dust and wood chips. Hold the vacuum nozzle close to the hole. Move it around to catch all particles inside. This clears the path for your drill bit.
Brushing The Hole With A Small Brush
Use a small, stiff brush to clean the sides of the hole. A wire brush or an old toothbrush works well. Brush gently but firmly to remove stuck debris. This step reaches areas the vacuum might miss.
Blowing Air Into The Hole
Blow compressed air into the hole to clear tiny dust particles. Use an air compressor or a can of compressed air. This pushes out dust that brushing and vacuuming can’t reach.
Credit: www.gaterslocksmith.com
Installing The Deadbolt
Installing the deadbolt is the final step in securing your door. This process ensures the lock fits perfectly and works smoothly. A proper installation keeps your home safe and adds peace of mind.
Preparing The Door
Check the hole depth before starting the installation. Use a drill to make the hole deeper if needed. Clean any wood chips or dust inside the hole. This helps the deadbolt fit tightly and operate well.
Fitting The Deadbolt
Insert the deadbolt latch into the hole on the door edge. Make sure the latch faceplate sits flush with the door surface. Use screws to secure the latch firmly in place. This keeps the deadbolt stable and reliable.
Installing The Deadbolt Cylinder
Slide the deadbolt cylinder through the hole from the outside. Align the cylinder with the latch mechanism inside the door. Attach the interior thumb turn on the other side. Tighten screws to hold both parts together securely.
Testing The Deadbolt
Turn the thumb turn to check smooth operation. The deadbolt should move in and out without resistance. If it sticks, adjust the screws or hole depth slightly. Proper function is vital for security and ease of use.
Tips To Avoid Common Mistakes
Making a deadbolt hole deeper sounds simple. Yet many make mistakes that cause damage or poor fit. Avoiding these errors saves time and money. Follow these tips to work safely and neatly.
Measure Twice, Drill Once
Mark the hole depth clearly on your drill bit. Use a tape or marker to avoid drilling too deep. Check measurements twice before starting. This step prevents costly errors.
Use The Right Drill Bit
Select a drill bit made for wood or metal, depending on your door. Using the wrong bit can crack or splinter the door. A sharp bit makes cleaner holes and works faster.
Drill Slowly And Steadily
Apply gentle pressure while drilling. Fast drilling may cause the bit to slip or break. A steady pace helps control and accuracy. Stop occasionally to check progress.
Protect The Door Surface
Place painter’s tape over the drilling area. This stops splintering and keeps the surface smooth. Remove the tape carefully after drilling.
Check Depth With A Drill Stop
Attach a drill stop collar to your bit. It limits how deep you drill automatically. This tool prevents drilling too far inside the door.
Frequently Asked Questions
How Can I Safely Deepen A Deadbolt Hole?
Use a drill with the correct spade bit size. Mark the desired depth with tape on the bit. Drill slowly and steadily to avoid splintering or misalignment. Always wear safety glasses and check progress frequently.
What Tools Are Needed To Make A Deadbolt Hole Deeper?
You need a power drill, a spade or hole saw bit, and measuring tape. A wood chisel can help clean the edges. Safety goggles and a dust mask are recommended for protection.
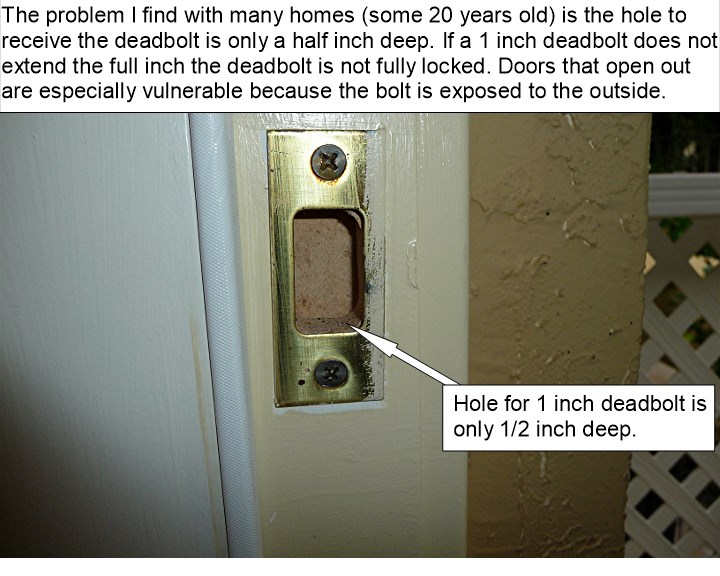
How Deep Should A Deadbolt Hole Be?
The hole should be deep enough to fit the full length of the deadbolt. Typically, this ranges from 2 1/8 inches to 2 1/2 inches. Measure your deadbolt for exact depth before drilling.
Can I Make The Deadbolt Hole Deeper Without Damaging The Door?
Yes, by drilling carefully with the right bit and measuring precisely. Avoid applying too much pressure or drilling too fast. Use protective tape around the hole to prevent chipping.
Conclusion
Making the deadbolt hole deeper is a simple task with the right steps. Use the proper tools and measure carefully before drilling. Take your time to avoid mistakes or damage to the door. A deeper hole ensures the deadbolt fits securely and works well.
With patience, anyone can improve their door’s security this way. Keep safety in mind and follow instructions closely. This small fix can make a big difference in your home’s safety. Ready to try it yourself?