Are you looking to boost safety in your home while keeping things simple? Installing a GFCI outlet with a light switch might sound tricky, but it’s easier than you think.
With just a few tools and clear steps, you can protect your family from electrical shocks and control your lighting all in one spot. In this guide, you’ll find straightforward instructions that anyone can follow—even if you’re not an expert.
Keep reading, and you’ll finish this project feeling confident and proud of your work.
Tools And Materials Needed
Installing a GFCI outlet with a light switch needs the right tools and materials. Having everything ready helps the job go smoothly. It also keeps you safe and makes the process faster.
Essential Tools
- Voltage tester to check power is off
- Wire stripper to remove insulation
- Flathead and Phillips screwdrivers
- Needle-nose pliers for bending wires
- Electric drill with screwdriver bits
- Utility knife for cutting cables
- Level to keep outlets straight
- Flashlight or work light for visibility
Required Materials
- GFCI outlet combined with a light switch
- Electrical box to hold the devices
- 12 or 14-gauge electrical wire, depending on circuit
- Wire nuts for secure connections
- Electrical tape to cover wire nuts
- Outlet cover plate that fits the combo unit
- Circuit breaker or fuse compatible with the outlet

Credit: www.youtube.com
Safety Precautions
Working with electricity needs care. Safety is the top rule before installing a GFCI outlet with a light switch. Following safety steps protects you from shocks and damage. Always prepare well and follow each step carefully.
Power Shutoff
Turn off the power at the main breaker panel. This stops electricity from flowing to the wires you will touch. Check that the power is off to avoid accidents. Never work on live wires.
Testing For Live Wires
Use a voltage tester to check wires. Touch the tester to each wire to see if it has power. Do this even after shutting off the breaker. It confirms no electricity is present. This simple step keeps you safe.
Preparing The Installation Area
Preparing the installation area is the first step to a safe and successful project. Clear the space around the outlet and switch. Make sure you have good lighting and easy access to the electrical box. Safety is important, so turn off the power at the breaker before starting.
Gather your tools and materials. Having everything ready helps the process go smoothly. Take your time to avoid mistakes and ensure a neat installation.
Removing Old Outlet And Switch
Start by unscrewing the cover plate. Use a screwdriver to remove the screws holding the outlet and switch. Pull them gently from the wall box. Do not force them out to avoid damaging the wires. Note how the wires are connected for later reference. Keep the screws and parts in a safe place.
Inspecting Wiring
Check the wires for any damage or wear. Look for cracks in the insulation or signs of burning. Make sure the wires are not loose or corroded. Use a voltage tester to confirm the power is off. Good wiring condition is crucial for safety. Replace any damaged wires before installing the new GFCI outlet and switch.
Wiring The Gfci Outlet
Wiring the GFCI outlet is a key step in your installation process. It ensures safety by protecting against electrical shocks. This part requires careful attention to detail and following clear steps. Understanding the wiring setup helps avoid mistakes and keeps your home safe.
Identifying Line And Load Wires
The first step is to find the line and load wires. Line wires bring power from the main panel to the outlet. Load wires carry power to other outlets downstream. Use a voltage tester to identify which wires have power. The line wires usually connect to the circuit breaker. Label these wires to avoid confusion during installation.
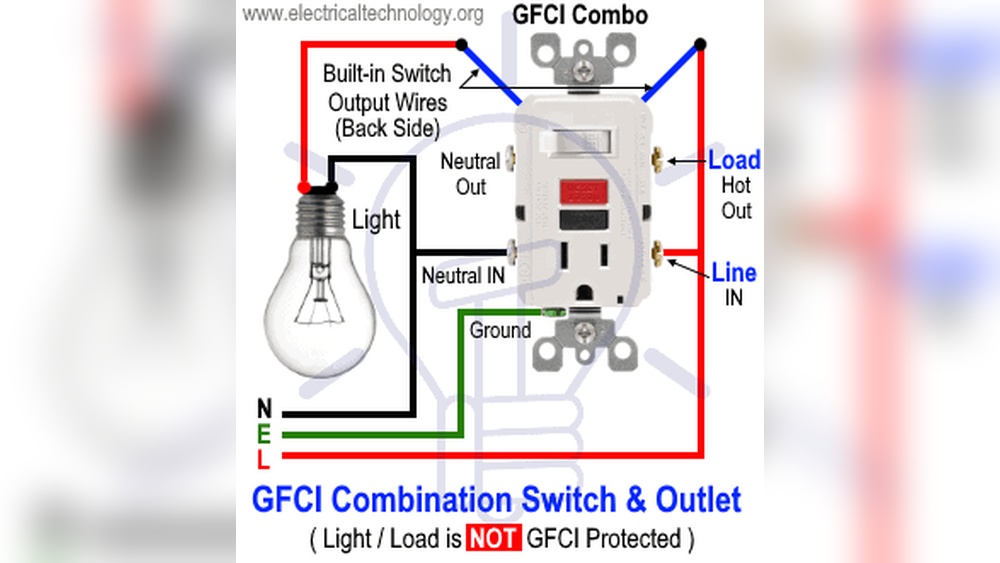
Connecting Wires To Gfci
Connect the line wires to the terminals marked “Line” on the GFCI outlet. Tighten screws securely to ensure good contact. Next, connect load wires to the “Load” terminals if you want to protect downstream outlets. Attach the ground wire to the green grounding screw. Double-check all connections before pushing the outlet back into the box. Proper wiring ensures the GFCI works correctly and provides safety.
Wiring The Light Switch
Wiring the light switch is an important step in installing a GFCI outlet with a light switch. It controls the light while keeping the outlet protected. This section explains how to connect the switch wires and ensure proper grounding for safety.
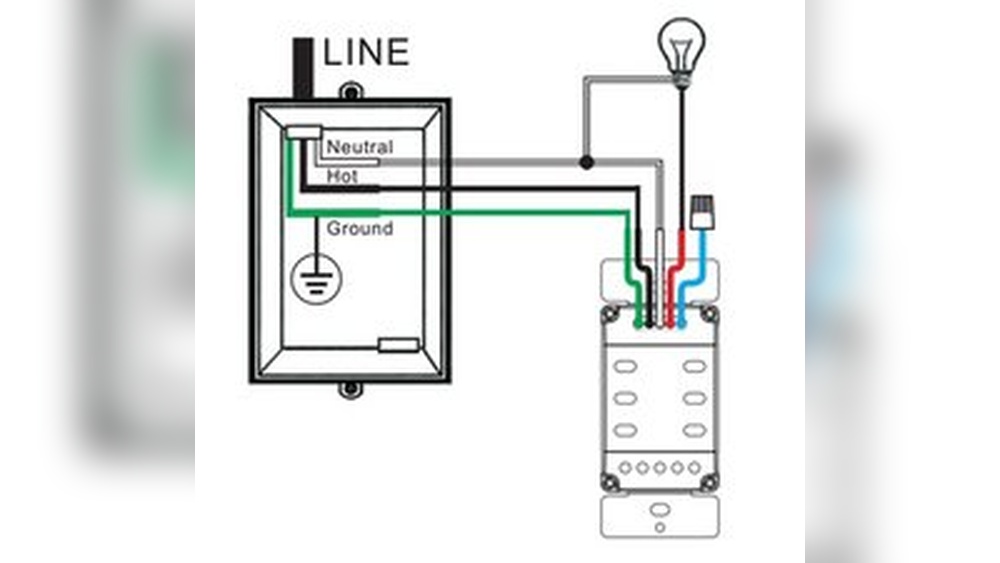
Connecting Switch Wires
Start by turning off the power at the breaker panel. Use a voltage tester to confirm no electricity flows. Identify the line (power) and load (light) wires in the switch box. Connect the black line wire to one terminal on the switch. Attach the black load wire to the other terminal. Use wire nuts to join the white neutral wires together. Make sure no bare wires touch the switch terminals. Tighten all connections firmly to avoid loose wiring.
Ensuring Proper Grounding
Grounding prevents electrical shock and fires. Find the bare copper or green grounding wire in the box. Attach it to the green screw on the switch. If the box is metal, connect a grounding wire to it as well. Use wire nuts or grounding clips to join all grounding wires. Check that the ground wires are secure and not damaged. Proper grounding ensures safe operation of the switch and outlet.

Credit: www.do-it-yourself-help.com
Mounting And Securing Devices
Mounting and securing devices is a key step in installing a GFCI outlet with a light switch. Proper mounting keeps the devices safe and stable. It also ensures they work correctly without any loose connections. Take your time to position each device firmly in the electrical box. Use the right screws and tools to avoid damage.
Check that wires are neatly arranged before securing the devices. Crowded or tangled wires can cause problems later. Tighten screws just enough to hold the device steady. Over-tightening may crack the plastic or strip the screw.
Installing The Gfci Outlet
Start by pushing the GFCI outlet into the electrical box gently. Align the screw holes with the box’s mounting holes. Use a screwdriver to fasten the screws securely. Do not force the outlet if wires feel tight. Adjust wires carefully to prevent strain.
Make sure the outlet sits flush with the wall surface. A loose or tilted outlet can be unsafe. After mounting, test the GFCI button to confirm it works. A firm mount helps the outlet last longer and stay safe.
Installing The Light Switch
Place the light switch into its electrical box with care. Match the switch’s mounting holes with the box screws. Use a screwdriver to secure the switch in place. Keep wires organized to avoid pinching when tightening screws.
Ensure the switch fits flat against the wall plate. Loose switches can cause flickering or failure. Check the switch’s operation after mounting. A stable mount supports smooth switch action and safety.
Testing The Installation
Testing the installation is a key step after wiring your GFCI outlet and light switch. It ensures everything works safely and correctly. Skipping this step can cause hazards or damage. Follow these simple tests to confirm your setup is correct.
Restoring Power
Turn the main breaker back on to restore power to the circuit. Watch for any sparks or unusual sounds. Check if the GFCI outlet and light switch have power. Use a flashlight or a small device to verify the outlet is live.
Using Gfci Test Button
Press the test button on the GFCI outlet. It should cut power to the outlet immediately. This simulates a fault and confirms the GFCI is working. Press the reset button to restore power. Repeat this test a couple of times to be sure.
Checking Light Switch Function
Flip the light switch on and off. The connected light or fixture should respond instantly. No flickering or delay means the switch wiring is correct. If the light does not work, re-check your connections. Proper testing ensures your installation is safe and functional.

Credit: diy.stackexchange.com
Troubleshooting Common Issues
Troubleshooting issues with a GFCI outlet combined with a light switch is common during installation. Many problems arise from wiring errors or device faults. Understanding these issues helps fix them quickly. This section covers two frequent problems and easy ways to solve them.
Gfci Not Resetting
A GFCI outlet that won’t reset often shows wiring problems. Check if the power is off before testing. Make sure the line and load wires connect properly. Swap the wires if unsure. Dirt or moisture inside the outlet can stop it from resetting. Clean the outlet carefully and try again. Sometimes, the GFCI device is faulty and needs replacement.
Switch Not Working
If the light switch does not work, start by checking the wiring connections. Loose or reversed wires can cause the switch to fail. Confirm the switch is compatible with the GFCI outlet. Test the switch with a voltage tester to verify power flow. Replace the switch if it shows no signs of working. Ensure the circuit breaker is on and not tripped.
Frequently Asked Questions
What Tools Are Needed To Install A Gfci Outlet With A Light Switch?
You need a voltage tester, wire stripper, screwdriver, electrical tape, and wire nuts. These tools ensure safe and proper installation.
Can I Install A Gfci Outlet And Light Switch In One Box?
Yes, combining them in a single electrical box is possible if the box size fits both devices properly. Follow local codes.
How Do I Wire A Gfci Outlet With A Light Switch?
Connect the line wires to the GFCI’s LINE terminals. Attach the switch to the load wires controlling the light.
Is It Safe To Install A Gfci Outlet Near Water Sources?
Yes, GFCI outlets protect against electrical shock. They are essential near sinks and bathrooms for safety.
Conclusion
Installing a GFCI outlet with a light switch is simple and safe. Follow each step carefully to avoid mistakes. Always turn off power before starting any work. Test the outlet after installation to ensure it works. This setup protects you from electrical shocks.
Take your time and ask for help if needed. Now, you can enjoy a safer and more convenient electrical system at home.