Are you looking to install a light switch but don’t know where to start? You’re in the right place.
Installing a light switch might seem tricky, but with the right steps, you can do it yourself and save money. Imagine flipping your switch and instantly lighting up your room—all done by your own hands. In this guide, you’ll find simple, clear instructions that make the process easy and safe.
Ready to take control of your home’s lighting? Let’s get started!
Gathering Tools And Materials
Before installing a light switch, gather all necessary tools and materials. This step saves time and ensures a smooth process. Having everything ready helps avoid interruptions and frustration.
Essential Tools For Installation
Start with a flathead screwdriver and a Phillips screwdriver. A voltage tester is crucial to check for live wires. Wire strippers help remove insulation safely. Needle-nose pliers make bending wires easier. Electrical tape secures wire connections. A flashlight can provide extra light in dark spaces.
Choosing The Right Switch
Select a switch that fits your needs and wiring system. Single-pole switches work for simple on/off control. Three-way switches control lights from two places. Check the voltage and amperage rating on the switch. Match the switch style to your home’s decor for a clean look.
Safety Gear Checklist
Wear insulated gloves to protect against electric shocks. Safety glasses shield your eyes from dust and debris. Use rubber-soled shoes for better insulation. Turn off the power at the breaker box before starting. Always double-check with a voltage tester to be sure.
:max_bytes(150000):strip_icc()/how-to-wire-and-install-single-pole-switches-1152330-05-2de77af170364a6fb3846f30634a5cd3.jpg)
Credit: www.thespruce.com
Preparing The Work Area
Preparing the work area is the first step in installing a light switch. A clean and safe space helps make the job easier and safer. Taking time to get ready prevents accidents and mistakes. Follow simple steps to prepare well before starting the installation.
Shutting Off Power Safely
Turn off the power at the circuit breaker. This stops electricity from flowing to the switch. Use the breaker panel and switch off the correct circuit. Double-check that the power is off before touching any wires. Safety first. Never skip this step.
Clearing The Switch Location
Remove any wall plates or covers around the switch. Clear the area of dust and debris. Make sure you have enough light and space to work. Keep tools and materials nearby but out of the way. A tidy space helps you focus on the task.
Testing For Electricity
Use a voltage tester to check the wires. Confirm that no electricity flows to the switch. Test each wire separately for safety. If the tester shows power, turn off the breaker again. Never touch wires until you are sure power is off.
Removing The Old Switch
Removing the old light switch is the first step in installing a new one. It requires care and attention to avoid damage. Safety is important. Always turn off the power at the breaker box before starting. This prevents shocks and accidents. The process includes unscrewing the cover plate, detaching wires, and inspecting the wiring. Each step must be done slowly and carefully.
Unscrewing The Cover Plate
Use a screwdriver to remove the screws on the cover plate. Keep the screws in a safe place for later use. Gently pull the cover plate away from the wall. Sometimes it may stick, so wiggle it slightly. Avoid forcing it hard to prevent cracks or breaks.
Detaching Wires Carefully
After the cover plate is off, you will see the switch and wires. Loosen the screws holding the wires on the switch. Note the wire positions or take a photo for reference. Pull the wires off the switch terminals gently. Do not pull the wires themselves. Hold the metal parts to avoid damage.
Inspecting The Wiring
Check the wire ends for damage or wear. Look for frayed or burnt wires. Clean any dirt or corrosion on the wires. Ensure the wires are solid and ready for the new switch. If wires look weak, consider calling an electrician.
Credit: www.youtube.com
Wiring The New Switch
Wiring the new switch is a key step in the installation process. It ensures the switch works safely and correctly. This part requires care and attention to detail. Following clear steps helps avoid electrical problems.
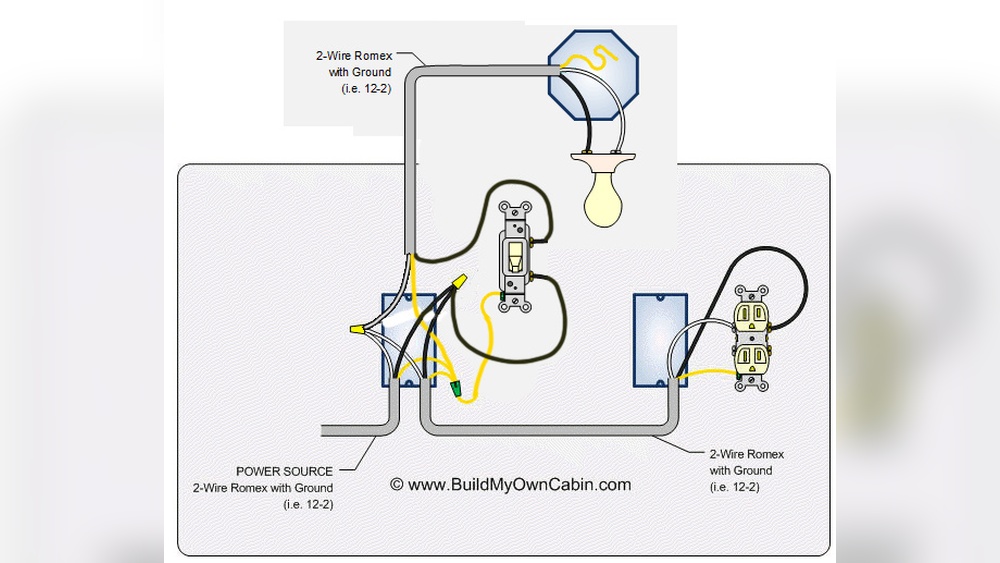
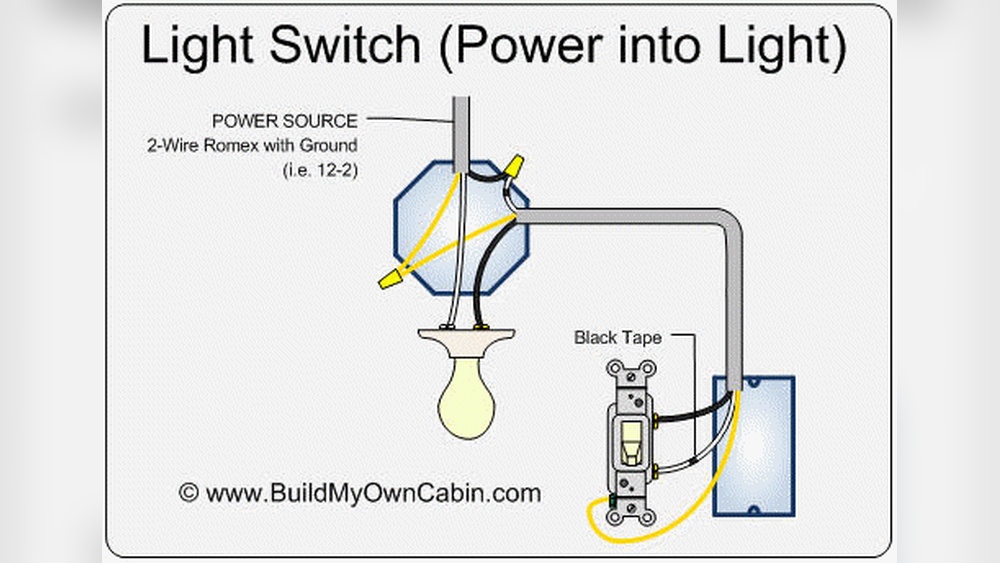
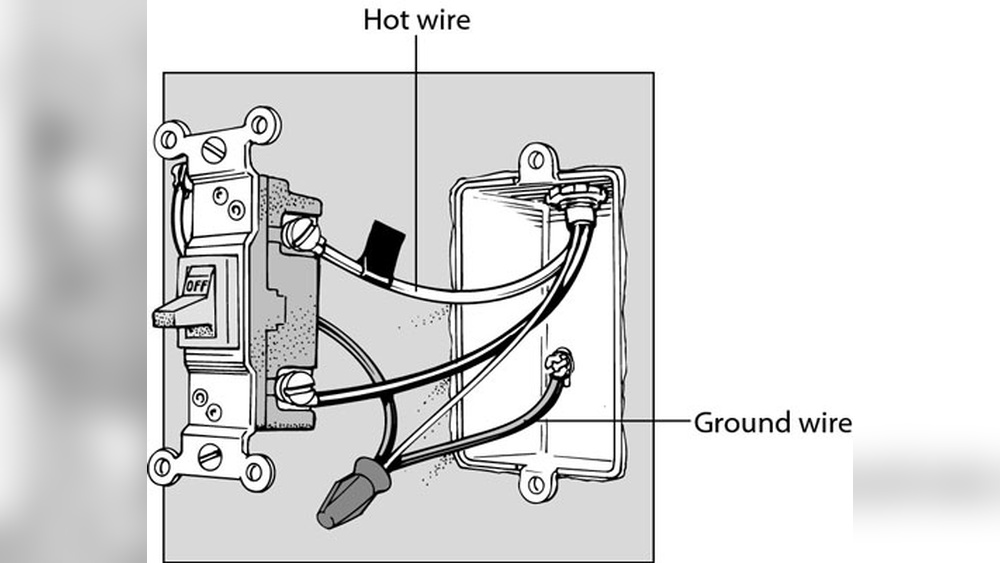
Identifying Wire Types
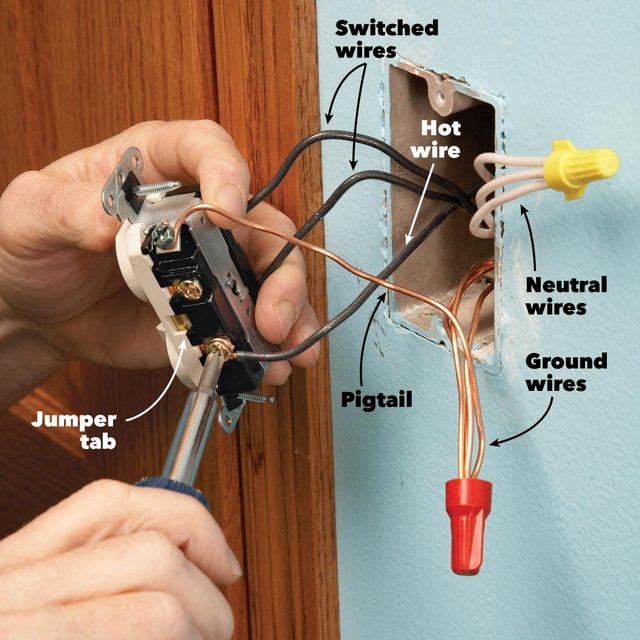
First, recognize the wires in your wall box. Common wires include black, white, and green or bare copper. Black wires carry power. White wires are neutral. Green or bare wires are ground. Knowing these helps connect the switch properly.
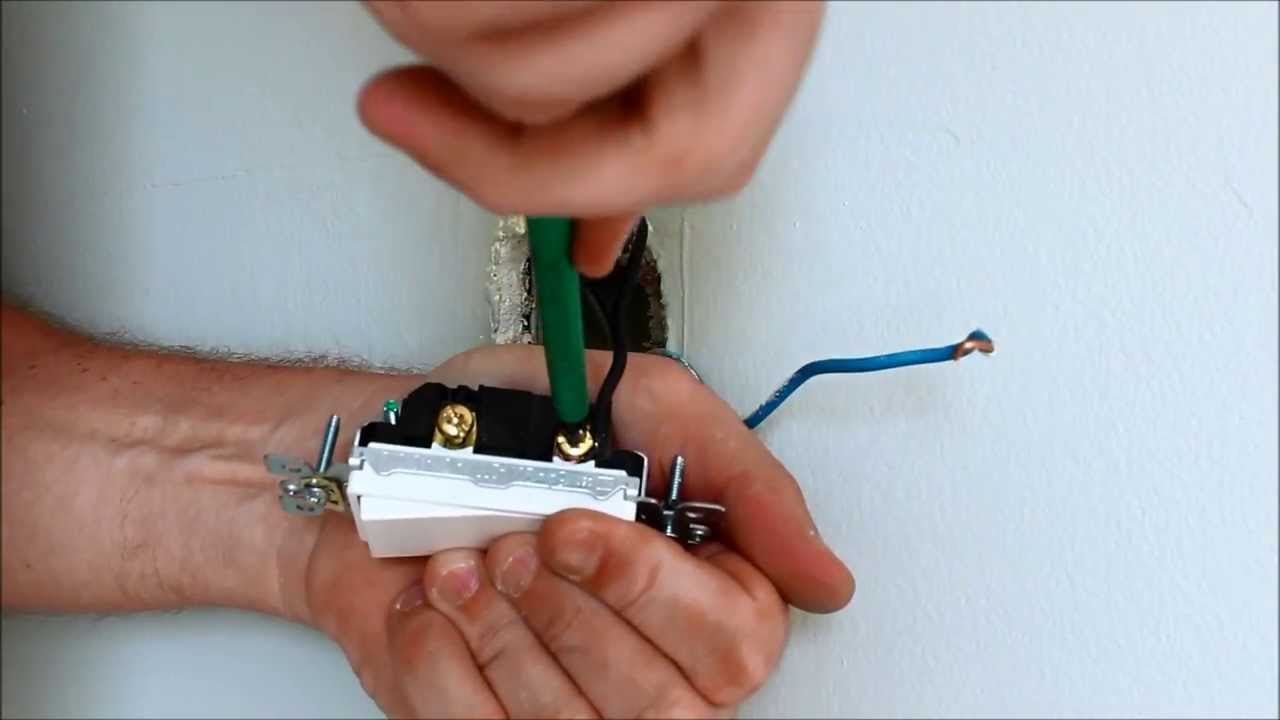
Connecting Wires To Terminals
Attach the black wire to the switch terminal labeled “live” or “common.” Connect the white wire to the neutral terminal if your switch has one. Secure the green or bare wire to the ground terminal. Tighten the screws firmly to hold the wires in place.
Securing Wire Connections
Ensure all wire connections are tight and secure. Use a screwdriver to check terminal screws. Wrap exposed wire ends with electrical tape for safety. Push wires gently into the box. Loose wires can cause shorts or shocks.
Mounting And Finishing
Mounting and finishing the light switch is the last step of the installation. It ensures the switch fits well and looks good. This part also makes sure the switch works safely. Follow these steps carefully to complete your project.
Attaching The Switch To The Box
Place the light switch inside the electrical box. Align the screw holes on the switch with those on the box. Use a screwdriver to tighten the screws. Do not overtighten; the switch should be firm but not cracked. Check the switch sits flat and straight.
Replacing The Cover Plate
Put the cover plate over the switch. Line up the holes on the plate with the screws on the switch. Screw in the cover plate using a small screwdriver. Tighten just enough to hold the plate in place. The plate should not be loose or bent.
Restoring Power And Testing
Turn the power back on at the circuit breaker. Flip the switch on and off to test it. The light should turn on and off smoothly. If the switch feels loose or the light does not work, turn off the power again. Check all connections and tighten screws if needed.
Troubleshooting Common Issues
Troubleshooting common issues helps fix problems quickly. Understanding typical faults saves time and effort. This section covers frequent problems and simple fixes. Follow these steps to solve light switch troubles safely.
Switch Not Working
Check if the power is on at the breaker. Test the switch with a voltage tester for safety. Replace the switch if it feels loose or broken. Make sure wires connect tightly to the switch terminals. Sometimes, the problem is a blown fuse or tripped breaker.
Flickering Lights
Flickering can mean a loose wire or bad bulb. Tighten wire connections inside the switch box carefully. Replace old or faulty bulbs with new ones. Use bulbs with the correct wattage for your fixture. Flickering may also come from a faulty switch or dimmer.
Loose Connections
Loose connections cause sparks or switch failure. Turn off power before touching wires. Tighten all wire nuts and terminal screws firmly. Inspect wires for damage or corrosion and replace if needed. Proper connections keep switches working safely and well.
Tips For Safe And Efficient Installation
Installing a light switch requires care and attention. Safety is the top priority to avoid accidents. Efficiency helps complete the job faster and better.
Follow these tips to work safely and efficiently on your light switch installation. They will guide you through important steps and decisions.
Working With Circuit Breakers
Always turn off the circuit breaker before starting. This cuts power to the switch and prevents electric shock. Test the wires with a voltage tester to be sure power is off. Never skip this step.
Label the breaker to avoid confusion later. Keep the breaker off until the job is complete. This keeps you safe during installation.
Using Proper Tools
Use tools designed for electrical work. Insulated screwdrivers and wire strippers protect against shocks. Avoid makeshift tools that can slip or damage wires.
Have a voltage tester, needle-nose pliers, and a wire cutter ready. These tools make the job smoother and reduce mistakes. Good tools save time and effort.
When To Call A Professional
Call an electrician if you feel unsure. Complex wiring or old circuits need expert handling. Professionals prevent damage and ensure safety.
Do not attempt repairs if wires look damaged or corroded. A professional can assess and fix problems correctly. Safety always comes first.
Credit: www.familyhandyman.com
Frequently Asked Questions
How Do I Safely Install A Light Switch?
Turn off power at the circuit breaker before starting. Use a voltage tester to confirm no electricity flows. Follow wiring instructions carefully and secure all connections tightly. Always use a switch rated for your circuit to ensure safety.
What Tools Are Needed To Install A Light Switch?
You need a screwdriver, voltage tester, wire stripper, and pliers. A flashlight can help if the area is dim. These tools ensure you can safely and accurately install the switch.
Can I Replace A Light Switch Myself?
Yes, if you follow safety steps and basic wiring knowledge. Turn off power, remove the old switch, connect wires to the new one, and secure it. If unsure, consult a professional electrician.
How Do I Identify The Correct Wires For Installation?
Look for the black (hot), white (neutral), and green or bare (ground) wires. Use a voltage tester to confirm. Match wires to the corresponding switch terminals as per instructions for proper installation.
Conclusion
Installing a light switch is easier than it seems. Follow each step carefully and take safety seriously. Always turn off power before you start working. Double-check your connections to avoid any problems. With patience, you can do this yourself. Enjoy the satisfaction of fixing things at home.
Remember, practice makes perfect. Try a simple switch first before moving to complex ones. Keep your tools and instructions close by. This skill saves money and boosts confidence. Give it a try and light up your space safely!