Are you ready to brighten up your space and take control of your lighting? Installing a light and switch might sound tricky, but with the right steps, you can do it yourself confidently.
Imagine flipping a switch and instantly changing the mood of your room—it’s easier than you think. In this guide, you’ll discover simple, clear instructions that anyone can follow, even if you’ve never handled electrical work before. Stick with me, and by the end, you’ll have the skills to safely install your own light and switch, saving money and adding a personal touch to your home.
Let’s get started!
Credit: www.familyhandyman.com
Tools And Materials Needed
Installing a light and switch requires specific tools and materials. These help you work safely and finish the job correctly. Preparing these items beforehand makes the process smooth and faster.
Essential Tools
You need a few basic tools for this task. A screwdriver set is vital, including flathead and Phillips types. Wire strippers help remove insulation from wires carefully. A voltage tester ensures the power is off before starting. Pliers assist in bending and twisting wires. A drill might be necessary for new holes or mounting boxes.
Choosing The Right Light And Switch
Select a light fixture that fits your room’s style and size. Check the wattage to avoid overload. Choose a switch that matches your wiring system and controls the light properly. Single-pole switches work for one light from one location. Three-way switches control a light from two places. Consider energy-saving LED bulbs for better efficiency.
Safety Gear
Safety is crucial during electrical work. Use insulated gloves to protect your hands from shocks. Safety glasses shield your eyes from dust and debris. Wear sturdy shoes to avoid slips or falls. Turn off power at the breaker box before starting any work. Use a ladder carefully if needed to reach high spots.
Preparing The Work Area
Preparing the work area is a crucial first step before installing a light and switch. Safety and organization make the job easier and faster. Clear space helps avoid accidents and allows you to focus on the task. Follow these steps carefully to get ready.
Turning Off Power
Start by turning off the power to the circuit you will work on. Find the main breaker box and switch off the correct breaker. This stops electricity flow and prevents shocks. Use a label or tape to mark the breaker as off. Never skip this step.
Clearing The Space
Remove any furniture, rugs, or objects near the work area. Clear floor space for tools and parts. A tidy area reduces tripping hazards. Spread a drop cloth to catch dust or debris. Organize tools within reach for smooth work.
Testing For Live Wires
Use a voltage tester to check wires before touching them. Test all wires in the box to ensure no power is present. A safe tester gives a clear signal if wires are live. Double-checking protects you from electric shock. Always test even if you turned off the breaker.
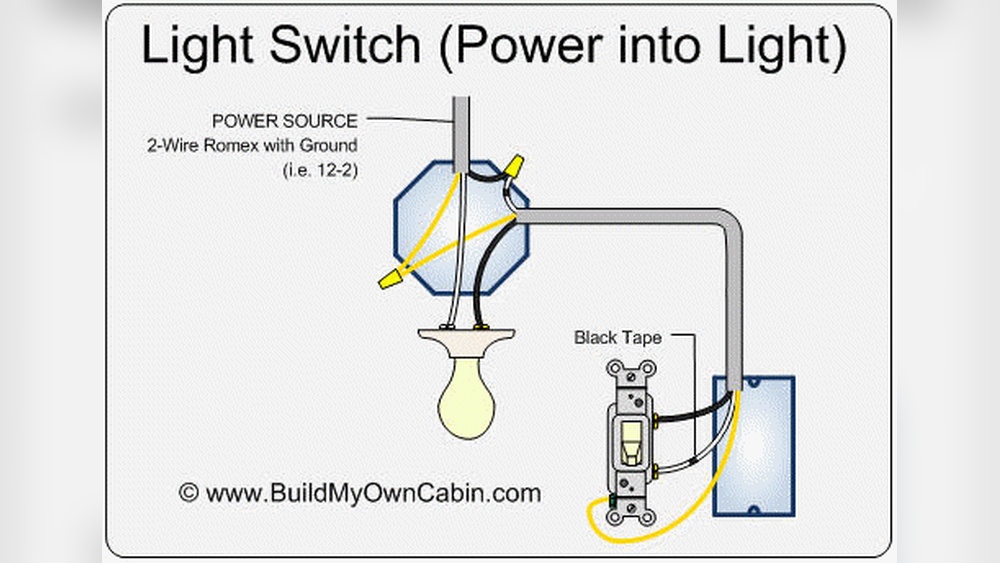
Wiring Basics
Wiring is the heart of installing a light and switch. Knowing the basics makes the job safer and easier. This guide explains key wiring steps for beginners.
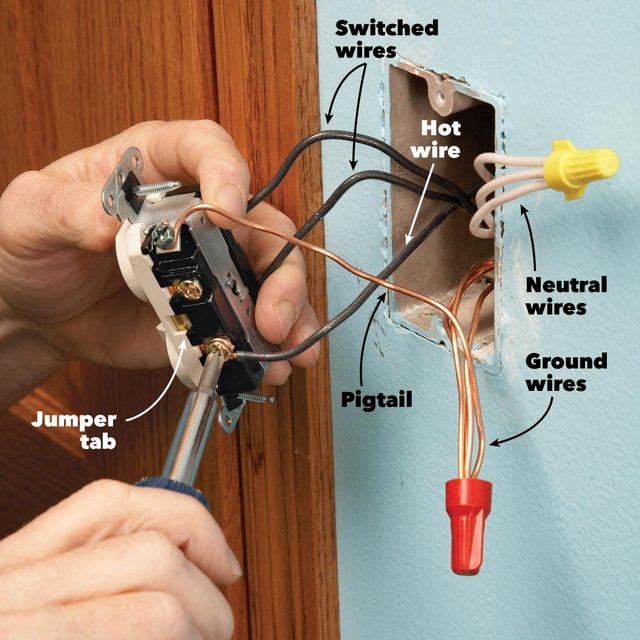
Identifying Wires
Wires carry electricity to power lights and switches. You will see different wires inside electrical boxes. Usually, there are three main types: hot, neutral, and ground.
The hot wire carries power from the breaker. The neutral wire completes the circuit back to the box. The ground wire protects against shocks and shorts.
Understanding Wire Colors
Colors help identify wire types quickly. In most homes, black or red means hot wire. White means neutral wire. Green or bare copper means ground wire.
Always double-check colors with a tester. Wire colors can vary in some cases. Safety is the top priority.
Using Wire Connectors
Wire connectors join wires safely. They keep wires tight and prevent sparks or shorts. Twist wires together, then screw on the connector.
Use the right size connector for the wires. Never leave wires loose or exposed. Proper connectors keep your installation safe and stable.
:max_bytes(150000):strip_icc()/how-to-wire-and-install-single-pole-switches-1152330-05-2de77af170364a6fb3846f30634a5cd3.jpg)
Credit: www.thespruce.com
Installing The Light Fixture
Installing the light fixture is a key step in adding new lighting to any room. It involves fixing the fixture securely, connecting the wires safely, and making sure everything stays in place. This part of the process must be done carefully to avoid any electrical problems. Follow these simple steps to install your light fixture correctly.
Mounting The Fixture
Start by attaching the mounting bracket to the electrical box. Use screws that fit well to hold the bracket tight. The bracket must be level to keep the fixture straight. Check that the box can support the fixture’s weight. This ensures the light will not fall.
Connecting The Wires
Turn off the power at the breaker before handling wires. Match the wires by color: black to black, white to white, and green or bare copper to ground. Twist the ends together and secure with wire nuts. Wrap electrical tape around the nuts for extra safety. Make sure no bare wire is exposed.
Securing The Fixture
Lift the fixture and align it with the mounting bracket. Use screws to attach the fixture firmly. Check that it does not wobble or move. Attach any covers or shades that came with the light. Finally, turn the power back on and test the light.
Installing The Switch
Installing the switch is a key step in setting up your new light. This process involves removing the old switch, wiring the new one, and then securing it in place. Each step requires care to ensure safety and proper function.
Removing The Old Switch
Start by turning off the power at the circuit breaker. Use a voltage tester to confirm no electricity is flowing. Remove the switch cover plate with a screwdriver. Unscrew the old switch from the electrical box. Carefully pull the switch out to access the wires. Note how the wires are connected before disconnecting them. Disconnect the wires from the old switch. Keep the wires separated to avoid contact.
Wiring The New Switch
Identify the terminals on your new switch. Connect the ground wire to the green terminal. Attach the hot wire to the brass or black screw. Connect the neutral wire if your switch requires it. Tighten the screws to secure each wire firmly. Make sure no bare wire is exposed. Double-check the connections for safety and accuracy.
Mounting And Testing
Push the wires back into the electrical box carefully. Screw the new switch into place. Attach the switch cover plate. Turn the power back on at the circuit breaker. Test the switch by toggling it on and off. Ensure the light responds correctly. If it does not work, turn off the power and recheck the wiring.
Final Checks
After installing your light and switch, final checks are essential to ensure safety and functionality. These steps verify that everything works as it should. Taking time now prevents issues later. Follow the simple steps below to complete your project confidently.
Restoring Power
Switch the main power back on at the circuit breaker. Double-check that the breaker is fully on. Avoid turning on other devices while testing. This ensures the circuit is ready for your new light and switch.
Testing The Light And Switch
Flip the switch to see if the light turns on. Try switching it on and off several times. Check for any flickering or unusual sounds. Make sure the light is steady and bright. This confirms the wiring is correct and safe.
Troubleshooting Common Issues
If the light does not work, first turn off the power. Check all wire connections for loose or incorrect wiring. Tighten any loose screws on the switch and light fixture. Replace the bulb if it is faulty. If problems persist, consult a professional electrician for help.
Safety Tips And Best Practices
Working with electricity needs care and attention. Safety is the top priority when installing a light and switch. Following safety tips helps prevent accidents and damage. Best practices protect you and your home from electrical hazards.
Avoiding Electrical Hazards
Turn off the power at the breaker before starting work. Use a voltage tester to check wires for electricity. Wear insulated gloves and tools designed for electrical work. Avoid water or damp areas while working with wires. Keep your work area clean and organized to prevent trips or mistakes.
When To Call A Professional
Call an electrician if you feel unsure or uncomfortable. Complex wiring or old electrical systems need expert help. If breakers trip often or wires look damaged, stop and get a professional. Safety is more important than saving money on repairs.
Maintaining Your Installation
Check switches and lights regularly for signs of wear or damage. Tighten loose screws and clean dust from fixtures. Replace bulbs with the correct wattage to avoid overheating. Always turn off power before making any repairs or changes.

Credit: www.dummies.com
Frequently Asked Questions
How Do I Safely Install A Light Fixture?
Turn off power at the breaker before starting. Use a voltage tester to confirm no electricity flows. Follow the fixture’s instructions carefully. Securely connect wires with wire nuts. Mount the fixture firmly to the electrical box. Restore power and test the light.
What Tools Are Needed To Install A Switch?
You’ll need a screwdriver, wire stripper, voltage tester, and pliers. A drill may help with mounting. Always use insulated tools to ensure safety when working with electrical wiring.
Can I Replace A Light Switch Myself?
Yes, if you follow safety steps and understand wiring basics. Always turn off power before starting. Carefully remove the old switch, note wire placement, and connect the new switch accordingly. Consult a professional if unsure.
What Type Of Switch Works Best For Home Lighting?
Toggle switches are common and easy to use. Dimmer switches allow adjustable brightness and energy savings. Consider smart switches for remote control and automation options.
Conclusion
Installing a light and switch is easier than it seems. Follow safety rules and use the right tools. Take your time and check every connection carefully. Turning off the power before starting protects you from shocks. After installation, test the switch to ensure it works well.
This simple project can brighten your home and save money. Practice makes perfect, so don’t rush. With patience, anyone can do it safely and confidently.

