Have you ever wished you could control your light fixture with a simple switch, but didn’t know where to start? Adding a switch might seem tricky, but it’s easier than you think—and it can make a huge difference in your daily routine.
Imagine turning your lights on and off without reaching for the plug or fumbling in the dark. In this guide, you’ll discover clear, step-by-step instructions that anyone can follow. By the end, you’ll have the confidence to upgrade your space and enjoy the convenience you deserve.
Ready to make your lighting work smarter for you? Let’s dive in!

Credit: diy.stackexchange.com
Tools And Materials Needed
Adding a switch to a light fixture requires the right tools and materials. Having everything ready makes the job easier and safer. This section covers the basic electrical tools, switch types, and safety gear needed for this project.
Basic Electrical Tools
You will need a screwdriver set to remove and attach screws. Wire strippers help remove insulation from wires. A voltage tester checks if wires have electricity. Pliers are useful for bending and holding wires. Electrical tape secures wire connections. A drill may be needed for mounting the switch.
Switch Types
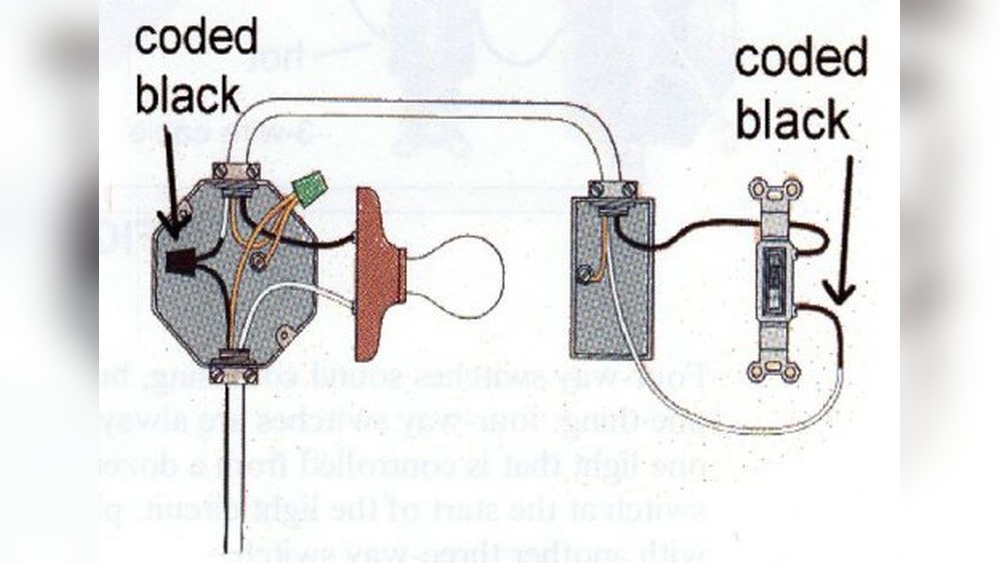
Choose the switch type based on your needs. A single-pole switch controls one light from one spot. A three-way switch works with another switch to control one light from two places. Dimmer switches adjust light brightness. Make sure the switch matches your fixture and wiring.
Safety Gear
Safety is important when working with electricity. Wear insulated gloves to protect from electric shock. Use safety glasses to shield your eyes from debris. Work in a well-lit area. Turn off the power at the circuit breaker before starting.
Preparing For Installation
Before installing a switch for your light fixture, preparation is key. It helps keep the work safe and smooth. Taking these steps will protect you and the wiring.
Preparing well makes the whole process easier. It also prevents damage to your home’s electrical system.
Turn Off Power
Start by switching off the power at the circuit breaker. This stops electricity from flowing to the light fixture. Use a breaker label to find the right switch. Double-check by turning the light on and off. If it does not light, the power is off.
Locate Wiring
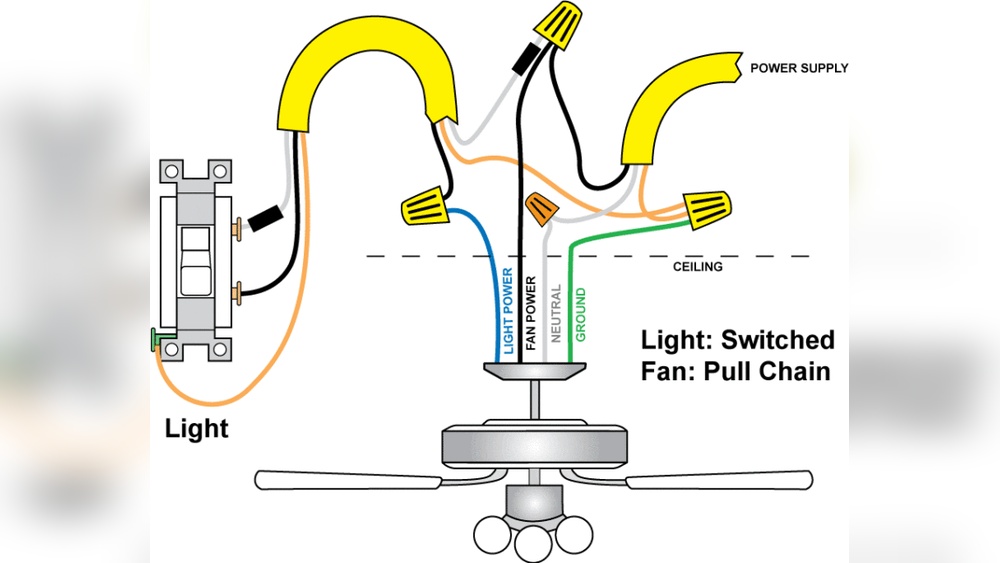
Find the wires inside the light fixture box. Usually, you will see three types: live (hot), neutral, and ground wires. They are often color-coded. Black or red wires are live. White wires are neutral. Green or bare wires are ground. Knowing this helps with the correct switch connection.
Test For Live Wires
Use a voltage tester to check wires for current. Touch the tester to each wire carefully. If the tester lights up or beeps, the wire is live. Test all wires to be sure the power is off. This step protects you from electric shocks.
Removing The Existing Fixture
Removing the existing light fixture is the first step in adding a switch. This step helps prepare the wiring for the new switch installation. Take your time and follow safety rules. Turn off the power at the circuit breaker before you begin. Safety is key when working with electrical parts.
Unscrew Fixture
Start by removing the screws holding the fixture to the ceiling or wall. Use a screwdriver that fits the screws well. Support the fixture with one hand while unscrewing. Carefully lower the fixture to expose the wires behind it.
Disconnect Wires
Look for the wire connectors that join the fixture wires to the house wiring. Twist off the wire nuts to separate the wires. Keep the wires apart to avoid touching. Note which wires connect to each other for later use.
Inspect Wiring
Check the wires for any damage or wear. Look for frayed insulation or loose connections. If wires look damaged, repair or replace them before continuing. Confirm the wires are the right type and size for your new switch.
Wiring The New Switch
Wiring the new switch is an important step in adding a switch to a light fixture. It controls the flow of electricity to the light. Proper wiring ensures the switch works safely and correctly.
Follow clear steps to identify wires, connect them, and secure connections. This guide helps make the process simple and safe.
Identify Hot And Neutral Wires
First, find the hot wire. It carries electricity from the power source. Usually, it is black or red. The neutral wire returns electricity and is often white. Use a voltage tester to check the wires. Always turn off power before touching wires. Knowing which wire is hot or neutral is key for safe wiring.
Connect Switch Wires
Attach the switch wires to the hot wires. Connect one switch terminal to the hot wire coming from the power source. Connect the other terminal to the wire going to the light fixture. Do not connect the neutral wire to the switch. This step controls the light by opening or closing the circuit.
Secure Wire Connections
Use wire nuts to twist wires together tightly. Make sure there is no bare wire showing. Wrap electrical tape around the wire nuts for extra safety. Push the wires gently into the switch box. Screw the switch into place. Secure connections prevent shorts and keep the switch working well.
Mounting The Switch
Mounting the switch is a crucial step in adding a switch to a light fixture. This part secures the switch to the wall and completes the installation. A properly mounted switch looks neat and works safely.
Follow these steps to attach the switch and finish the setup. Take your time and handle the parts gently to avoid damage.
Attach Switch To Wall Box
Start by positioning the switch inside the wall box. Align the holes on the switch with the holes in the box. Use screws to fix the switch firmly to the box. Tighten the screws just enough to hold the switch steady. Avoid over-tightening as it can crack the switch or box.
Check if the switch is straight and does not wobble. A steady switch ensures safe operation and a clean look.
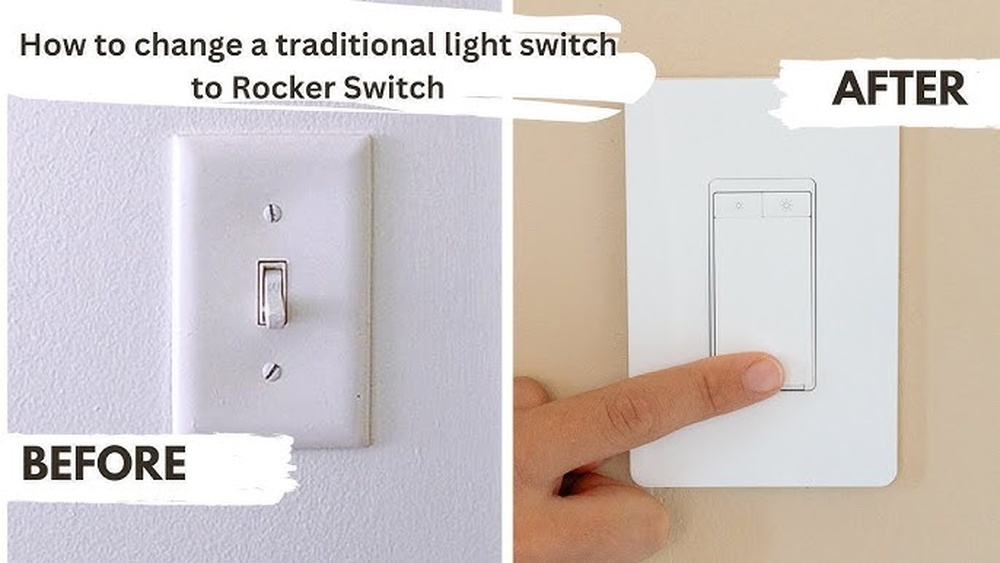
Install Switch Cover Plate
Once the switch is secured, place the cover plate over it. The plate hides wires and makes the switch look complete. Align the cover plate holes with the switch screw holes. Insert the screws and tighten them gently. Do not force the screws, or the plate may crack.
Confirm the cover plate fits flush against the wall. A tight fit prevents dust and dirt from entering the switch box.
Testing The Installation
Testing the installation is a crucial step after adding a switch to a light fixture. It confirms that the wiring is correct and the switch works properly. This step helps avoid electrical problems and ensures safety.
Restore Power
Turn the circuit breaker back on. This restores electricity to the light fixture. Wait a moment for power to stabilize before testing the switch. Never skip this step.
Operate Switch
Flip the new switch up and down. Check if the light turns on and off each time. The switch should feel smooth and responsive. If the light doesn’t change, the wiring may be incorrect.
Troubleshoot Common Issues
If the light stays off, check the bulbs. Replace any burned-out bulbs. Tighten all wire connections inside the switch box. Make sure the switch is wired to the correct wires. Use a voltage tester if needed. Safety first—always turn off power before fixing wiring.
Tips For Safe Electrical Work
Working with electricity can be risky. Safety must come first when adding a switch to a light fixture. Following simple safety tips helps prevent accidents and injuries. This section explains key safety steps to keep your project safe and smooth.
These tips are easy to follow and very important for anyone doing electrical work at home.
Use A Voltage Tester
Always check if the power is off before starting. A voltage tester shows if wires have electricity. Test the wires in the fixture and switch box. This step stops shocks and keeps you safe.
Work With A Partner
Have someone near when working on electrical parts. A partner can help in emergencies. They can also hand you tools and watch for safety. Two people make the job safer and easier.
When To Call A Professional
Some jobs need expert help. Call an electrician if you feel unsure or confused. Complex wiring or older homes are best handled by pros. This choice protects your home and your health.

Credit: www.wikihow.com

Credit: www.youtube.com
Frequently Asked Questions
How Do I Safely Add A Switch To A Light Fixture?
Turn off power at the breaker before starting. Use a voltage tester to confirm no electricity flows. Follow wiring diagrams carefully and use insulated tools. If unsure, consult a licensed electrician to avoid hazards.
What Tools Are Needed To Install A Light Switch?
You need a voltage tester, wire strippers, screwdriver, electrical tape, and a new switch. A wire cutter and pliers help with connections. Proper tools ensure a safe, efficient installation process.
Can I Add A Switch To An Existing Light Fixture?
Yes, you can add a switch by wiring it between the power source and fixture. Ensure power is off before working. Proper wiring and switch placement are key for functionality and safety.
How Do I Identify Wires For A New Switch?
Look for black (hot), white (neutral), and green or bare (ground) wires. Use a voltage tester to confirm which wire carries power. Correct identification prevents wiring mistakes and ensures safety.
Conclusion
Adding a switch to a light fixture is simple and useful. It lets you control lights easily and saves energy. Always turn off power before starting work. Use the right tools and follow safety steps closely. Taking your time helps avoid mistakes.
With some care, anyone can do this task. Enjoy the convenience of your new light switch. Keep practicing to improve your DIY skills. Small projects like this build confidence and save money. Give it a try and see the difference it makes.