Have you ever opened up your light switch only to realize putting it back together feels confusing? You’re not alone.
Fixing a light switch might seem tricky, but with the right steps, you can do it yourself safely and quickly. This guide will walk you through exactly how to put your light switch back together, so you don’t have to call a professional or live in the dark a moment longer.
Keep reading—you’ll be amazed at how simple it really is.
Tools Needed
Putting a light switch back together requires a few simple tools. Having the right tools makes the job easier and safer. You do not need many items, just the basics.
Gather all tools before starting. This saves time and avoids frustration. Each tool has a specific role in the process.
Screwdriver
A screwdriver is essential for removing and tightening screws. Most light switches use flathead or Phillips screws. Choose the correct type to avoid stripping screws.
Voltage Tester
A voltage tester ensures the power is off. Safety first. It checks if wires carry electricity before you touch them.
Needle-nose Pliers
Needle-nose pliers help bend wires and pull small parts. They give better control in tight spaces. Handy for handling wires carefully.
Wire Stripper
A wire stripper removes the insulation from wires. Use it to expose clean wire ends. This tool prevents damage to the wire core.
Electrical Tape
Electrical tape secures wire connections. It insulates exposed wires. Use tape to prevent short circuits and keep wires neat.
Safety First
Safety comes first when putting a light switch back together. Electricity can be dangerous. Taking the right steps keeps you safe and avoids accidents.
Simple safety habits protect you and your home. Follow each step carefully before starting the repair.
Turn Off The Power
Switch off the power at the circuit breaker. Do not rely on the wall switch alone. Use a tester to confirm the power is off.
Use Insulated Tools
Choose tools with insulated handles. They reduce the risk of electric shock. Avoid using metal tools without insulation.
Wear Protective Gear
Wear rubber-soled shoes and safety glasses. They offer extra protection. Avoid working in wet conditions.
Check For Damaged Wires
Inspect wires for cracks or burns. Replace damaged wires before reassembling the switch. Damaged wires cause shorts and fires.
Work In A Well-lit Area
Good lighting helps you see wires clearly. It prevents mistakes. Use a flashlight if needed.
Removing The Switch Cover
Removing the switch cover is the first step in putting a light switch back together. It gives you access to the switch and wires inside. Doing this safely is very important.
Take your time and follow these steps carefully to avoid damage or injury.
Turn Off Power
Always switch off the power at the circuit breaker. This stops electricity from flowing to the switch. Use a tester to make sure the power is off before touching anything.
Locate And Remove Screws
Find the screws holding the switch cover in place. Usually, there are two screws, one at the top and one at the bottom. Use a screwdriver to remove them carefully.
Gently Pull Off The Cover
After removing screws, pull the cover straight out. Do not force it, as you might break the plastic. If it feels stuck, check for hidden screws or clips.

Credit: www.reddit.com
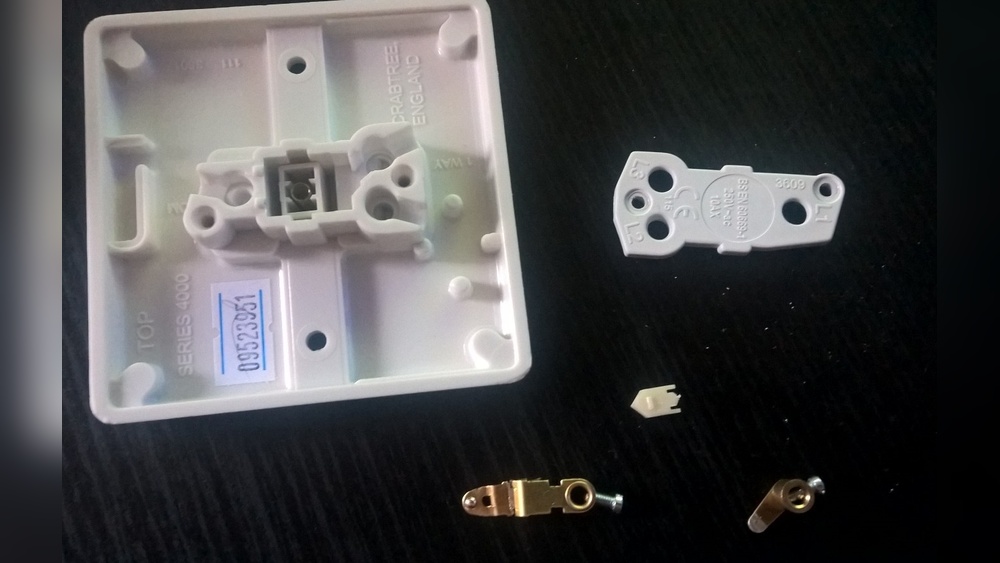
Inspecting The Switch Components
Inspecting the switch components is an important step before putting a light switch back together. It helps find any broken or worn parts. This makes sure the switch works safely and correctly.
Take your time to check each part closely. Small damage can cause big problems later. A careful inspection saves time and effort.
Checking The Switch Plate
The switch plate covers the inside parts. Look for cracks or chips. A damaged plate may not fit well. Replace the plate if you see damage.
Examining The Toggle Or Rocker
The toggle or rocker moves up and down to turn lights on or off. Press it gently to test movement. It should move smoothly without sticking. Any stiffness means it may need cleaning or replacement.
Inspecting The Internal Contacts
Internal contacts carry electricity when the switch is on. Look for corrosion or dirt on these parts. Clean contacts with a dry cloth if dirty. Replace contacts if they look burnt or damaged.
Reviewing The Screws And Terminals
Screws and terminals hold wires and parts together. Make sure screws are not loose or stripped. Tighten loose screws carefully. Replace damaged screws to keep parts secure.
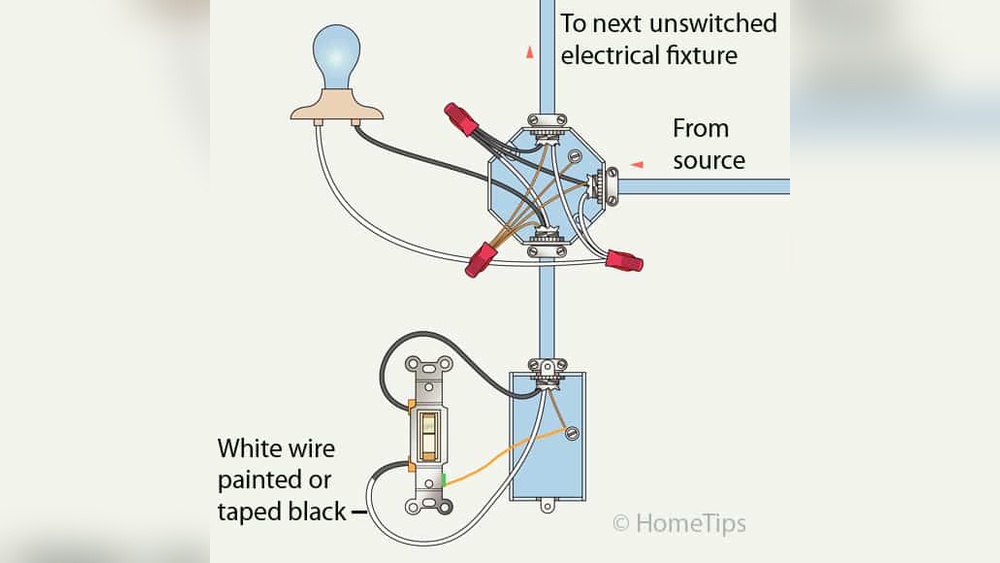
Reattaching Wires
Reattaching wires is a key step in putting a light switch back together. This process ensures the switch works safely and correctly. Understanding how to identify and secure wires will help avoid common problems like loose connections or short circuits.
Identifying Wire Types
Start by recognizing each wire’s function. The most common wires are the live (hot), neutral, and ground wires. Live wires carry electricity to the switch. Neutral wires complete the electrical circuit. Ground wires provide safety by directing electricity away from the switch.
Look for colors to identify wires. Black or red usually means live wires. White typically indicates neutral wires. Green or bare copper wires are ground wires. Always double-check with a voltage tester to be sure.
Securing Wire Connections
Connect each wire tightly to its proper terminal. Loose wires can cause sparks or stop the switch from working. Wrap the wire clockwise around the screw terminal. Tighten the screw firmly but avoid damaging the wire.
Use wire nuts to join wires if needed. Twist wires together first, then screw on the nut. Tug gently to make sure the connection is firm. Proper securing keeps the switch safe and functional.

Credit: www.reddit.com
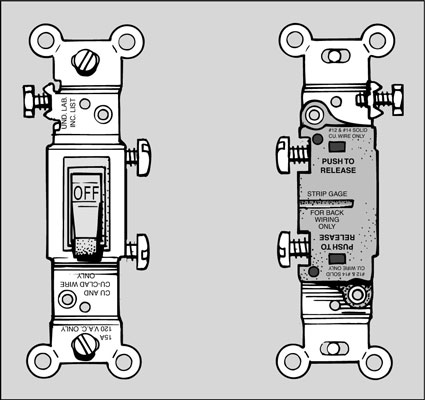
Aligning The Switch Mechanism
Aligning the switch mechanism is a key step in putting a light switch back together. This step ensures the switch works smoothly and safely. Proper alignment helps the switch toggle on and off without sticking or failing.
Take your time to position the parts exactly as they fit. Small misalignments can cause the switch to jam or break quickly. Careful alignment also keeps the internal parts from wearing down too fast.
Identify The Main Components
First, recognize the switch’s main parts. These usually include the toggle lever, the internal spring, and the contact plate. Knowing their place helps in lining everything up properly.
Fit The Toggle Lever Correctly
Place the toggle lever into its slot gently. It should move freely but not wobble. The lever controls the on/off action, so it needs precise positioning.
Secure The Internal Spring
The spring helps the switch snap back to its resting position. Align it so it presses the lever correctly. If misplaced, the switch may feel loose or too stiff.
Align The Contact Plate
The contact plate completes the electrical circuit when the switch flips. Position it so it touches the toggle lever at the right spots. This ensures the light turns on and off reliably.
Test The Movement Before Final Assembly
Move the toggle gently after alignment. It should click smoothly between positions. No resistance or loose parts mean the alignment is good.
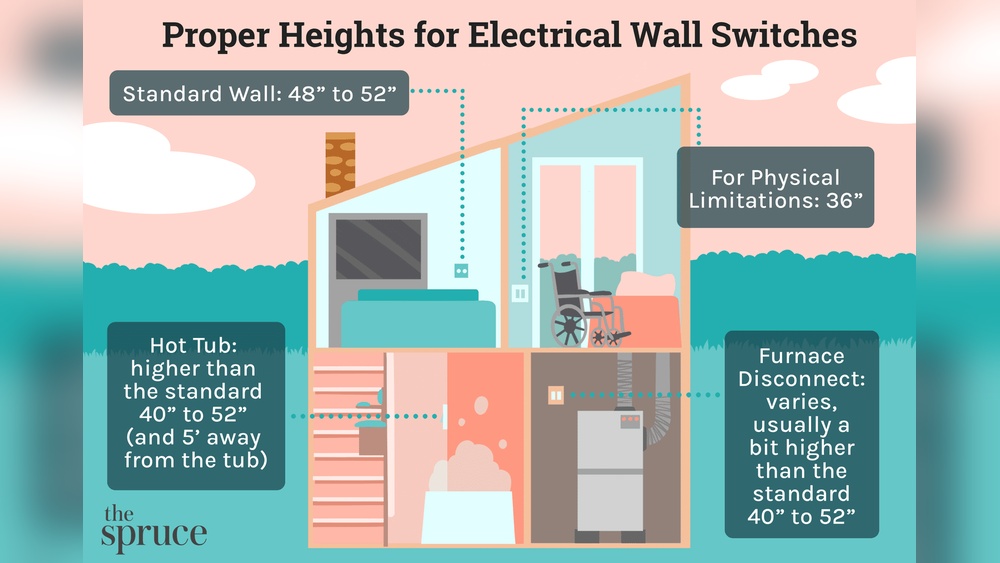
Securing The Switch To The Wall
Securing the light switch to the wall is a key step in the reassembly process. This step keeps the switch stable and safe for use. Properly attaching the switch prevents it from moving or falling out of the electrical box. It also ensures that the switch works correctly without any loose connections.
Aligning The Switch With The Electrical Box
Place the switch carefully into the electrical box. Make sure the switch fits snugly without forcing it. Check that the screw holes on the switch line up with the holes in the box. Proper alignment avoids damage and makes securing easier.
Inserting And Tightening The Screws
Use the correct screws for your switch. Insert screws into the holes and turn them clockwise. Tighten screws until the switch is firmly held. Avoid over-tightening to prevent cracking the switch or wall plate.
Testing The Stability Of The Switch
After tightening, gently wiggle the switch. It should not move or feel loose. If it does, recheck the screws and tighten them more. A steady switch ensures safe and proper operation.
Replacing The Switch Cover
Start by placing the switch cover over the switch carefully. Align the screws with the holes and tighten them gently. Make sure the cover fits snugly without forcing it.
Preparing The Switch Cover For Installation
Start by choosing the right switch cover for your switch. Check the size and shape to match your switch box. Clean the cover to remove dust or dirt. This helps it fit well and look neat.
Aligning The Switch Cover Properly
Hold the switch cover gently against the switch. Line up the screw holes with the switch box holes. Make sure the cover sits flat and straight on the wall. Proper alignment prevents damage and ensures safety.
Securing The Switch Cover With Screws
Insert the screws into the holes by hand first. Tighten the screws with a screwdriver slowly and evenly. Avoid over-tightening to prevent cracking the cover. The cover should feel firm and stable once secured.
Testing The Switch
Testing the switch is a crucial step after putting it back together. It ensures the switch works safely and correctly. Skipping this step may cause electrical problems or hazards. Take your time and follow these simple checks to confirm the switch is ready to use.
Checking The Power
Turn the main power back on from the breaker. Use a voltage tester to check if power reaches the switch. Touch the tester to the wires connected to the switch. The tester should light up or beep if power is present. No power means the switch is not connected properly.
Testing The Switch Function
Flip the switch several times to check its function. The connected light or device should turn on and off each time. If the light does not respond, double-check the wiring. A faulty switch or loose wire may cause failure. Make sure the switch clicks when flipped.
Using A Multimeter For Accuracy
Set a multimeter to measure continuity or resistance. Place the probes on the switch terminals. Flip the switch to the ON position. The multimeter should show zero or very low resistance. Switch it OFF and the reading should show no continuity. This confirms the switch works electrically.
Credit: www.dummies.com
Troubleshooting Common Issues
Troubleshooting common issues is key to fixing a light switch safely. Problems can happen even after careful assembly. Knowing how to find and fix these issues saves time and keeps your home safe.
Some problems are easy to spot. Others need careful checking. This guide helps you handle typical troubles with light switches. Follow each step to find the problem and fix it quickly.
Checking For Loose Connections
Loose wires cause switches to fail or flicker. Turn off power before touching any wires. Look for wires not tightly wrapped around screws. Tighten any loose wires with a screwdriver. Make sure wires are secure but not damaged.
Testing The Switch Mechanism
Sometimes the switch itself breaks inside. Use a tester or multimeter to check for continuity. Press the switch on and off while testing. No continuity means the switch is faulty. Replace the switch if it does not work properly.
Inspecting The Wiring Setup
Wrong wiring can stop the switch from working. Compare your wiring to the switch’s wiring diagram. Make sure live, neutral, and ground wires go to the right terminals. Correct any wiring mistakes carefully before turning power back on.
Dealing With A Tripped Circuit Breaker
A breaker may trip if the switch or wiring shorts. Check your breaker panel for any tripped switches. Reset the breaker by flipping it off and on. If it trips again, turn off power and inspect wiring for damage or shorts.
Frequently Asked Questions
How Do I Safely Put A Light Switch Back Together?
Turn off the power at the circuit breaker first. Confirm no electricity is flowing using a tester. Reconnect wires to their correct terminals. Secure the switch in the wall box and attach the cover plate. Finally, restore power and test the switch.
What Tools Are Needed To Reassemble A Light Switch?
You need a flathead screwdriver, a Phillips screwdriver, and a voltage tester. Wire strippers may help if wires need adjustment. These tools ensure you can safely and efficiently reconnect and secure the light switch components.
How Do I Identify Wire Connections On A Light Switch?
Typically, black or red wires are hot and connect to brass terminals. White wires are neutral and connect to silver terminals. Ground wires are green or bare copper and attach to the green screw. Always verify with a voltage tester before handling.
Can I Reassemble A Light Switch Without Professional Help?
Yes, if you follow safety guidelines and have basic electrical knowledge. Always turn off power before starting. Use proper tools and double-check wiring connections. If unsure, consult a professional to avoid electrical hazards.
Conclusion
Putting a light switch back together can be simple and quick. Follow each step carefully and check your work. Always turn off the power before starting. Take your time to avoid mistakes or accidents. A well-fixed switch keeps your home safe and working.
Practice makes the task easier next time. Stay patient and focused for the best results. You can handle this project with basic tools and clear instructions. Safety first, then enjoy the satisfaction of a job done right.