Changing a light switch with the power still on might sound risky, but what if you could do it safely and quickly? Imagine fixing that flickering switch without shutting off your entire home’s electricity or calling a costly electrician.
In this guide, you’ll discover simple, step-by-step tips to handle the job confidently. Keep reading to learn how you can save time, avoid hassle, and get your lights working perfectly again—without the usual downtime or stress.
Safety First
Safety must come first when changing a light switch with the power on. Electricity is dangerous and can cause serious harm. Understanding risks and using the right safety gear helps reduce accidents. Knowing when to call a professional keeps you and your home safe.
Risks Of Working With Power On
Working with the power on can cause electric shock or burns. Touching live wires may lead to serious injury or death. Sparks can start fires. The risk of damaging the electrical system is high. Mistakes happen fast and without warning.
Necessary Safety Gear
Use insulated gloves to protect your hands from electric shock. Wear safety goggles to guard your eyes from sparks. Use tools with insulated handles only. Avoid wearing metal jewelry or rings. Stand on a dry, non-conductive surface for extra safety.
When To Call A Professional
Call a professional if you feel unsure or unsafe. Complex wiring needs expert knowledge. Professionals have tools and training to handle power safely. Don’t risk injury or damage by guessing. Trust experts to do the job right.
Tools And Materials Needed
Before changing a light switch with the power on, gather the right tools and materials. This step ensures safety and efficiency during the process. Use tools designed for electrical work to avoid accidents. Prepare all supplies before starting to save time and reduce errors.
Essential Tools
You need a voltage tester to check if wires carry current. A flathead and a Phillips screwdriver will help remove the switch cover and screws. Wire strippers are necessary to trim and prepare the wires properly. Needle-nose pliers help bend wires and fit them into terminals. Use insulated tools to protect yourself from electric shocks.
Choosing The Right Switch
Select a switch that matches your current setup. Check the switch type: single-pole or three-way. Look at the voltage and amperage ratings on the switch label. Pick a switch with similar ratings to your old one. Choose switches with clear markings for easier installation.
Additional Supplies
Have electrical tape to cover exposed wires safely. Wire nuts help connect and secure wire ends. A flashlight or headlamp can provide light if power is off temporarily. Keep a small container for screws and parts. Use a voltage detector pen for quick safety checks.
Preparing The Work Area
Preparing the work area is the first step for a safe and smooth light switch change. It helps avoid accidents and keeps the task organized. Taking time to get ready makes the process easier and faster.
Clearing The Space
Remove all items near the switch. Clear furniture, decorations, and cords. This creates enough room to work freely. A clean area lowers the risk of tripping or knocking things over. Good lighting helps you see clearly. Use a portable lamp if needed.
Testing The Switch
Test the switch to understand its function. Turn it on and off to observe what it controls. Check if the light or device reacts properly. This step confirms you work on the correct switch. Use a voltage tester for extra safety. It shows if power is still flowing.
Marking Wires
Before disconnecting wires, mark each one. Use colored tape or labels to identify them. Marking wires helps you reconnect them correctly later. Take a photo as a backup reference. This prevents confusion and mistakes. Clear labeling saves time during reassembly.
/how-to-replace-a-light-switch-1824670_hero_40432-43add2624f6c4522a4ee50bb24ece2be.jpg)
Credit: www.thespruce.com
Step-by-step Switch Replacement
Changing a light switch with the power on requires care and focus. Follow each step carefully to avoid risks. This guide breaks down the process into simple actions. Take your time and work safely.
Loosening The Old Switch
First, remove the switch cover plate. Use a screwdriver to loosen the screws. Keep the screws safe for later. Gently pull the switch out from the wall box. Hold it steady to avoid wire damage.
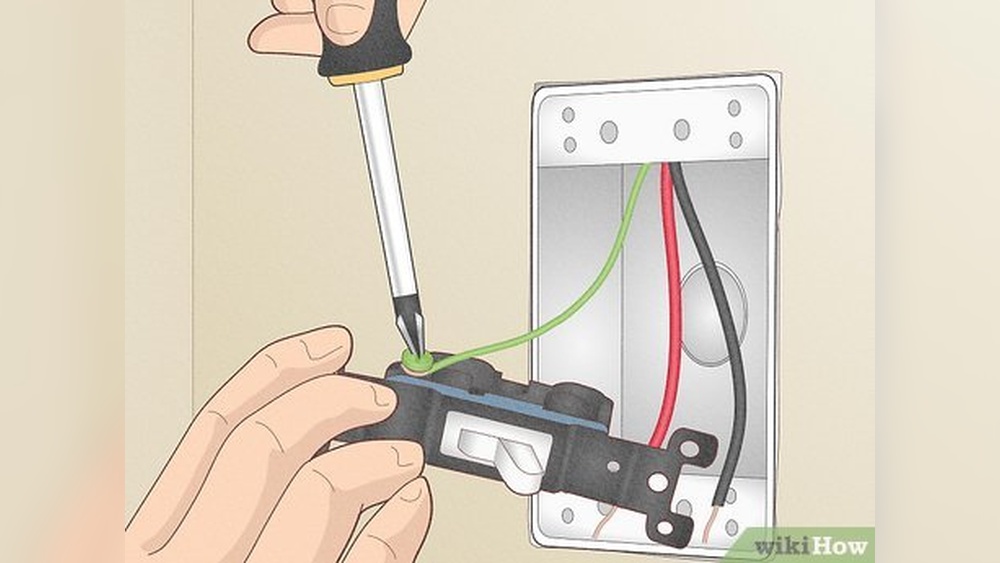
Disconnecting The Wires
Notice how the wires connect to the old switch. Use a screwdriver to loosen the terminal screws. Carefully detach each wire from the switch. Keep the wires separate and do not let them touch. This step prevents shorts and sparks.
Connecting The New Switch
Match the wires to the new switch terminals. Attach each wire under the correct screw. Tighten the screws firmly but do not over-tighten. Make sure no wire insulation is under the screws. Proper connection ensures the switch works well.
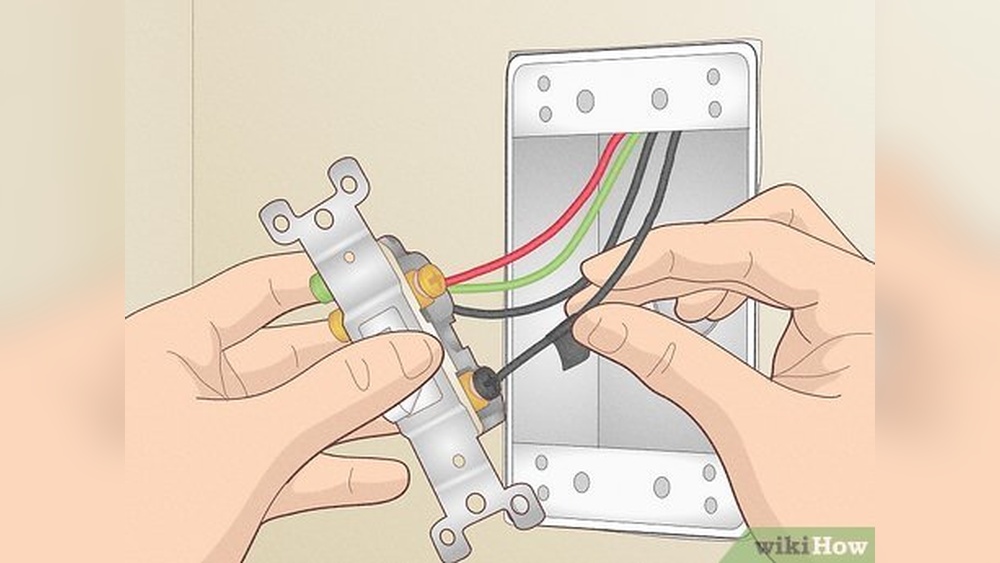
Securing The Switch
Push the new switch back into the wall box. Align it carefully to avoid pinching wires. Use the screws to secure the switch in place. Reattach the cover plate and tighten its screws. Check the switch for solid fitting before testing.
Testing The New Switch
Testing the new switch is a key step after installation. It confirms the switch works correctly and safely. This step protects you from electrical hazards and ensures your light functions as expected. Follow these simple instructions to verify your new switch is ready for use.
Turning The Power Back On
Locate your home’s circuit breaker panel. Switch the correct breaker back to the “on” position. Be cautious and avoid touching exposed wires. Turning the power on restores electricity to the switch and connected light fixture.
Checking Functionality
Press the new switch to turn the light on and off. Notice if the light responds quickly and fully. Test both switch positions several times. A properly installed switch will operate smoothly without flickering or delay.
Troubleshooting Common Issues
If the light does not turn on, check the breaker again. Ensure the switch wiring is tight and connected properly. Replace the bulb if it is burnt out. If the switch feels warm or sparks appear, turn off power immediately and consult an electrician.

Credit: icreatables.com
Preventing Future Problems
Preventing future problems with your light switch helps keep your home safe. Small steps can stop big issues later. Regular care and knowing what to watch for make a difference. This section offers easy tips to keep your switch working well and avoid electrical troubles.
Regular Maintenance Tips
Check your light switches every few months. Look for loose parts or cracks on the switch cover. Tighten any screws that feel loose. Clean around the switch with a dry cloth to remove dust. Avoid using water or wet cloths near switches. Replace old or worn switches promptly. A well-maintained switch lasts longer and works better.
Signs Of Electrical Issues
Notice flickering lights or switches that feel warm. These are warning signs of electrical problems. Buzzing or crackling sounds from the switch are not normal. Switches that are hard to flip may have internal damage. Sparks or burning smells need immediate attention. Spotting these signs early helps prevent accidents and costly repairs.
Credit: www.youtube.com
Frequently Asked Questions
Is It Safe To Change A Light Switch With Power On?
Changing a light switch with power on is risky and not recommended. Always turn off the circuit breaker to avoid electric shock. Safety first ensures you prevent accidents and damage during the process.
What Tools Are Needed To Change A Light Switch Safely?
You need a voltage tester, screwdriver, and insulated gloves. These tools help ensure you don’t get shocked and allow safe switch replacement. Proper tools improve safety and efficiency.
How Can I Test If The Power Is Off Correctly?
Use a voltage tester on the switch terminals to confirm no electricity flows. This ensures the circuit is completely off before you start working. Double-checking prevents electric shocks.
Can I Replace A Light Switch Without Turning Off The Breaker?
Technically yes, but it’s dangerous and not advised. Always switch off the breaker to protect yourself and the wiring. Safety precautions reduce injury risks significantly.
Conclusion
Changing a light switch with the power on can be risky. Always stay careful and follow safety steps. Use the right tools and check wires twice. Taking your time helps avoid mistakes and accidents. If unsure, ask a professional for help.
Staying safe is the most important part. This guide helps you understand the process clearly. Now, you can handle simple switch changes more confidently. Remember, safety first, and work with focus.