Are you looking for a simple, secure way to hang your frames, shelves, or DIY projects so they sit perfectly flush against your wall? Installing keyhole fasteners might just be the solution you need.
These clever brackets hide all the hardware behind your item, giving your space a clean, polished look without any visible hooks or wires. If you’ve ever struggled with crooked pictures or bulky wall mounts, learning how to install keyhole fasteners will change the game for you.
Keep reading, and you’ll discover easy step-by-step instructions that anyone can follow—even if you’re new to DIY. By the end, you’ll have the confidence to mount your items like a pro, with a neat finish that impresses every time.
Keyhole Fasteners Basics
Keyhole fasteners offer a smart way to hang objects securely on walls. They consist of a special slot shaped like a keyhole. This design allows easy mounting and removal of items. Understanding the basics helps you install them correctly and get a strong hold.
These fasteners are popular in woodworking and home decor. They provide a clean look and save space. Knowing their uses and benefits makes them a handy choice for many projects.
What Are Keyhole Fasteners
Keyhole fasteners are metal or plastic fittings. They have a narrow slot with a larger circular opening. The screw head fits into the larger part, then slides down into the narrow slot. This locks the object in place. It keeps items flush against the wall without visible hardware.
Common Uses
Keyhole fasteners are often used for hanging picture frames. They also mount shelves, mirrors, and cabinets. Woodworkers use them to attach signs or panels. Their discreet design works well in homes, offices, and shops. They support moderate weights, making them versatile.
Benefits Of Keyhole Mounting
Keyhole mounting creates a clean and secure hold. Items hang tightly without wobbling or gaps. The fasteners are hidden behind the object for a neat finish. Installation is simple and requires few tools. They allow easy removal for repairs or rearranging. This method protects walls and keeps surfaces smooth.
Tools And Materials Needed
Before installing keyhole fasteners, gather all necessary tools and materials. Proper preparation ensures a smooth and accurate installation process. Using the right items helps secure your project firmly and safely on the wall.
Fasteners And Screws
Select fasteners designed specifically for keyhole slots. Choose screws that fit snugly into the keyhole opening. Use screws long enough to hold the weight of your item securely. Wood screws are common, but check your material type before choosing.
Drill And Bits
A drill is essential for making holes for fasteners. Use drill bits that match the screw size to prevent splitting. A countersink bit helps create a flush surface for screws. Keep drill speed moderate to avoid damaging the material.
Measuring Tools
Accurate measurements ensure proper placement of fasteners. A tape measure or ruler helps mark exact points. A pencil or fine marker shows where to drill. Use a level to keep fasteners aligned horizontally or vertically.
Additional Supplies
Safety glasses protect your eyes during drilling. A clamp can hold the workpiece steady. Sandpaper smooths edges around drilled holes. A screwdriver or drill driver helps tighten screws securely.
Preparing The Object
Preparing the object is the first step in installing keyhole fasteners. This process ensures your fasteners fit perfectly and hold securely. Taking time to prepare the object carefully will save effort later. Follow these steps to get your object ready for installation.
Marking Keyhole Locations
Start by deciding where to place the keyhole fasteners. Use a pencil to mark the spots on the object. Make sure the marks match the mounting points on the wall or surface. Double-check the marks for accuracy before moving forward. Clear, precise marks help avoid mistakes during drilling.
Measuring For Alignment
Measure the distance between the marks to confirm they align properly. Use a ruler or tape measure for this task. The fasteners must be level and spaced evenly. If the marks are off, adjust them to keep the object balanced when hung. Proper alignment ensures the object hangs straight and stable.
Drilling Keyhole Slots
Select a drill bit that matches the size of the keyhole fasteners. Carefully drill the slots at the marked locations. Drill straight and to the correct depth for a snug fit. Clean any debris from the drilled slots before attaching the fasteners. Well-drilled slots make installation smooth and secure.

Credit: www.youtube.com
Preparing The Wall
Preparing the wall is a crucial step before installing keyhole fasteners. It ensures the fasteners hold firmly and your item hangs securely. Follow these steps carefully to get the best results.
Choosing Screw Positions
Measure the width of the item you want to hang. Mark two points on the wall that match the distance between the keyhole slots on the item. Use a level to make sure the marks are even. This prevents the item from hanging crooked.
Drilling Pilot Holes
Select a drill bit slightly smaller than your screws. Drill pilot holes at the marked points. This helps the screws go in smoothly and prevents the wall from cracking. Drill straight and stop once you reach the right depth.
Installing Wall Anchors
Use wall anchors if you are drilling into drywall or plaster. Insert the anchors into the pilot holes by gently tapping them with a hammer. The anchors give extra support and keep the screws from pulling out. Make sure they sit flush with the wall surface before screwing in.
Installing The Fasteners
Installing keyhole fasteners is a straightforward process that secures your items firmly on walls. Proper installation ensures stability and prevents damage. Follow clear steps to attach brackets and fix screws correctly for a strong hold.
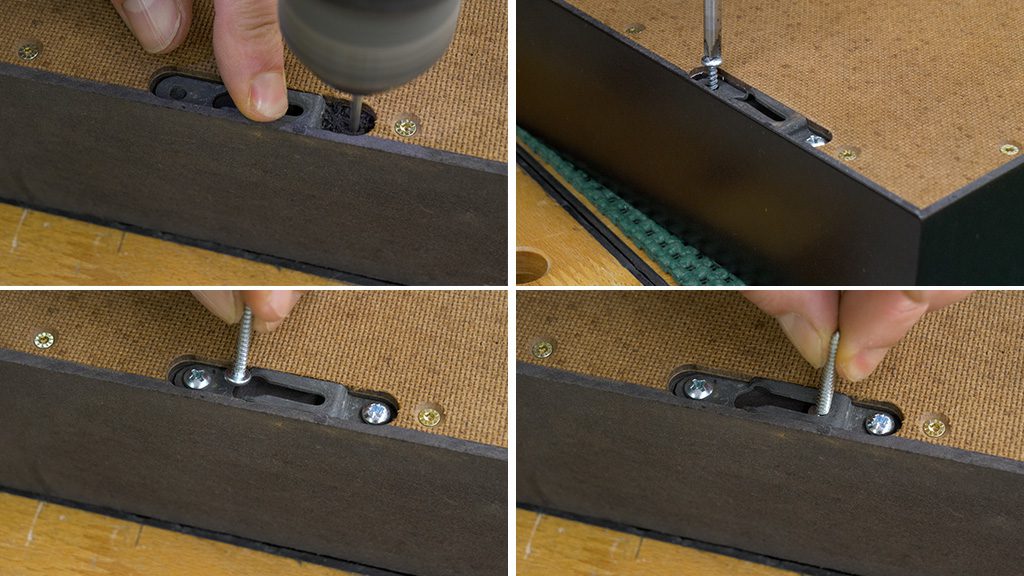
Attaching Keyhole Brackets
Start by positioning the keyhole brackets on the back of your item. Align them evenly to keep the weight balanced. Use a pencil to mark where screws will go. Drill pilot holes if the material is hard. Then, screw the brackets firmly in place, avoiding over-tightening to prevent damage.
Securing Screws In The Wall
Choose wall screws suitable for your wall type. Use a level to mark screw spots for even hanging. Drill holes and insert anchors if needed for extra support. Screw the screws into the wall, leaving a small gap between the screw head and wall. This gap allows the keyhole bracket to fit snugly.
Ensuring Proper Screw Head Exposure
Check that screw heads stick out enough to fit into the keyhole slots. The screw must not be flush with the wall. It should allow the bracket to slide over and lock securely. Adjust the screws by loosening or tightening until the fit is perfect. This step ensures your item hangs firmly and safely.

Credit: www.youtube.com
Hanging The Object
Hanging an object with keyhole fasteners is a simple step that needs careful attention. Proper hanging ensures your item stays secure and looks neat on the wall. This part guides you through aligning, sliding, and checking the fit of your object.
Aligning Keyholes With Screws
Start by positioning the object near the wall. Look at the keyholes on the back of the object. Match each keyhole with the screws on the wall. The screws should fit inside the wide opening of the keyhole.
Make sure the screws are tight in the wall but leave some space for the object to slide over them. Holding the object steady, bring the keyholes close to the screws for proper alignment.
Sliding Object Into Place
Once aligned, gently slide the object downwards. The screws will move into the narrow part of the keyholes. This locks the object in place. Slide slowly to avoid scratching the wall or the object.
Keep sliding until the object feels secure and stops moving down. This position ensures the best hold for your keyhole fasteners.
Checking For Secure Fit
Test the hold by gently moving the object side to side. It should not wobble or feel loose. If it moves, lift the object and check the screws or keyholes again. Adjust the screws or reposition the object until it fits tightly.
Confirm the object sits flush against the wall for a clean look. A secure fit keeps your item safe and stable for daily use.
Tips For Perfect Installation
Installing keyhole fasteners correctly ensures strong, clean, and safe wall mounting. Perfect installation saves time and avoids damage. Follow these tips for accuracy and lasting results.
Avoiding Common Mistakes
Use the right screws for your fasteners. Too long or too short screws cause weak support. Do not overtighten screws; this can crack the wood. Check the fastener fits snugly but moves slightly for adjustment. Avoid drilling holes too big or small. Measure twice and drill once to prevent errors.
Adjusting For Level And Alignment
Mark the exact spots on the back of your item before drilling. Use a level tool to keep fasteners straight. Uneven fasteners cause the item to hang crooked. Test the fit on the wall before final tightening. Adjust screws slightly if the fastener is off-level. Correct alignment ensures your item hangs flat and secure.
Using A Template For Accuracy
Create or buy a template for drilling keyhole slots. Templates keep spacing and depth consistent. Place the template firmly on your piece before marking holes. This reduces mistakes and speeds up installation. Using a template ensures all fasteners line up perfectly on the wall. Templates are especially helpful for multiple fasteners or repeat projects.
Maintenance And Adjustments
Maintaining and adjusting keyhole fasteners ensures your mounted items stay secure over time. Regular checks prevent loosening and damage. Simple upkeep keeps the fasteners working well and extends their life.
Tightening Screws
Check screws holding the keyhole fasteners regularly. Use a screwdriver to tighten any loose screws. Tight screws stop the mounted object from shifting or falling. Avoid overtightening to prevent damage to the fastener or the object.
Repositioning The Object
Sometimes you may need to adjust the object’s position on the wall. Loosen the screws slightly to move the object. Slide it carefully until it sits straight and level. Then, tighten the screws again for a firm hold. This keeps your display neat and secure.
Inspecting Fastener Condition
Look closely at the keyhole fasteners for signs of wear or damage. Cracks, rust, or bent parts reduce holding strength. Replace damaged fasteners immediately to avoid accidents. Clean the fasteners to remove dust and dirt that may affect performance.
Credit: www.paoson.com
Frequently Asked Questions
How To Hang A Keyhole Frame?
Insert screws into the wall, leaving heads exposed. Align the keyhole slots on the frame over the screw heads. Slide the frame downward to secure it flush against the wall. Adjust screws if needed for a tight fit.
What Screws To Use For Keyhole Mounting?
Use flat-head wood screws that fit snugly in the keyhole slot. Choose screws with heads slightly larger than the slot’s narrow opening. Select screw length based on wall material and object weight for secure mounting.
How To Drill A Keyhole Mount?
Mark the drill points for the keyhole slots on your material. Use a drill bit to create a larger hole, then a narrower slot above it. Ensure the slot fits over the screw head for secure mounting. Clean edges and test the fit before final installation.
What Is Keyhole Mounting?
Keyhole mounting uses keyhole-shaped slots on an object’s back to hang it flush on a wall. Screws or nails fit into these slots. This method hides hardware, ensures a neat look, and allows easy installation by sliding the slots onto the screw heads.
Conclusion
Installing keyhole fasteners is simple with clear steps. Measure and mark where the fasteners will go. Drill the keyhole slots carefully to fit your screws. Attach the fasteners securely to your item’s back. Place screws on the wall at the right height.
Slide your item onto the screws for a snug fit. This method keeps your wall neat and hardware hidden. Practice patience and check alignment for best results. Now, your project hangs firmly and looks clean. Try this easy technique for your next DIY hanging task.