Are you tired of having to flip multiple switches just to light up one room? Imagine controlling two lights with a single switch—making your space simpler and more convenient.
It’s easier than you think, and once you know how, you’ll save time and add a sleek touch to your home. In this guide, you’ll discover clear, step-by-step instructions to connect two lights on one switch safely and effectively. Keep reading to unlock this handy skill and brighten up your space with just one flick.

Credit: diy.stackexchange.com
Tools And Materials Needed
To connect two lights on one switch, having the right tools and materials is important. Using proper equipment makes the work safer and easier. It also ensures the connection lasts without problems.
This list covers all basics you need. Prepare these before starting your project.
Tools Required
- Screwdriver – for removing and securing screws.
- Wire stripper – to strip insulation from wires.
- Voltage tester – to check if wires are live.
- Pliers – to twist and hold wires.
- Drill (optional) – for mounting lights or switch boxes.
- Measuring tape – to measure wire lengths accurately.
Materials Needed
- Electrical wires – usually 14 or 12 gauge for lighting circuits.
- Wire connectors – to join wires safely.
- Light switch – single-pole switch suits most cases.
- Light fixtures – the two lights you want to connect.
- Electrical tape – for extra insulation on wire joints.
- Switch box – to house the switch securely.
Safety Gear
- Insulated gloves – protect hands from electrical shocks.
- Safety glasses – shield eyes from debris.
- Work boots – protect feet during installation.
Safety Precautions
Safety is the top priority when connecting two lights on one switch. Electrical work can be risky without the right precautions. Follow these safety steps to protect yourself and your home.
Turn Off The Power
Always switch off the power at the circuit breaker. Do not rely on the wall switch alone. Use a voltage tester to ensure no electricity flows to the wires. This step prevents shocks and injuries.
Use Proper Tools And Equipment
Choose insulated tools made for electrical work. Avoid metal tools without insulation. Wear rubber-soled shoes and use a sturdy ladder if needed. Proper tools reduce the chance of accidents.
Check Wire Conditions
Inspect wires for damage or wear before connecting. Replace any frayed or exposed wires. Damaged wires can cause shorts or fires. Safe wiring ensures a steady power flow.
Follow Electrical Codes
Adhere to local electrical codes and standards. These rules keep installations safe and reliable. Use wire connectors and electrical tape to secure connections. Proper compliance avoids hazards and legal issues.
Work In A Dry Environment
Keep the workspace dry and free from moisture. Water increases the risk of electrical shock. Do not work in damp or wet conditions. Dry areas protect you and your tools.
Basic Wiring Concepts
Understanding basic wiring concepts is important before connecting two lights to one switch. It helps ensure safety and proper function. Simple knowledge about wiring types and circuit load makes the task easier. This section explains these key ideas clearly.
Types Of Wiring
There are different ways to wire lights. The most common are series and parallel wiring. In series wiring, lights connect one after another. If one light goes out, the others stop working. Parallel wiring connects each light directly to the power source. Lights work independently in parallel wiring. This method is safer and more reliable for home lighting.
Understanding Circuit Load
Circuit load means the total power used by all devices on a circuit. Lights use watts to measure power. Adding two lights increases the load on the switch and wiring. It is important not to exceed the switch’s load rating. Too much load can cause overheating or tripping. Always check the switch and wire limits before wiring two lights.
Preparing The Switch And Lights
Start by turning off the power to avoid accidents. Gather all tools and materials, including wires, switches, and lights. Check the switch and lights to ensure they are compatible and ready for wiring.
Turn Off Power
Start by switching off the power at the circuit breaker. This step is crucial for safety. Never work on electrical wiring with the power on. Use a voltage tester to confirm the power is off. This simple check protects you from electric shocks. Safety first keeps the job smooth and worry-free.
Identify Wiring Points
Next, find the wiring points in your switch box and light fixtures. Look for the live wire, neutral wire, and ground wire. Usually, the live wire is black or red. The neutral wire is white. The ground wire is green or bare copper. Label each wire with tape for easy identification. Knowing these wires helps connect the lights properly. It also prevents mistakes that could cause electrical problems.
Wiring Two Lights To One Switch
Wiring two lights to one switch is a common electrical task. It helps control multiple lights with a single switch. This setup saves space and simplifies your lighting system. The process requires careful wiring of live, neutral, and ground wires. Each step must be done safely and correctly.
Below is a clear guide on how to wire two lights to one switch. Follow these steps to ensure proper and safe installation.
Connecting The Live Wire
Start by turning off the power at the breaker box. Identify the live wire from the power source. Connect this live wire to the switch terminal. Then, run a wire from the switch to the first light’s live terminal. Use a jumper wire to link the first light’s live terminal to the second light. This way, both lights get power when the switch is on.
Linking The Neutral Wires
Neutral wires carry current back to the panel. Connect the neutral wire from the power source to the first light’s neutral terminal. Then, join the first light’s neutral wire to the second light’s neutral wire. Use wire connectors to secure these connections. Keep all neutral wires together and insulated properly.
Securing Ground Connections
Ground wires protect against electric shock. Attach the ground wire from the power source to the switch’s ground terminal. Connect the ground wires from both lights together and to the switch ground. Use wire connectors or grounding screws to keep them secure. Proper grounding ensures safety and code compliance.

Credit: www.electrical-online.com
Testing The Connection
Testing the connection is a key step after wiring two lights to one switch. It ensures safety and confirms the lights work properly. Take your time to check everything carefully.
Restore Power
Turn the main power back on at the circuit breaker. This step supplies electricity to your switch and lights. Be cautious and avoid touching wires while restoring power.
Check Light Operation
Flip the switch to turn on the lights. Both lights should turn on at the same time. If one or both lights do not work, double-check your wiring and connections.
Try turning the switch off and on several times. This helps ensure the connection is stable. If the lights flicker or do not respond, there may be a loose wire.
Troubleshooting Common Issues
Troubleshooting common problems helps keep your lights working well. Simple checks can save time and avoid costly repairs. This section covers typical issues and easy fixes. Follow these tips to solve problems quickly and safely.
Lights Not Turning On
Check the power source first. Make sure the circuit breaker is on. Confirm the bulbs are not burned out. Test the switch by toggling it several times. Look for loose wires in the switch box. Tighten any loose connections carefully. Use a voltage tester to check for current. Replace the switch if it shows no power.
Flickering Lights
Flickering can mean a loose bulb or wiring issue. Turn off the power before inspecting the bulb. Tighten the bulb gently but firmly. Check if the bulb type matches the fixture. Inspect the wiring for any loose or damaged parts. Flickering may also be caused by a bad switch. Replace the switch if flickering continues. Consider consulting an electrician for complex problems.
Switch Problems
A faulty switch can stop both lights from working. Listen for a clicking sound when you flip the switch. No sound could indicate a broken switch. Remove the switch cover to check wiring connections. Look for signs of burning or corrosion. Replace damaged switches with the same type. Always turn off power before working on switches. Use a quality switch for better durability.
Tips For Efficient Wiring
Wiring two lights on one switch needs clear planning. It saves time and keeps the setup safe. Proper wiring avoids future problems and makes the system work well.
Follow simple rules to make wiring easier. Use the right tools and parts. This helps avoid mistakes and ensures the lights work as expected.
Use The Correct Wire Gauge
Choose wire thickness based on the lights’ power needs. Thin wires can overheat and cause hazards. Check local rules for the right wire size.
Turn Off Power Before Starting
Always switch off electricity at the breaker box. This step protects you from electric shock. Test wires with a voltage tester before touching.
Keep Connections Tight And Secure
Loose connections cause flickering lights and fire risks. Use wire nuts or terminals to join wires firmly. Double-check all connections before finishing.
Label Wires For Easy Identification
Mark wires with tape or tags during installation. It helps find the right wire later. Clear labels save time during repairs or upgrades.
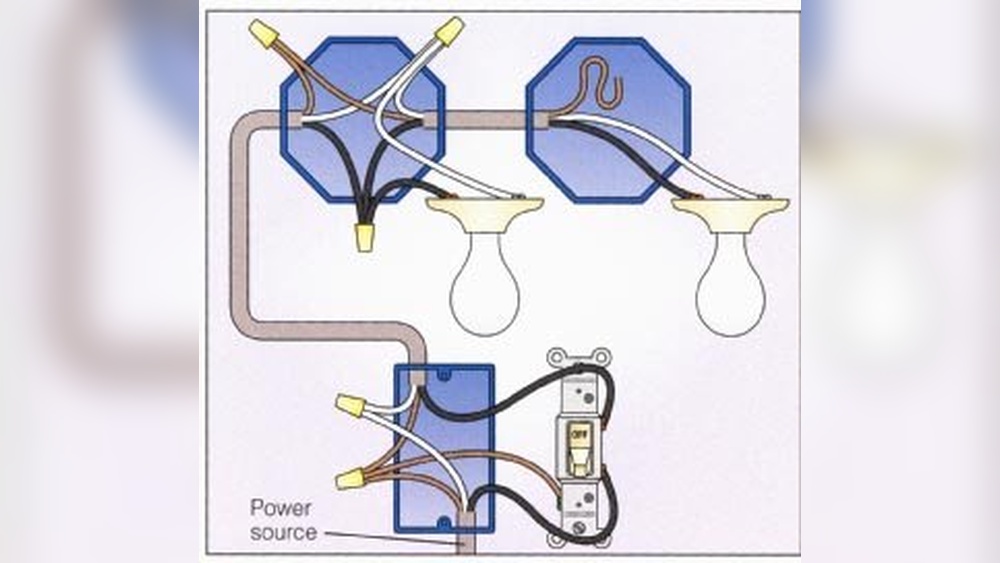
Follow The Wiring Diagram
Use a simple wiring diagram to guide your work. It shows which wires connect to the switch and lights. This reduces errors and speeds up the process.

Credit: www.youtube.com
Frequently Asked Questions
How Do I Wire Two Lights To One Switch Safely?
To wire two lights to one switch, connect both light fixtures in parallel. Use a single switch leg from the switch to control both. Ensure power is off before starting. Follow electrical codes and use proper wire connectors for safety.
Can One Switch Handle Multiple Light Fixtures?
Yes, one switch can control multiple lights if wired correctly. Make sure the switch rating matches the total wattage of lights. Using parallel wiring allows the switch to operate all lights simultaneously without overloading.
What Tools Do I Need To Connect Two Lights On One Switch?
You need a screwdriver, wire stripper, voltage tester, wire nuts, electrical tape, and appropriate wiring. These tools help safely connect and secure the wires from the switch to both lights.
Is It Possible To Control Two Lights Independently On One Switch?
No, a single switch controls all connected lights simultaneously. To control lights separately, install multiple switches or use smart switches with individual control features.
Conclusion
Connecting two lights on one switch is simple and saves space. Follow safety steps and use the right tools. Double-check your wiring before turning the power back on. This setup helps control multiple lights easily. It also makes your room brighter and more functional.
Take your time and work carefully for the best results. You can enjoy better lighting with just one switch. Keep this guide handy for future home projects. Safety first, and happy wiring!