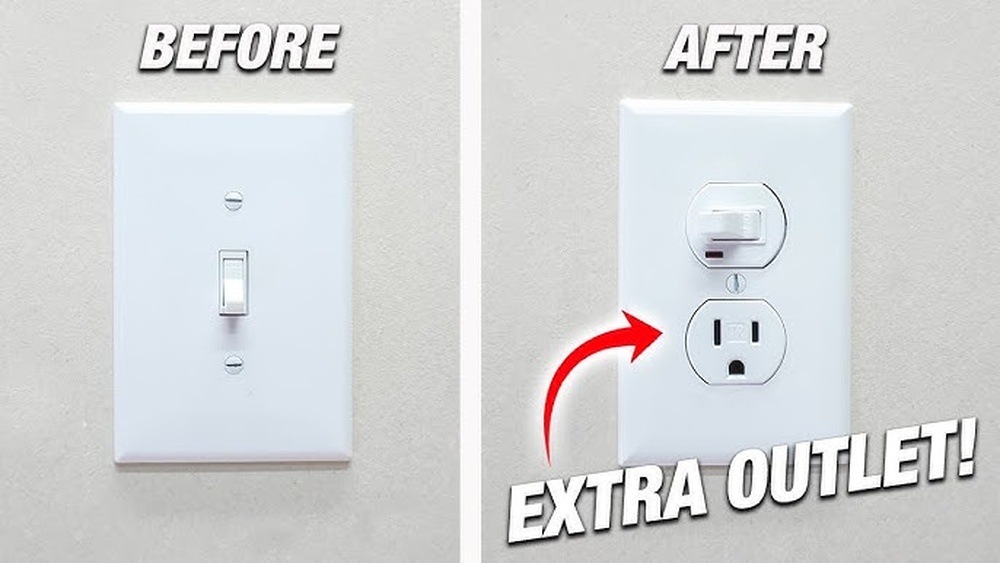
Have you ever wished you had an extra outlet where a light switch sits? Maybe you need more plugs for your devices, or you want to make your space more convenient.
Changing a light switch to an outlet might sound tricky, but with the right steps, you can do it yourself and save money. In this guide, you’ll learn exactly how to make this change safely and easily. Keep reading, and by the end, you’ll have the confidence to upgrade your room’s electrical setup in no time.
Tools And Materials Needed
Changing a light switch to an outlet requires specific tools and materials. Having the right items ensures safety and a smooth process. This section lists what you need to complete the job efficiently.
Essential Tools
- Screwdriver (flathead and Phillips) for removing and securing screws
- Wire stripper to remove insulation from electrical wires
- Voltage tester to check if wires are live
- Needle-nose pliers to bend and twist wires
- Electrical tape to insulate wire connections
- Utility knife for cutting wires or insulation
- Flashlight or work light for better visibility
Required Materials
- Electrical outlet (receptacle) to replace the switch
- Outlet cover plate to protect and finish the installation
- Wire connectors (wire nuts) to join wires securely
- Electrical box if the current box is too small or damaged
- Wire (if needed) matching the existing circuit gauge

Credit: diy.stackexchange.com
Safety Precautions
Changing a light switch to an outlet involves working with electricity. Safety comes first. Taking the right precautions helps avoid shocks and accidents. Follow these steps carefully before starting any work on your electrical system.
Turn Off Power
Start by turning off the power at the circuit breaker. This stops electricity from flowing to the switch. Never trust the wall switch alone. Confirm that the power is off before touching any wires. This step is crucial to protect yourself from electric shock.
Use A Voltage Tester
Check the wires with a voltage tester. This tool shows if wires still carry electricity. Touch the tester to each wire carefully. If the tester lights up or beeps, the wire is live. Only proceed when the tester confirms no voltage. This extra check ensures your safety during the change.
Removing The Light Switch
Removing the light switch is the first step to changing it into an outlet. This step requires care and attention to safety. Always turn off the power at the circuit breaker before starting. You will need a screwdriver and a voltage tester for this task.
Unscrew The Switch Plate
Begin by unscrewing the switch plate cover. Use a flathead or Phillips screwdriver to remove the screws. Place the screws somewhere safe for later use. Gently pull the plate away from the wall. This exposes the light switch and wiring behind it.
Disconnect Wires
Check the power is off with a voltage tester. Touch the tester to each wire to confirm no electricity flows. Loosen the screws holding the wires on the switch. Carefully pull the wires free from the terminals. Keep the wires separated to avoid contact. This step frees the switch for removal and outlet installation.
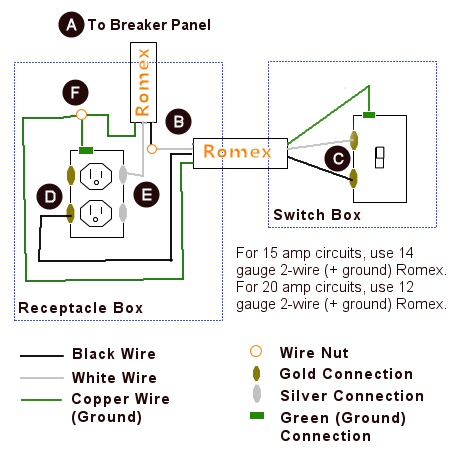
Wiring The Outlet
Wiring the outlet is a key step in changing a light switch to an outlet. It requires careful attention to ensure safety and functionality. This part of the process involves identifying the wires correctly and connecting them to the new outlet. Proper wiring helps avoid electrical problems and keeps your home safe.
Identify Wire Types
First, look at the wires inside the switch box. Usually, you will see black, white, and bare copper wires. The black wire is the “hot” wire that carries electricity. The white wire is the neutral wire. The bare copper or green wire is the ground wire. Identifying these wires helps you connect the outlet properly.
Use a voltage tester to confirm which wire is live. This step ensures you know which wire carries power. Knowing the wire types is essential before making any connections.
Connect The Outlet Wires
Start by connecting the black hot wire to the brass screw on the outlet. Attach the white neutral wire to the silver screw. The bare copper or green ground wire goes to the green grounding screw. Make sure each wire is securely fastened under the screw.
Double-check all connections for tightness. Loose wires can cause sparks or shorts. After wiring, carefully push the outlet back into the box. Then, secure it with screws to complete the connection step.
Installing The Outlet
Installing the outlet is the final step after wiring. It must be done carefully. A secure and neat installation ensures safety and functionality. Follow these steps to fix the outlet properly in the electrical box and finish with the cover plate.
Secure The Outlet To The Box
Place the outlet inside the electrical box carefully. Align the screw holes on the outlet with those on the box. Use screws to fasten the outlet firmly. Tighten screws just enough to hold the outlet steady. Avoid over-tightening to prevent damage. The outlet should sit flush with the wall surface.
Attach The Outlet Cover
After securing the outlet, position the cover plate over it. Align the screw hole on the cover with the outlet’s center screw. Insert the screw and tighten it gently. The cover should fit snugly without gaps. This step protects wiring and gives a clean look.
Testing The New Outlet
Testing the new outlet is an important step after changing a light switch to an outlet. It ensures the outlet works safely and correctly. This step helps avoid any electrical problems in the future.
Restore Power
Turn the power back on at the circuit breaker. Make sure the breaker is fully switched on. Check the outlet’s faceplate to see if any lights are on. This confirms the outlet has power.
Check Outlet Functionality
Plug a small device like a lamp or phone charger into the outlet. See if the device turns on or charges properly. Use a voltage tester if available for extra safety. Test both sockets of the outlet to confirm full functionality.
Troubleshooting Common Issues
Troubleshooting common issues is key when changing a light switch to an outlet. Problems can stop your project and cause frustration. Understanding typical issues helps fix them fast. This section covers two frequent problems and their solutions.
Outlet Not Working
Sometimes, the new outlet does not get power. First, check the circuit breaker. It may have tripped during installation. Reset it and test the outlet again. If it still fails, test the wires with a voltage tester. No power means a wiring issue. Confirm the hot wire connects to the outlet’s brass terminal. The neutral wire should connect to the silver terminal. Check that the ground wire is secure. A wrong connection can stop the outlet from working.
Loose Connections
Loose wires cause outlets to fail or work intermittently. Turn off power before inspecting connections. Pull the outlet gently from the box. Look for wires that are loose or not wrapped tightly. Tighten all screws holding the wires. Use pliers to curl wires around screws if needed. Make sure the wires fit snugly under each screw. Loose connections can cause sparking or heat. Secure connections improve safety and performance.
Credit: www.oneprojectcloser.com

Credit: www.youtube.com
Frequently Asked Questions
How Do I Change A Light Switch To An Outlet Safely?
Turn off power at the breaker before starting. Remove the switch, disconnect wires, and connect them to the outlet terminals. Use a voltage tester to ensure no electricity flows. Follow local electrical codes and consider consulting a professional for safety.
What Tools Are Needed To Convert A Switch To An Outlet?
You need a screwdriver, voltage tester, wire stripper, electrical tape, and a new outlet. A wire nut may be necessary to secure wire connections. Ensure you have a suitable outlet matching your wiring type and local code requirements.
Can I Use The Existing Wiring For An Outlet?
Yes, typically existing wiring can be reused if it’s in good condition. Ensure the wiring supports the outlet’s amperage requirements. Double-check connections and avoid using damaged or frayed wires to maintain safety and code compliance.
Is It Legal To Replace A Switch With An Outlet Myself?
DIY electrical work is legal in many areas but must follow local codes. Permits may be required, and inspections might be necessary. If unsure, hiring a licensed electrician ensures compliance and safety. Always research local regulations before starting.
Conclusion
Changing a light switch to an outlet can save space and add convenience. Always turn off the power before starting any work. Use the right tools and follow safety steps carefully. Double-check your connections to avoid any problems. This simple project can improve your room’s function quickly.
Take your time and ask for help if unsure. Enjoy the new outlet once the job is done safely.