Are you tired of fumbling in the dark to find your light switch? Imagine your lights turning on automatically the moment you step into a room.
Installing a motion sensor light switch can make this a reality, saving you time, energy, and hassle. In this guide, you’ll discover simple, step-by-step instructions that anyone can follow—even if you’ve never worked with electrical wiring before. By the end, you’ll have the confidence to upgrade your home with smart lighting that responds to your every move.
Ready to make your life easier and your home smarter? Let’s dive in!
Credit: www.youtube.com
Tools And Materials Needed
Installing a motion sensor light switch requires some basic tools and materials. Having everything ready makes the process faster and safer. This section lists the key items you need before starting.
Essential Tools
A screwdriver set is important for removing and securing screws. Use a voltage tester to check if wires carry electricity. Wire strippers help prepare the wires for connection. Needle-nose pliers make it easier to bend and hold wires. A drill may be needed if you must create new holes in the wall.
Materials Needed
The main material is the motion sensor light switch itself. Make sure it fits your existing wiring and socket type. Electrical tape is useful to wrap wire connections safely. Wire nuts secure the joined wires and prevent short circuits. Finally, have a flashlight ready if you work in a dark area during installation.
Choose The Right Motion Sensor Switch
Choosing the right motion sensor switch is important for a smooth installation and proper function. Not all switches work the same. Some fit certain rooms or wiring better than others. Picking the correct switch saves time and prevents issues later.
Types Of Motion Sensor Switches
There are mainly two types: passive infrared (PIR) and ultrasonic. PIR sensors detect heat from people moving nearby. Ultrasonic sensors send out sound waves and notice changes in the room. Some switches combine both types for better accuracy. Choose a type that suits your room size and needs.
Compatibility With Your Wiring
Check your home’s wiring before buying a switch. Some motion sensor switches need a neutral wire, others do not. Older homes may lack a neutral wire in some boxes. Make sure the switch matches your wiring to avoid extra work or electrical problems.
Turn Off Power Safely
Turning off power safely is the first step in installing a motion sensor light switch. It protects you from electric shock and prevents damage to your device. This step requires care and attention but is simple to do.
Always treat electrical work with respect. Power must be off before handling wires or switches. Safety comes first.
Locate The Circuit Breaker
Find your home’s circuit breaker box. It is usually in the basement, garage, or utility room. The box contains switches that control power to different areas.
Switch Off The Correct Breaker
Identify the breaker that controls the room where you work. Flip the breaker switch to the off position. This stops electricity flow to the switch.
Double Check Power Is Off
Use a voltage tester or plug in a lamp to check. If the lamp does not light, power is off. Never assume the power is off without testing.
Wear Safety Gear
Wear rubber-soled shoes and avoid wet floors. Safety gloves add extra protection. These small steps reduce the risk of accidents.
Remove The Existing Switch
Removing the existing switch is the first step to install a motion sensor light switch. This step requires care and attention to avoid electrical shocks or damage. Always turn off the power to the switch at the circuit breaker before starting any work.
After switching off the power, test the switch to confirm no electricity flows. This ensures safety while handling wires. Keep tools and materials ready for the removal process. Follow each step carefully for a smooth switch replacement.
Turn Off The Power At The Circuit Breaker
Locate the circuit breaker panel in your home. Find the breaker that controls the light switch. Flip the breaker to the off position. Use a voltage tester to check the switch for power. Confirming no power prevents accidents.
Remove The Switch Cover Plate
Use a screwdriver to unscrew the cover plate. Keep the screws safe for later use. Gently pull the cover plate away from the wall. This exposes the switch and wiring inside the electrical box.
Unscrew The Existing Switch
Loosen the screws holding the switch to the box. Pull the switch out carefully to see the wires. Avoid pulling on the wires directly. Keep the switch steady while loosening screws.
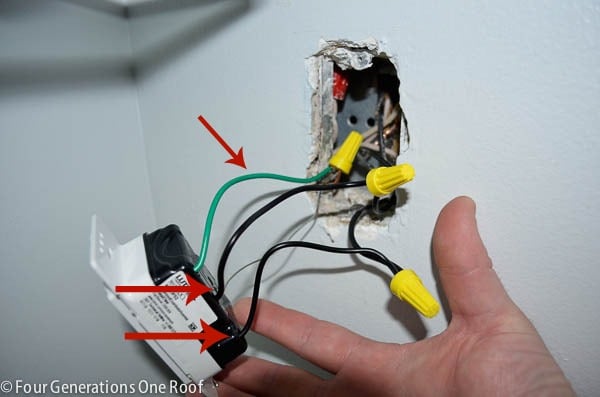
Disconnect The Wires From The Switch
Note the wire positions before disconnecting. Take a picture or label the wires for reference. Loosen the terminal screws or release wire connectors. Remove the wires from the old switch carefully.
Identify And Connect Wires
Installing a motion sensor light switch starts with identifying and connecting the wires. This step is critical for the switch to work properly and safely. Knowing which wire is which helps avoid electrical problems and ensures the light turns on automatically.
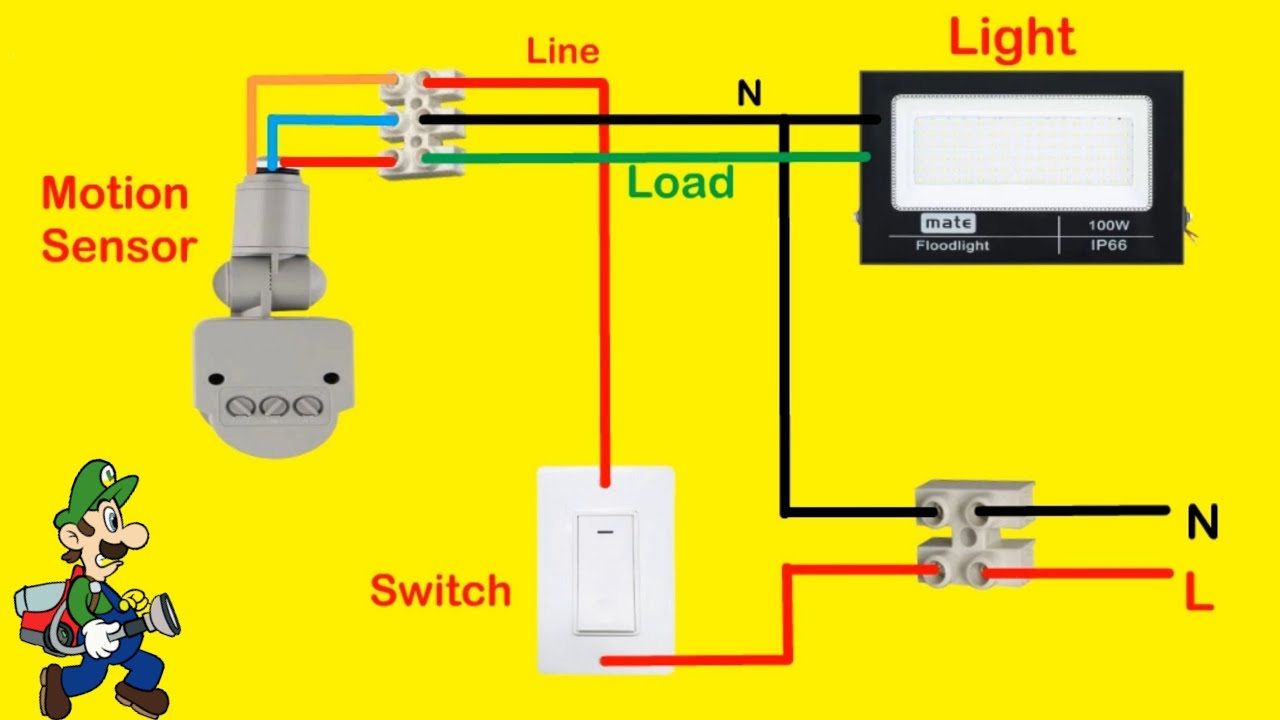
Identify Line And Load Wires
The line wire carries power from the electrical panel to the switch. It is usually black or red. The load wire sends power from the switch to the light fixture. It can also be black or red but connects to the light.
Turn off the power before touching any wires. Use a voltage tester to find the live wire. The line wire will have voltage when the power is on. The load wire will not have voltage until the switch is turned on.
Also, look for a neutral wire. It is usually white and is needed for some motion sensor switches. Ground wires are green or bare copper and provide safety by grounding the switch.
Connect The Motion Sensor Switch
Match the wires from the motion sensor switch to the wires in the wall. Connect the line wire from the switch to the line wire in the wall. Do the same with the load wire.
Attach the neutral wire from the switch to the neutral wire in the wall, if your switch has one. Connect the ground wire from the switch to the ground wire in the wall.
Use wire nuts to secure the connections. Wrap electrical tape around the wire nuts for extra safety. Carefully push the wires back into the box and attach the switch to the wall.
Credit: www.fourgenerationsoneroof.com
Secure The Switch And Restore Power
After wiring your motion sensor light switch, securing it properly is essential. A loose switch can cause problems and may not work well. This step ensures safety and keeps the switch in place. Once secured, restoring power allows you to test the switch and see it in action.
Secure The Switch To The Wall Box
Gently push the wires back into the wall box. Avoid forcing or bending wires too much. Align the switch with the screw holes on the box. Use a screwdriver to tighten the screws. Do not overtighten; it can crack the switch plate.
Attach The Switch Cover Plate
Place the cover plate over the switch. Line up the holes with the screws on the switch. Screw in the cover plate gently. This protects the switch and gives a clean look. Check that the plate fits flush against the wall.
Restore Power At The Circuit Breaker
Go to your home’s electrical panel. Find the circuit breaker for your switch. Flip the breaker to the ON position. This restores electricity to the switch. Check for any sparks or unusual sounds.
Test The Motion Sensor Light Switch
Turn the switch on to activate the sensor. Move in front of the sensor to trigger the light. Observe if the light turns on quickly. Adjust settings if the sensor does not respond well. Testing ensures proper function and safety.
Test The Motion Sensor Light
Testing the motion sensor light is important after installation. It ensures the light works correctly and reacts to movement. Proper testing helps avoid false triggers or missed activations. Spend time checking the sensor’s response in different conditions. This step guarantees safety and energy savings.
Adjust Sensitivity
Sensitivity controls how much motion the sensor detects. Too high sensitivity may cause the light to turn on for small movements. Too low makes it miss people walking by. Stand at different distances and move slowly to test. Adjust the sensitivity dial or switch until the light responds well. Find a balance that suits your space.
Timer Settings
The timer controls how long the light stays on after motion stops. Short times save energy but may turn off too fast. Long times keep the area lit but use more power. Test various timer settings by walking out of the sensor’s range. Adjust the timer to match your needs for safety and efficiency.

Credit: www.fourgenerationsoneroof.com
Troubleshooting Common Issues
Troubleshooting common issues with motion sensor light switches helps keep your setup working well. Simple checks often fix many problems quickly. Understanding common errors saves time and effort.
Sometimes, the sensor might not detect motion correctly. Other times, the light may stay on or off unexpectedly. Knowing these issues helps you solve them fast.
Check The Power Supply
Ensure the light switch receives proper power. Turn off the circuit breaker before inspection. Look for loose wires or poor connections. Tighten screws and reconnect wires as needed.
Adjust The Sensor Sensitivity
Motion sensors have sensitivity settings. Too high or low sensitivity causes detection problems. Use the adjustment dial or buttons to set the right level. Test the sensor after changes to confirm.
Clean The Sensor Lens
Dirt or dust on the lens blocks motion detection. Wipe the lens gently with a soft cloth. Avoid using harsh chemicals that can damage the sensor. Keep the lens clean for best performance.
Check For Obstructions
Objects near the sensor can block its view. Move furniture or decorations away from the sensor area. Ensure the sensor has a clear path to detect movement.
Reset The Motion Sensor
Sometimes, a reset fixes sensor glitches. Turn off power to the switch for a few minutes. Turn it back on and test the sensor. This can clear temporary errors.
Frequently Asked Questions
What Tools Are Needed To Install A Motion Sensor Light Switch?
You need a screwdriver, voltage tester, wire stripper, and electrical tape. These tools help safely remove the old switch and connect the new one. Always turn off the power at the breaker before starting your installation.
How Do I Connect Wires To A Motion Sensor Switch?
Match the wires by color: black to black (hot), white to white (neutral), and green or copper to ground. Use wire nuts to secure connections. Follow the switch’s wiring diagram for proper setup to ensure safe and effective operation.
Can I Install A Motion Sensor Switch Myself Safely?
Yes, if you follow instructions and turn off power. Basic electrical knowledge is recommended. If unsure, consult a professional electrician. Safety precautions prevent electrical shocks and ensure your installation works correctly.
How Long Does Installation Of A Motion Sensor Switch Take?
Typically, installation takes 15 to 30 minutes. This depends on your experience and wiring complexity. Taking time to double-check connections helps avoid problems later. Always test the switch after installation to confirm it works.
Conclusion
Installing a motion sensor light switch saves energy and adds convenience. It works by detecting movement and turning lights on automatically. You only need a few tools and basic steps to complete the job. Safety is important—always turn off the power before starting.
After installation, enjoy hands-free lighting that helps reduce electricity bills. Try it in rooms where you often forget to turn off lights. This small change makes your home smarter and more efficient. Give it a try and see the difference today.