Are you ready to brighten up your space and take control of your lighting? Adding a ceiling light and a switch might sound tricky, but with the right steps, you can do it yourself and save money.
Imagine flipping a switch and instantly transforming the room’s atmosphere. In this guide, you’ll learn exactly how to install a ceiling light and switch safely and easily. Keep reading—you’re just a few simple steps away from lighting up your home like a pro.
Tools And Materials Needed
Before starting to add a ceiling light and switch, gather all needed tools and materials. This step makes the job easier and safer. Having the right items helps you work faster and avoid mistakes. Below is a list of what you need for this project.
Basic Tools
- Screwdrivers (flathead and Phillips) for screws
- Wire strippers to remove insulation from wires
- Voltage tester to check if wires have power
- Drill for making holes if needed
- Measuring tape to measure spaces accurately
- Wire cutters to cut wires cleanly
- Level to ensure the light fixture is straight
Electrical Components
- Ceiling light fixture with mounting bracket
- Light switch compatible with your wiring
- Electrical box for the switch and ceiling fixture
- Wire nuts to connect wires safely
- Electrical cables (usually 14-2 or 12-2 type)
- Switch plate cover to finish the switch
- Light bulbs matching your fixture
Safety Gear
- Insulated gloves to protect from electric shock
- Safety goggles to protect your eyes
- Dust mask if drilling creates dust
- Work boots for foot protection
- Flashlight or headlamp for visibility in dark areas

Credit: diy.stackexchange.com
Preparing The Workspace
Preparing the workspace is a key step before adding a ceiling light and switch. It helps ensure safety and makes the job easier. A clean and organized area keeps tools handy and prevents accidents.
Follow simple steps to get ready. Focus on turning off the power, clearing the area, and verifying the power is off. These steps protect you from electric shocks and create a safe working spot.
Turn Off Power
Start by switching off the power at the main circuit breaker. Find the right breaker that controls the room’s electricity. Flip the switch to the off position. This stops electricity from flowing to the wires you will work on.
Clear The Area
Remove all furniture and items under the ceiling light spot. Move fragile objects away from the workspace. Keep the floor clear to avoid tripping. Lay down a drop cloth to catch dust and debris. A tidy space makes your work smooth and safe.
Verify Power Is Off
Use a voltage tester to check the wires. Touch the tester to the wires to confirm no electricity flows. Test multiple wires to be sure. If the tester shows no power, you are safe to continue. Never skip this important check.
Planning Your Installation
Planning your installation is the first step to adding a ceiling light and switch. It helps avoid mistakes and saves time. Careful planning ensures the light fits your room’s needs and wiring is safe.
Take time to think about where the light and switch will go. Check the wiring paths before you start any work. This preparation makes the whole process smoother and safer.
Choose Light Location
Pick a spot that lights the room well. Center of the room works for most lights. Avoid places too close to walls or furniture. Think about the light’s style and size too. It should match the room’s look and purpose.
Select Switch Placement
Place the switch near the door for easy reach. It should be at a comfortable height. Make sure it is visible when entering the room. Avoid placing it behind doors or furniture.
Check Wiring Access
Locate existing wires in the ceiling and walls. Use a stud finder or wire detector for safety. Make sure power is off before checking wires. Plan how to run new wires if needed. Good wiring access avoids damage and extra costs.
Running Electrical Wiring
Running electrical wiring is a key step when adding a ceiling light and switch. It connects the power source to your new fixture. Doing it safely helps avoid future problems. Follow clear steps to route wires properly and connect everything securely.
Measure And Cut Wires
Measure the distance from the power source to the switch and ceiling light. Add a little extra length to allow for bends and connections. Use a wire cutter to cut wires to the right size. Avoid cutting wires too short. Proper length makes installation easier and safer.
Route Wires To Ceiling
Route the wires through walls and ceiling cavities. Use wire staples or clips to keep wires in place. Avoid sharp bends or pinching the wires. Make sure wires reach the light fixture location. Keep wires away from heat sources or moving parts.
Connect To Power Source
Turn off the main power before working on wiring. Connect wires to the power source using wire nuts or connectors. Match wire colors: black to black, white to white, and green or bare copper to ground. Double-check connections are tight and secure. Restore power and test the switch and light.
Installing The Ceiling Light
Installing the ceiling light is a key step in updating any room’s lighting. This process requires care and attention to ensure safety and function. Follow these simple steps to fit your new light properly. Always turn off the power before starting any electrical work. Use a sturdy ladder and keep your tools close for easy access.
Attach Mounting Bracket
Start by attaching the mounting bracket to the electrical box in the ceiling. Use screws that come with your light fixture. Make sure the bracket is tight and secure. This bracket will hold the weight of your new light fixture. Check that it is level before moving to the next step.
Connect Wires To Fixture
Next, connect the wires from the ceiling to the light fixture wires. Match the colors carefully: black to black, white to white, and green or copper to ground. Use wire nuts to twist the wires together firmly. Wrap electrical tape around the nuts for extra safety. Keep the wires neat and push them gently into the electrical box.
Secure The Light Fixture
Finally, attach the light fixture to the mounting bracket. Align the fixture base with the bracket holes. Use screws to secure the fixture in place. Tighten the screws well to avoid any movement. Once fixed, install the light bulbs and any covers or shades. Turn the power back on and test your new ceiling light.

Credit: diy.stackexchange.com
Setting Up The Light Switch
Setting up the light switch is a key step in installing a ceiling light. It controls the power to the light fixture. Doing this right ensures safety and convenience in your room. Follow clear steps to install the switch properly and avoid common mistakes.
Install Switch Box
Start by choosing the spot for the switch box on the wall. It should be easy to reach and at a comfortable height. Cut out a hole in the drywall that fits the switch box. Secure the box firmly inside the wall. Use screws or nails to hold it in place. Make sure the box sits flush with the wall surface for a clean look.
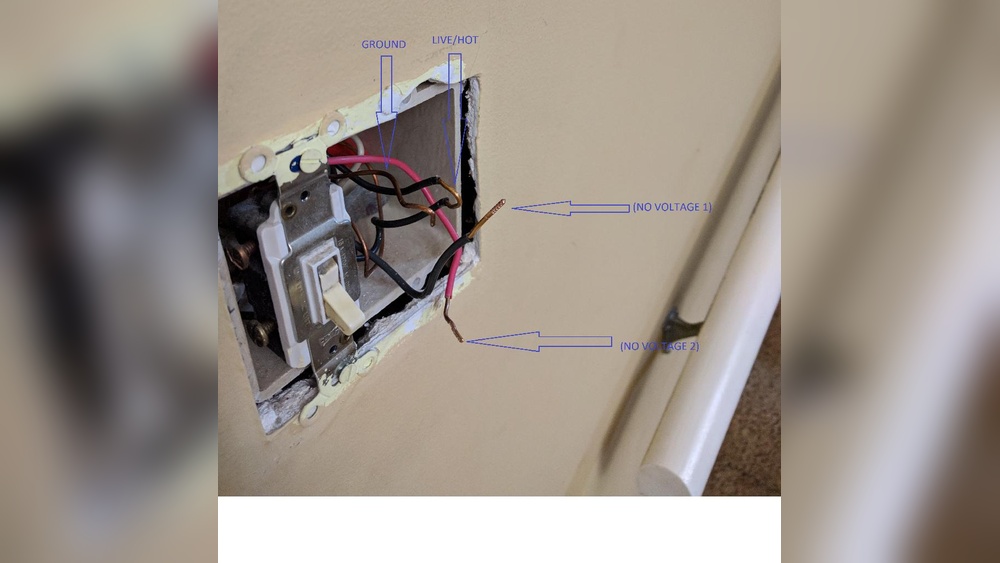
Wire The Switch
Turn off the power at the circuit breaker before handling wires. Pull the electrical cables through the switch box. Strip the wire ends carefully to expose the copper. Connect the black (hot) wire to the switch terminal. Attach the white (neutral) wires together with a wire nut. Connect the ground wire to the green screw or ground wire on the switch. Tighten all connections to ensure they are secure and safe.
Mount The Switch Plate
After wiring, tuck the wires neatly into the switch box. Align the switch with the mounting holes. Use screws to fasten the switch to the box firmly. Place the switch plate over the switch. Secure it with the small screws provided. Check that the plate sits flat against the wall without gaps.
Testing The Installation
Testing the installation of your new ceiling light and switch is a crucial step. It confirms that everything works safely and correctly. This step helps avoid future electrical problems and ensures your lighting functions as expected.
Restore Power
First, turn the main power back on at the circuit breaker. Wait a moment to let the electricity flow to the new installation. Make sure no sparks or unusual sounds come from the switch or light fixture.
Operate The Switch
Flip the switch to see if the light turns on. Test the switch multiple times to check for consistent operation. The light should respond instantly and without flickering.
Troubleshoot Common Issues
If the light does not turn on, double-check your wiring connections. Make sure wires are tight and properly placed. Look for blown fuses or tripped breakers. Replace bulbs if needed. If problems persist, consider consulting a professional electrician.

Credit: www.wikihow.com
Safety Tips And Best Practices
Working with electrical wiring can be dangerous without the right knowledge. Safety is the top priority when adding a ceiling light and switch. Follow these tips to avoid accidents and ensure a smooth installation. These best practices help protect you and your home.
Avoid Electrical Hazards
Always turn off the power at the circuit breaker before starting. Use a voltage tester to confirm wires are not live. Never touch wires with wet hands or metal tools. Keep your work area dry and clear of clutter. Wear safety glasses and insulated gloves for extra protection.
Use Proper Wire Gauges
Choose wires with the correct thickness for your circuit. Thin wires can overheat and cause fires. Check the light fixture and switch ratings to pick the right gauge. Usually, 14-gauge wires work for 15-amp circuits. Using the right wire size keeps the system safe and efficient.
Follow Local Codes
Building codes vary by location and must be followed strictly. They ensure installations are safe and legal. Check with your local authority before starting the job. Obtain any required permits for electrical work. Following codes helps avoid fines and keeps your home insured.
Frequently Asked Questions
How Do I Safely Add A Ceiling Light And Switch?
Turn off power at the breaker before starting. Use a voltage tester to confirm no electricity flows. Follow wiring diagrams carefully. Secure all connections with wire nuts. Always comply with local electrical codes for safety.
What Tools Are Needed To Install A Ceiling Light?
You need a voltage tester, wire strippers, screwdrivers, drill, and pliers. Also have wire nuts, electrical tape, and a ceiling light fixture ready. Proper tools ensure a safe and efficient installation process.
Can I Install A Ceiling Light Without Prior Electrical Experience?
Basic electrical knowledge is helpful but not mandatory. Follow step-by-step instructions carefully. If unsure, consult a licensed electrician to avoid hazards. Safety is paramount when working with electrical wiring.
How Do I Connect The Ceiling Light To The Switch?
Connect the live (hot) wire from the power source to the switch. Then connect the switch to the ceiling light’s live wire. Neutral wires connect directly to the light fixture. Ground wires must be attached to grounding terminals.
Conclusion
Adding a ceiling light and switch can brighten any room easily. Follow safety steps and use the right tools for success. Take your time and check all connections carefully. A well-installed light improves both comfort and style. Now, enjoy your new lighting and the effort you made.
Simple tasks like this boost your home’s value and feel. Keep practicing, and small projects become less hard over time.