Are you ready to brighten up your space and take control of your lighting? Installing a light with a switch might sound tricky, but with the right steps, you can do it yourself quickly and safely.
Imagine flipping a switch and instantly transforming your room’s atmosphere—it’s easier than you think. In this guide, you’ll find simple, clear instructions that anyone can follow. Keep reading, and by the end, you’ll have the confidence to install your own light and enjoy the satisfaction of a job well done.
Tools And Materials Needed
Before installing a light with a switch, gather all necessary tools and materials. Having the right items makes the job easier and safer. This list includes common tools and electrical parts used in most installations.
Basic Tools
You will need a screwdriver set, including both flathead and Phillips screwdrivers. Wire strippers are essential for removing insulation from wires. A voltage tester helps ensure the power is off before you start working. Pliers and a utility knife are also useful for cutting and bending wires.
Electrical Materials
Get a light fixture that fits your room and style. A switch matching your electrical system is necessary. Use electrical wire that meets your home’s voltage requirements. Wire nuts secure wire connections safely. Electrical tape adds extra protection around wire joints.
Safety Gear
Wear insulated gloves to protect against electric shocks. Safety glasses shield your eyes from dust and debris. Use a sturdy ladder if the light is out of reach. Make sure the area is well-lit and clear before starting the work.
Safety Precautions
Safety is the top priority when installing a light with a switch. Electricity can be dangerous. Taking the right precautions helps avoid accidents and injuries.
Follow these safety steps before starting your installation. They protect you and your home. Understanding safety rules makes the project easier and safer.
Turn Off The Power
Always switch off the power at the circuit breaker. Do not rely on the light switch alone. Use a voltage tester to check that wires are not live.
Use Proper Tools And Equipment
Choose tools designed for electrical work. Insulated screwdrivers and wire strippers reduce shock risk. Avoid using damaged or worn-out tools.
Wear Safety Gear
Use safety glasses to protect your eyes. Wear rubber-soled shoes to reduce shock chances. Gloves can help but must be dry and rated for electrical work.
Work In A Dry Area
Never work in wet or damp conditions. Water conducts electricity and increases shock risk. Ensure the workspace is dry before starting.
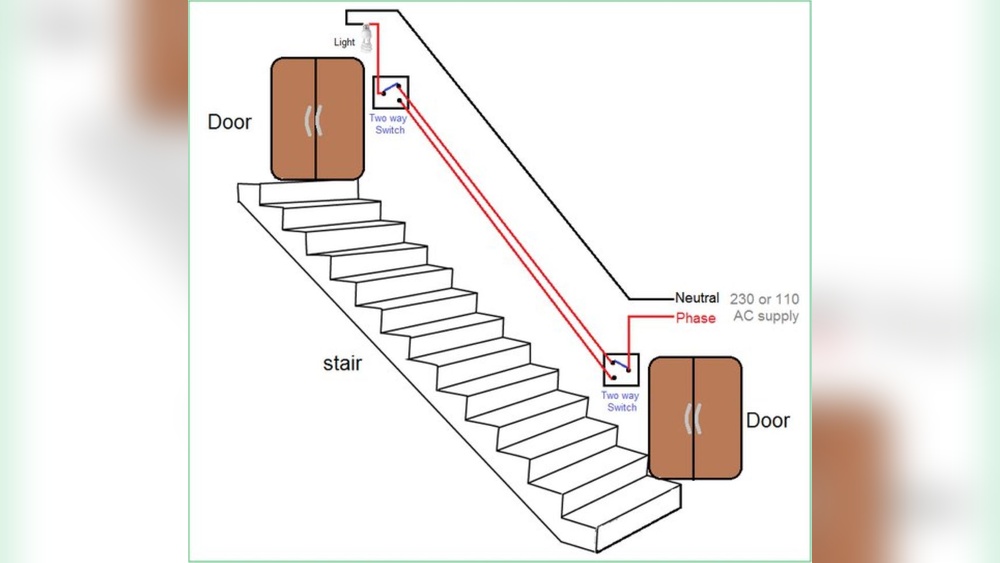
Follow Wiring Diagrams
Use clear wiring diagrams for your light and switch. Correct connections prevent shorts and fires. If unsure, consult an electrician.
Check Local Codes
Local electrical codes may have specific rules. Follow these regulations for safety and legality. Getting a permit might be required.
Turn Off Power
Turning off the power is the first step in installing a light with a switch. It keeps you safe from electric shocks. Always make sure no electricity flows through the wires before you start.
Electricity can be dangerous. Even a small shock can cause injury. Taking time to switch off the power protects you and your home.
Locate The Circuit Breaker
Find your home’s circuit breaker panel. It is usually in the basement, garage, or a utility room. The panel controls the electrical power for different parts of your home.
Switch Off The Correct Breaker
Look for the breaker that controls the light or the room where you will work. Flip the switch to the off position. This stops electricity from flowing to that area.
Test The Power Is Off
Use a voltage tester or a simple lamp to check the power. Turn on the switch or plug in the lamp. If it does not light up, the power is off and safe to work.
Credit: www.familyhandyman.com
Prepare The Wiring
Preparing the wiring is a key step in installing a light with a switch. This step ensures the electrical connections are safe and ready. Proper preparation helps avoid future problems like shorts or flickering lights. Follow each part carefully for a smooth installation.
Locate Existing Wires
Start by finding the existing wires in your wall. These wires usually come from the main power source or an existing switch. Use a voltage tester to make sure the power is off. Locate the hot, neutral, and ground wires. Mark each wire to avoid confusion later.
Strip Wire Ends
Next, strip about half an inch of insulation from each wire end. Use a wire stripper tool for a clean cut. Avoid nicking the wire strands while stripping. Exposed wire ends allow good contact with connectors. Twist wire strands tightly to prevent fraying.
Install The Switch Box
Installing the switch box is a key step in adding a new light with a switch. It holds the switch securely and keeps wiring safe. Proper installation ensures your light works well and stays safe over time.
Follow the correct steps carefully. Safety is very important when working with electricity. Turn off the power before starting any work. Use the right tools and materials for a smooth installation.
Choose The Right Location For The Switch Box
Select a spot near the door or where it is easy to reach. The switch should be at a comfortable height, usually about 48 inches from the floor. Make sure the wall space is clear and can fit the box.
Cut The Opening In The Wall
Mark the outline of the switch box on the wall. Use a drywall saw to cut carefully along the lines. Remove the cut piece gently. Check that the box fits snugly inside the opening.
Secure The Switch Box In Place
Insert the switch box into the wall opening. Use screws or nails to fix it firmly. The box should not move or wiggle. It must sit flush with the wall surface for a neat finish.
Prepare For Wiring
Make holes for the wires to enter the box. Use a wire clamp to hold the cables safely. Leave enough wire length inside the box to connect the switch easily. Double-check that the wires are not damaged.
:max_bytes(150000):strip_icc()/how-to-wire-and-install-single-pole-switches-1152330-05-2de77af170364a6fb3846f30634a5cd3.jpg)
Credit: www.thespruce.com
Connect The Wires To The Switch
Connecting the wires to the switch is a key step in installing a light with a switch. This step controls the flow of electricity, allowing you to turn the light on and off. It requires attention to detail and safety. Take your time and follow each part carefully.
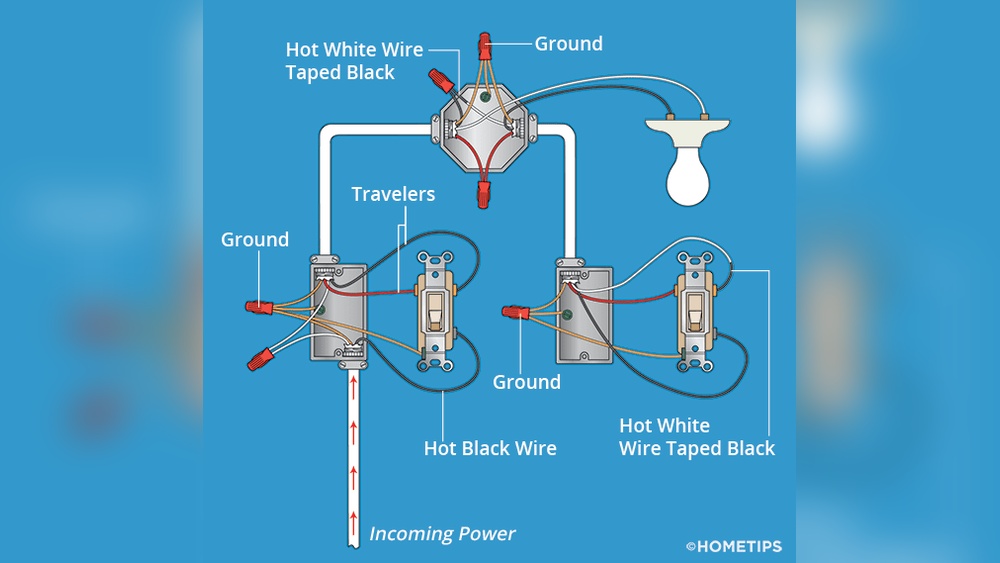
Identify Wire Types
Start by knowing the types of wires you have. Usually, there are three: the live wire, the neutral wire, and the ground wire. The live wire carries electricity to the switch. The neutral wire completes the electrical circuit. The ground wire is for safety, preventing shocks. Look for color codes: black or red is live, white is neutral, and green or bare is ground.
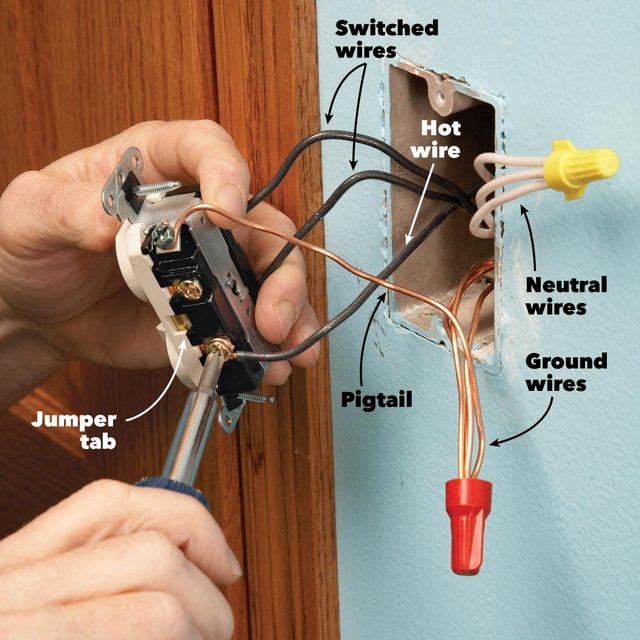
Attach Wires To Terminals
Next, connect each wire to the correct terminal on the switch. The live wire connects to the terminal marked “live” or “L.” The neutral wire usually bypasses the switch and goes straight to the light fixture. The ground wire goes to the green screw on the switch. Use a screwdriver to tighten the screws, securing the wires firmly. Loose wires can cause sparks or failures.
Mount The Switch
Mounting the switch is a key step in installing a light with a switch. It holds the switch securely in place. This step ensures the switch works safely and looks neat. Follow these simple instructions for a proper mount.
Choose The Right Switch Box
Select a switch box that fits your wall and switch size. Plastic or metal boxes work well. Make sure the box is deep enough for wiring.
Turn Off The Power
Switch off the circuit breaker before starting. This stops electric shocks. Use a voltage tester to confirm power is off.
Prepare The Wall Opening
Mark the spot for the switch box on the wall. Cut a hole using a drywall saw. The hole should fit the box snugly.
Run The Electrical Wires
Pull the electrical wires through the switch box opening. Leave enough wire to connect the switch easily. Strip the wire ends carefully.
Secure The Switch Box
Place the box into the hole in the wall. Use screws or nails to fix it tightly. Check that it sits flush with the wall surface.

Credit: www.dummies.com
Wire The Light Fixture
Wiring the light fixture is a key step in installing a light with a switch. It connects the light to your home’s electrical system. This step must be done carefully for safety and proper function.
Follow the instructions and take your time. Proper wiring ensures your light works well and stays safe to use.
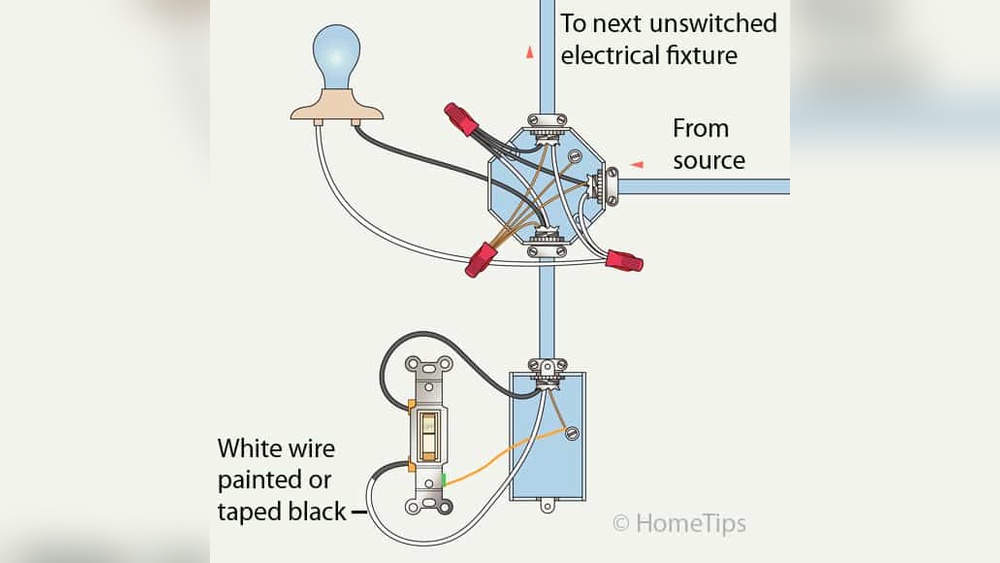
Connect Fixture Wires
Start by matching the wires from the light fixture to the wires in the ceiling. Usually, black or red wires are for power. White wires are neutral. Green or bare wires are ground.
Twist the matching wires together. Use wire nuts to secure them. Make sure no copper is exposed outside the wire nuts.
Secure Connections
After connecting the wires, gently tug each to check the hold. Loose wires can cause shorts or fires. Wrap electrical tape around wire nuts for extra safety.
Push the connected wires carefully into the electrical box. Avoid pinching or bending them sharply. Secure the fixture base to the ceiling as the final step.
Attach The Light Fixture
Attaching the light fixture is a key step in installing a light with a switch. This part connects the fixture to your ceiling or wall. It also links the fixture to the electrical wires safely. Follow these steps to attach the light fixture securely and correctly.
Turn Off The Power
Switch off the power at the circuit breaker. This prevents any electrical shock. Double-check by trying to turn the light on. The light should stay off before you start working.
Prepare The Mounting Bracket
Find the mounting bracket that came with your fixture. Attach it to the electrical box using screws. Make sure it is tight and stable. This bracket holds the fixture in place.
Connect The Wires
Match the wires from the fixture to the house wires. Usually, black connects to black, white to white, and green or copper to ground. Use wire nuts to secure the connections. Wrap electrical tape around the nuts for safety.
Attach The Fixture To The Bracket
Lift the fixture and align it with the mounting bracket. Use screws to attach the fixture firmly. Check that it does not wobble or move. This keeps the fixture safe and sturdy.
Install The Light Bulbs And Cover
Insert the correct light bulbs into the fixture sockets. Avoid bulbs with higher wattage than recommended. Attach any covers or shades that come with the fixture. This finishes the installation and protects the bulbs.
Restore Power And Test
After installing your light and switch, restoring power is the next step. This step brings electricity back to the circuit. Testing ensures the light works as planned.
Take your time here. Safety is key. Confirm everything is connected correctly before turning the power back on.
Turn On The Circuit Breaker
Find the circuit breaker panel in your home. Switch the breaker back to the ON position. This restores electricity to the light and switch.
Listen for any unusual sounds. Smell for burning odors. Both can signal a problem.
Test The Light Switch
Flip the switch up and down. The light should turn on and off easily. If it does not, check your wiring again.
Test multiple times. The switch should work smoothly every time.
Check For Proper Light Operation
Look at the brightness of the light. It should be steady and bright. Flickering or dim light means there might be an issue.
Ensure the bulb is the correct wattage. Use bulbs that match the fixture’s rating.
Troubleshooting Tips
Troubleshooting common problems during light installation saves time and frustration. Some issues arise from simple mistakes. Others involve wiring or switch faults. This section highlights key tips to fix those issues. Follow these steps to ensure your light and switch work correctly.
Check Power Supply
Ensure the circuit breaker is on. Test the power with a voltage tester. No power means the breaker may be off or a fuse is blown. Always turn off power before working on wiring.
Verify Wire Connections
Loose or wrong wires cause the light to fail. Match wire colors: black to black, white to white, and ground to ground. Tighten all wire nuts securely. Incorrect wiring can trip breakers or cause shorts.
Test The Switch
Use a multimeter to check switch function. The switch should open and close the circuit. Replace the switch if it is faulty or old. A bad switch stops the light from turning on.
Inspect The Light Fixture
Check the bulb and socket. A burned-out bulb or damaged socket prevents light. Replace the bulb and clean the socket if needed. Ensure the bulb fits the fixture correctly.
Look For Short Circuits
Short circuits cause breakers to trip immediately. Inspect wires for damage or exposed copper. Repair or replace damaged wires. Use electrical tape to cover exposed wires safely.
Frequently Asked Questions
How Do I Safely Install A Light With A Switch?
Turn off power at the breaker before starting. Use a voltage tester to confirm no electricity flows. Follow wiring instructions carefully, connect wires securely, and mount the switch and light fixture properly to ensure safety.
What Tools Are Needed To Install A Light With Switch?
You’ll need a screwdriver, wire stripper, voltage tester, electrical tape, and wire nuts. A drill may be required for mounting fixtures. These tools help ensure a safe and efficient installation process.
Can I Install A Light Switch Without Professional Help?
Yes, if you understand basic electrical wiring and safety. Always turn off power first. Follow installation instructions carefully. If unsure, consult a professional to avoid risks and ensure code compliance.
How Do I Connect Wires For A Light Switch?
Connect the black (hot) wire to the switch’s input terminal. Attach the switch’s output terminal to the light fixture’s black wire. Connect white (neutral) wires together and ground wires to the switch’s green screw.
Conclusion
Installing a light with a switch is easier than it seems. Follow each step with care and patience. Always turn off the power before starting the work. Use the right tools to stay safe and get the job done. Testing the light and switch ensures everything works well.
Enjoy your new light that you installed yourself. Small tasks like this build your confidence and skills. Keep practicing, and you will handle more projects soon. Simple steps bring good results every time.