Are you looking to add a light to a 3 way switch but don’t know where to start? You’re not alone.
Many homeowners face this challenge and wonder if it’s too complicated or risky to tackle on their own. The good news is, with the right steps and clear instructions, you can do it yourself—and save money while upgrading your home’s lighting.
You’ll discover simple, easy-to-follow tips that guide you through the process safely and confidently. Keep reading, and by the end, you’ll have the knowledge to brighten up your space exactly how you want.
Tools And Materials Needed
Adding a light to a 3 way switch requires the right tools and materials. Having everything ready makes the job easier and safer. This section lists all items needed for the task. Use this list to prepare before starting your project.
Essential Tools For The Job
Gather these tools for a smooth installation:
- Screwdrivers (flathead and Phillips)
- Wire strippers
- Voltage tester
- Needle-nose pliers
- Electrical tape
- Wire nuts
- Drill with bits
- Flashlight or work light
Materials Required
Here are the materials needed to add the light:
- Light fixture
- Electrical wire (14/3 or 12/3 gauge)
- 3 way switch (if replacing or adding)
- Light switch box (if needed)
- Wire connectors
- Mounting hardware
Safety Gear
Protect yourself with these safety items:
- Insulated gloves
- Safety glasses
- Dust mask (for drilling)
- Non-slip shoes
How A 3 Way Switch Works
A 3 way switch lets you control one light from two different places. This is useful in hallways, stairs, or large rooms. Understanding how it works helps you add lights or fix wiring safely.
Two switches connect to the same light. Each switch can turn the light on or off independently. The wiring inside the switches moves the electrical current to the light or stops it.
What Makes A 3 Way Switch Different?
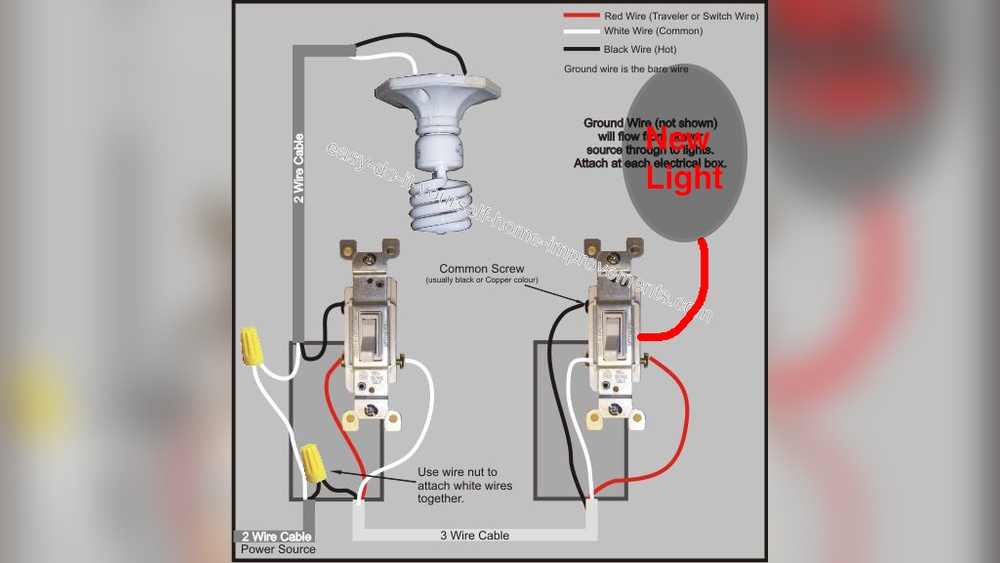
Unlike a regular switch, a 3 way switch has three terminals. These terminals connect to wires called travelers and a common wire. The travelers carry current between the two switches.
Both switches work together to open or close the electrical path. This allows the light to turn on or off from either switch.
How The Switches Control The Light
Each switch changes the path of electricity. The light turns on when the path is complete. When the path breaks, the light turns off.
The switches flip the connection between traveler wires. This changes the flow of electricity through the circuit.
The Role Of Traveler Wires
Traveler wires connect the two switches. They carry current back and forth. This lets each switch control the flow of electricity.
Depending on the switch positions, the current reaches the light or does not. This simple system makes 3 way switches work well.
Safety Precautions Before Starting
Working with electrical switches needs care. Safety comes first before adding a light to a 3 way switch. Simple steps can keep you safe and prevent accidents. Take time to prepare and check everything before starting.
Turn Off Power At The Circuit Breaker
Always switch off the power from the main circuit breaker. This stops electricity from flowing to the switch. Use a tester to check the wires. Make sure no power is running before you touch anything.
Use Proper Tools And Equipment
Choose tools made for electrical work. Insulated screwdrivers and wire strippers are best. Avoid using damaged or worn tools. Wear rubber-soled shoes to reduce shock risk. Keep your work area clean and dry.
Understand The Wiring Layout
Study the wiring diagram for a 3 way switch. Know which wires carry power and which connect the switches. Label wires if needed. Clear knowledge helps avoid mistakes and keeps you safe.
Wear Safety Gear
Wear safety glasses to protect your eyes. Use gloves designed for electrical work. These can stop shocks and cuts. Avoid loose clothing that can catch on wires or tools.
Turn Off Power To The Circuit
Turning off power to the circuit is the first and most important step. This step keeps you safe from electric shocks. Working with electricity is dangerous without power off. Always take time to make sure the power is off before starting your work.
Switches control the flow of electricity in your home. A 3-way switch lets you control one light from two places. Adding a light to this setup means working with live wires. Power must be off to avoid accidents.
Locate The Circuit Breaker
Find your home’s circuit breaker box. It is usually in the basement or a utility room. Look for the breaker that controls the room you will work in. The breakers are labeled for easy identification.
Turn Off The Correct Breaker
Flip the breaker switch to the OFF position. This stops electricity from flowing to the circuit. Do not guess. Make sure it is the right breaker to avoid cutting power to other areas.
Verify Power Is Off
Use a voltage tester or a non-contact voltage detector. Check the wires at the switch or light fixture. The tester will show no power if the breaker is off. Double-checking is essential for safety.
Locate The Switches And Wiring
Before adding a light to a 3 way switch, find the switches and wiring first. This step is key to a smooth and safe installation. Knowing where the switches and wires are helps you plan the work better. It also reduces mistakes and saves time.
Identify The Two Switch Locations
Start by finding the two switches that control the light. These switches are usually at opposite ends of a hallway or room. Look for switch plates that have two switches controlling the same light. Confirm by turning the switches on and off to see if the light responds.
Turn Off Power At The Breaker
Safety first. Turn off the power to the switches at the breaker box. Use a voltage tester to check that wires have no power. This step prevents electric shock while working on wiring.
Remove Switch Covers And Inspect Wiring
Take off the switch covers using a screwdriver. Look inside to see the wires connected to the switches. Note the wire colors and how they are connected. Take pictures or mark wires to remember their positions.
Trace The Wiring Path
Follow the wires from one switch to the other. Look inside the wall or attic if needed. Identify traveler wires that connect the two switches. These wires allow the switches to work together.
Locate The Power Source And Light Fixture Wiring
Find the power source wire that brings electricity to the switches. Also, locate the wiring going to the light fixture. Understanding this layout helps you know where to connect the new light.

Credit: diy.stackexchange.com
Wiring The Light Fixture
Wiring a light fixture to a 3-way switch involves connecting wires correctly for two switches to control one light. Start by turning off power and identifying the traveler and common wires. Proper connections ensure the light works from both switch locations.
Wiring the light fixture is a key step in adding a light to a 3-way switch. It connects the power from the switch to the light. This step needs care to ensure safety and proper function.
Follow each step carefully. Use the right tools and turn off power before starting.
Connect The Hot Wire
First, find the hot wire from the switch box. It usually has black insulation. Connect this hot wire to the light fixture’s black wire. Use a wire nut to secure the connection tightly. This wire carries power to the light.
Attach The Neutral Wire
Next, locate the neutral wire. It has white insulation. Attach this wire to the light fixture’s white wire. Twist them together and use a wire nut. The neutral wire completes the electrical circuit.
Ground The Fixture
Finally, connect the ground wire. It is either bare copper or green. Attach it to the fixture’s ground screw or wire. This step prevents electrical shocks. Make sure the ground connection is firm and secure.
Modify The 3 Way Switch Wiring
Modifying the wiring of a 3 way switch is essential to add a new light. This process changes how the switches connect to the light fixture. It requires understanding the existing wiring setup. Careful steps will ensure safety and proper function of the switches.
Identify Traveler Wires
Start by turning off the power at the breaker. Remove the switch covers and use a tester to check wires. Traveler wires usually connect the two 3 way switches. These wires carry current back and forth to control the light. Mark these wires with tape for easy identification.
Run New Wire To Light
Next, run a new cable from one of the switches to the new light fixture. Use a cable with enough wires for power, neutral, and ground. Secure the cable along walls or ceilings safely. Make sure the new wire does not interfere with existing wiring. This step connects the light to the switch circuit.
Connect Switches Properly
Connect the new light’s wires to the correct terminals on the switch. Attach the traveler wires to the traveler terminals. Connect the common terminal to the power source or load wire. Tie neutral wires together in the switch box if needed. Always attach the ground wire to the green terminal. Check all connections twice for tightness and accuracy.

Credit: www.youtube.com
Test The Light And Switches
Testing the light and switches is a key step after installation. It ensures everything works as planned. This step helps find wiring mistakes early. Fix problems before closing walls or securing fixtures.
Check both switches separately and together. The light should turn on or off from either switch. If it doesn’t, the wiring needs review. Testing saves time and prevents safety risks.
Turn On The Power
Restore power at the breaker box. Use caution. Make sure no wires are exposed. A voltage tester can confirm power is live.
Operate Each Switch
Flip the first switch on and off. Watch if the light responds. Repeat with the second switch. Both must control the light independently.
Test All Switch Combinations
Try all possible switch positions. The light should turn on or off in each case. This confirms the 3-way wiring is correct.
Check For Flickering Or Dim Light
Observe the light closely. Flickering or dim light may mean loose wires. Tighten connections or replace faulty parts as needed.
Use A Non-contact Voltage Tester
Check switches and wires for power without touching. This tool adds safety. It detects voltage presence quickly and easily.
Troubleshooting Common Issues
Troubleshooting common issues helps fix problems quickly. Adding a light to a 3 way switch can bring some challenges. Many errors happen during installation. Identifying these problems saves time and effort.
Understanding common faults guides you to correct solutions. Safety matters most. Always turn off power before inspecting wiring or switches. Use simple steps to check your work carefully.
Check For Loose Or Disconnected Wires
Loose wires cause lights not to work or flicker. Look behind switches and light fixtures. Make sure all wires are tight and connected to the right terminals. Use a screwdriver to secure any loose screws. A loose wire can stop the entire circuit from working.
Test The Switches For Proper Operation
Switches can fail or have broken internal parts. Flip each switch several times. Notice if the light responds correctly. Use a voltage tester to check if power flows through the switches. Replace any switch that does not work as expected.
Verify Correct Wire Connections
Wrong wire placement causes switches to malfunction. Identify traveler wires, common wires, and ground wires. Confirm each wire is in the correct terminal. Review your wiring diagram or instructions carefully. Mistakes in wiring lead to no light or constant light issues.
Inspect The Light Fixture And Bulb
Sometimes the problem is the light fixture or bulb. Check if the bulb is burned out or loose. Test the fixture with another working bulb. Look for damage or corrosion inside the fixture. Replace faulty parts to restore lighting.

Credit: www.finehomebuilding.com
Frequently Asked Questions
How Do I Wire A Light To A 3 Way Switch?
To wire a light to a 3 way switch, connect the light fixture between the two switches. Use traveler wires to link the switches, allowing control from both points. Ensure the power source is turned off before wiring for safety.
Can I Add A Light To An Existing 3 Way Switch?
Yes, you can add a light to an existing 3 way switch by extending the wiring. Identify the switch loop and connect the new light in parallel. Always follow electrical codes and turn off power before starting the project.
What Tools Are Needed To Add A Light To 3 Way Switch?
Essential tools include a voltage tester, wire stripper, screwdriver, electrical tape, and wire nuts. These help safely handle wires, test circuits, and secure connections. Using the right tools ensures a safe and efficient installation.
Is It Safe To Install A Light On A 3 Way Switch?
Yes, it is safe if you follow proper wiring procedures and turn off the power. Double-check connections and use quality materials. If unsure, consult a licensed electrician to avoid hazards and ensure compliance with electrical codes.
Conclusion
Adding a light to a 3-way switch can brighten any room easily. Follow the steps carefully for safe and proper wiring. Always turn off power before starting any electrical work. Take your time and check connections twice. This simple upgrade can improve your home’s lighting control.
With patience and care, you can do it yourself. Enjoy the convenience of controlling lights from two places. Keep safety first, and you will succeed.