Are you looking to brighten up a room without adding a whole new switch? Adding a light to an existing light switch can be a smart and simple way to improve your space.
Imagine controlling two lights with just one switch—saving you time and effort. In this guide, you’ll discover easy steps to make this upgrade yourself, even if you’re not an expert. Keep reading, and by the end, you’ll have the confidence to enhance your home’s lighting quickly and safely.
Tools And Materials Needed
Adding a light to an existing light switch is a simple task. Having the right tools and materials makes the job easier and safer. This list helps you prepare everything before you start.
Essential Tools For The Job
A screwdriver set is necessary to open switch plates and secure wires. Wire strippers help remove insulation from electrical wires safely. A voltage tester checks if the power is off. Needle-nose pliers make bending and twisting wires easier. A drill may be needed to create holes for mounting the new light fixture.
Materials You Will Need
Choose a light fixture that fits your room and style. Electrical wire connects the switch to the new light. Use wire nuts to join wires securely and safely. Electrical tape adds extra insulation and protection. A new switch cover plate can freshen the look after installation.
Safety Gear To Protect Yourself
Wear insulated gloves to avoid electric shocks. Safety glasses protect your eyes from dust and debris. A flashlight or headlamp helps when working in dark areas. Keep a fire extinguisher nearby just in case. Always turn off the power at the breaker box before starting.

Credit: www.youtube.com
Safety Precautions
Working with electricity needs careful attention. Safety is the top priority when adding a light to an existing switch. Taking the right steps can prevent accidents and injuries. Follow these safety tips to keep yourself and your home safe.
Turn Off The Power
Always switch off the power at the circuit breaker. Do not rely only on the light switch. Use a voltage tester to confirm the power is off before touching wires.
Use Proper Tools
Use insulated tools made for electrical work. Avoid using damaged or worn-out tools. Good tools help prevent electric shocks and make the job easier.
Wear Safety Gear
Wear rubber-soled shoes and safety glasses. Gloves can protect your hands from sharp edges. Safety gear reduces the risk of injury.
Check Local Codes
Follow local electrical codes and rules. These codes ensure safe and proper installation. Ignoring codes can cause hazards and legal issues.
Work In A Dry Area
Keep your work area dry and clean. Water and electricity do not mix. Avoid working in wet conditions to reduce shock risk.
Label Wires Clearly
Label wires before disconnecting them. This helps you reconnect everything correctly. Clear labels prevent wiring mistakes that cause shorts or fires.
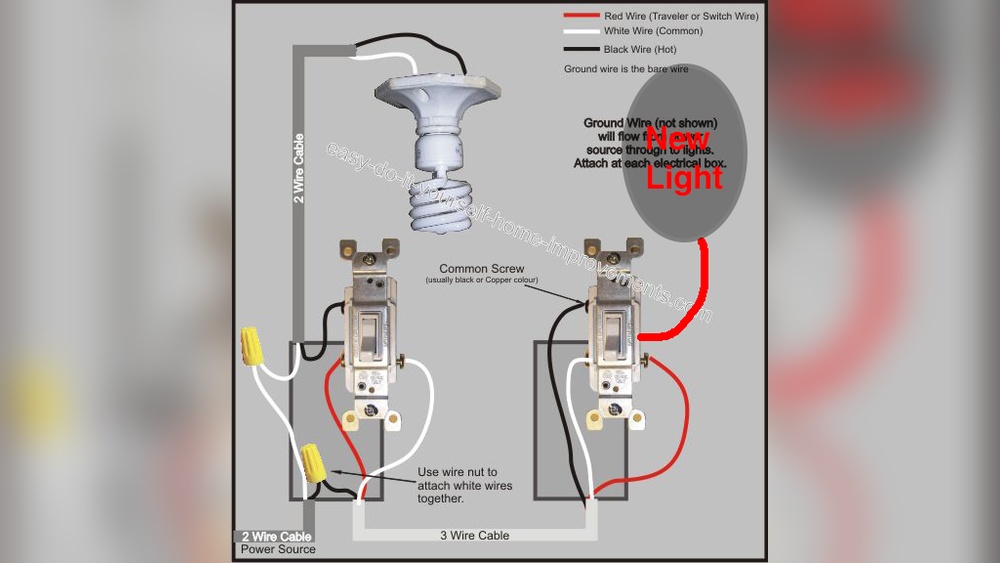
Identify Your Existing Wiring
Identifying your existing wiring is the first step to add a light to a light switch. Knowing the wiring type helps you work safely and correctly. This step prevents damage and ensures the new light works well.
Turn off the power at the breaker before touching any wires. Use a voltage tester to confirm no power flows. Safety is the top priority in any electrical task.
Locate The Switch Box
Open the switch box cover carefully. Look inside to see the wires connected to the switch. The box usually contains black, white, and ground wires.
Identify Wire Colors
Black wires carry power from the breaker. White wires are neutral and complete the circuit. Bare copper or green wires are grounding wires for safety.
Check Wire Connections
Notice how wires connect to the switch terminals. Usually, black wires attach to the screw terminals. White wires might be twisted together and capped with a wire nut.
Determine Switch Type
Find out if the switch controls one light or multiple lights. Single-pole switches have two terminals plus a ground. Three-way switches have three terminals plus a ground.
Document Your Findings
Take notes or photos of the wiring setup. This record helps you reconnect wires correctly later. Clear documentation reduces mistakes during installation.

Credit: www.do-it-yourself-help.com
Turn Off Power Safely
Turning off the power safely is the first step before adding a light to an existing switch. This step protects you from electrical shocks. It also prevents damage to your home’s wiring. Never skip this important safety measure. Always take your time and be careful.
Locate The Correct Circuit Breaker
Find your home’s circuit breaker panel. Look for the label that matches the switch you will work on. If labels are missing or unclear, turn off breakers one by one. Check which switch loses power. This helps identify the correct breaker.
Use A Voltage Tester
Before starting any work, test the switch with a voltage tester. This tool shows if electricity is still flowing. Touch the tester to the switch wires. If the tester lights up or beeps, power is still on. Turn off the breaker again and test until no power shows.
Double-check The Power Is Off
Always confirm the power is off twice. After turning off the breaker, test the switch and nearby outlets. Ensure no lights or devices turn on. This double-check step reduces risk of shock and mistakes.
Remove The Switch Cover
Removing the switch cover is the first step to add a light to an existing switch. This step lets you see the wiring behind the switch. It also makes the area safe to work on.
Take your time with this step. A careful approach avoids damage and keeps you safe.
Turn Off The Power
Always switch off the power at the circuit breaker. This stops electricity flow to the switch. Use a tester to confirm the power is off before touching anything.
Gather The Right Tools
You will need a screwdriver, usually a flathead or Phillips. Have a flashlight ready to see inside the switch box better. Keep a small container for screws to avoid losing them.
Unscrew The Switch Cover
Locate the screws holding the cover plate. Turn the screws counterclockwise to remove them. Keep the screws safe for reinstallation.
Remove The Cover Plate Carefully
Gently pull the cover plate away from the wall. Avoid bending or cracking the plate. Set it aside on a flat surface.
Connect The New Light Fixture
Connecting the new light fixture is an important step. This part involves running wires, making connections, and securing the fixture. Follow each step carefully to ensure safety and proper function.
Run Electrical Wire
Start by running electrical wire from the switch box to the new light fixture location. Use a wire type that matches your existing wiring. Measure the distance and cut the wire with some extra length for connections. Pull the wire through walls or ceilings using fish tape or a wire puller. Leave enough wire exposed at both ends for easy connection.
Make Wire Connections
Turn off the power at the breaker before touching any wires. Strip about half an inch of insulation from each wire end. Connect the wires by matching colors: black to black (hot), white to white (neutral), and green or bare copper to ground. Use wire nuts to twist the wires together securely. Wrap electrical tape around the wire nuts for extra safety. Double-check all connections are tight and neat.
Secure The Fixture
Attach the mounting bracket to the electrical box first. Align the fixture’s mounting plate with the bracket and screw it in place. Tuck wires carefully into the box to avoid pinching. Attach the light fixture firmly so it does not wobble. Finally, install bulbs and any covers or shades that come with the fixture.
Test Your New Light
Testing your new light is an important step. It shows if your work is correct and safe. Check the light before closing the switch box. This saves time and avoids extra work later.
Turn On The Power
Switch the circuit breaker back on. This sends electricity to the light switch. Now you can test the new light.
Flip The Light Switch
Press the switch to turn the light on. The bulb should light up immediately. If it stays dark, check your connections again.
Check For Flickering Or Dim Light
Watch the light for flickers or dim spots. Flickering means loose wires or a bad bulb. Replace the bulb or tighten connections if needed.
Inspect The Switch Function
Turn the switch on and off several times. The light should respond every time. If it does not, the switch may be faulty.
Look For Unusual Smells Or Sounds
Listen for buzzing or crackling sounds. Smell for burning or unusual odors. These signs mean a wiring problem. Turn off power and fix issues immediately.
Troubleshooting Common Issues
Adding a light to an existing switch can sometimes lead to issues. Troubleshooting helps find and fix these problems quickly. Understanding common issues saves time and frustration. Below are some typical problems and how to solve them.
Incorrect Wiring Connections
Wiring mistakes are the most common cause of issues. Check all wire connections carefully. Make sure wires match the switch and light terminals. Loose or swapped wires can stop the light from working.
Tripped Circuit Breaker
A tripped breaker cuts power to the switch. Inspect the breaker panel for any switches that are off. Reset the breaker by turning it off and back on. Avoid overloading the circuit to prevent trips.
Faulty Light Bulb Or Fixture
Sometimes the problem is the bulb or fixture. Test the bulb in another socket to confirm it works. Replace the bulb with a new one if it is burned out. Check the fixture for damage or loose parts.
Switch Not Working Properly
The switch itself may be faulty. Test the switch by replacing it with a new one. A broken switch can block power flow. Use a voltage tester to check if the switch sends power when flipped.
Power Supply Issues
No power at the switch can cause the light not to work. Use a voltage tester to check for power at the switch box. If no power is present, the problem may be in the circuit or wiring before the switch.

Credit: diy.stackexchange.com
Frequently Asked Questions
How Do I Safely Add A Light To An Existing Switch?
Turn off power at the breaker first. Use a voltage tester to confirm no power. Connect the new light’s wiring to the switch’s load wire. Follow local electrical codes and use proper tools for safety.
What Tools Are Needed To Add A Light To A Switch?
You need a voltage tester, wire stripper, screwdriver, wire nuts, electrical tape, and possibly a drill. These tools help ensure safe and secure connections when adding a light to an existing switch.
Can I Add A Light To A Switch Without Rewiring?
Yes, if the switch box has a neutral wire and the wiring setup supports it. Use a wireless or smart light switch if rewiring is difficult. Always check local electrical codes before proceeding.
How Do I Know If My Switch Can Support Another Light?
Check the switch’s amperage rating and the total wattage of all connected lights. Ensure the combined load does not exceed the switch’s capacity to avoid electrical hazards or damage.
Conclusion
Adding a light to an existing switch is simple and useful. Follow safety rules carefully to avoid problems. Turn off power before starting any work. Use the right tools and materials for a good result. Double-check all connections before restoring electricity.
Taking time and care will make your project safe and bright. Now, you can enjoy better lighting in your space. Small changes can make a big difference in your home. Try this project to improve your lighting today.