Are you tired of your motion sensor light turning off too quickly or not sensing movement properly? Adjusting your motion sensor light switch can make a huge difference in how well it works for you.
Whether you want it to stay on longer, detect motion from farther away, or respond only at certain times, this simple tweak can boost your home’s convenience and security. Keep reading, and you’ll learn exactly how to fine-tune your motion sensor light switch to fit your needs perfectly.
Choosing The Right Motion Sensor Switch
Choosing the right motion sensor switch is key to a smooth and effective installation. The right switch will fit your needs and work well with your lights. It also helps save energy and increase safety. Understanding the types of motion sensors and the compatibility with your fixtures makes the choice easier.
Types Of Motion Sensors
Motion sensor switches use different technologies. Passive infrared (PIR) sensors detect body heat. They work best indoors and in small spaces. Ultrasonic sensors send sound waves and detect movement by echo changes. They work well in larger areas or where heat changes are small. Dual-technology sensors combine PIR and ultrasonic. They reduce false triggers and improve accuracy.
Compatibility With Fixtures
Not all motion sensor switches fit all light fixtures. Check the switch’s voltage and power ratings first. LED lights may need specific sensors made for low power. Incandescent and fluorescent bulbs may work with most sensors. Also, check the size and design of the switch. It must fit your wall box and match your decor. Proper compatibility ensures the sensor switch works without issues.

Credit: diy.stackexchange.com
Gathering Tools And Safety Tips
Before adjusting a motion sensor light switch, gather the right tools. Proper preparation helps the job go smoothly. Safety is very important to avoid accidents or damage.
Essential Tools Needed
First, get a screwdriver, usually a flathead or Phillips. A voltage tester is crucial to check if wires are live. Wire strippers help remove insulation without cutting wires. Electrical tape secures wire connections safely. A ladder might be necessary for high switches. Keep a flashlight handy for better visibility in dark spots.
Safety Precautions
Turn off power at the circuit breaker before starting any work. Test the switch with a voltage tester to confirm no electricity flows. Wear rubber-soled shoes to reduce shock risk. Avoid working with wet hands or in damp areas. Keep tools dry and organized to prevent slips. Never touch wires directly, even if power is off. Work in a well-lit area to see clearly.
Preparing The Installation Area
Preparing the installation area is the first step to adjust a motion sensor light switch. This step ensures safety and makes the process smooth. You need to work carefully to avoid accidents and damage.
Turning Off Power
Start by turning off the power at the circuit breaker. This stops electricity from flowing to the switch. Use a voltage tester to confirm power is off. Never skip this step for your safety.
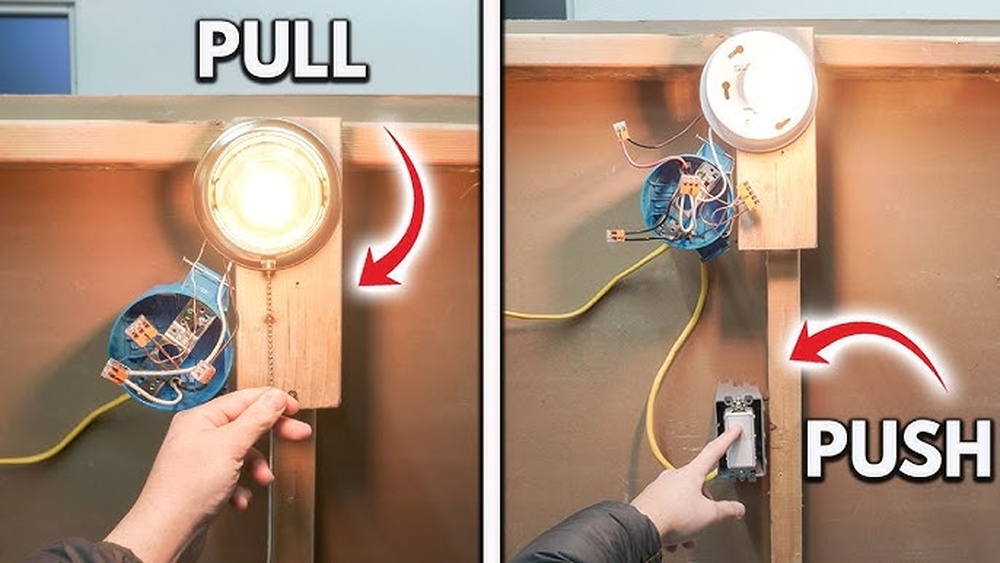
Removing Existing Switch
Remove the switch cover plate with a screwdriver. Unscrew the existing switch from the wall box. Gently pull the switch out to see the wires. Keep track of the wires’ positions for reconnection.
Wiring The Motion Sensor Switch
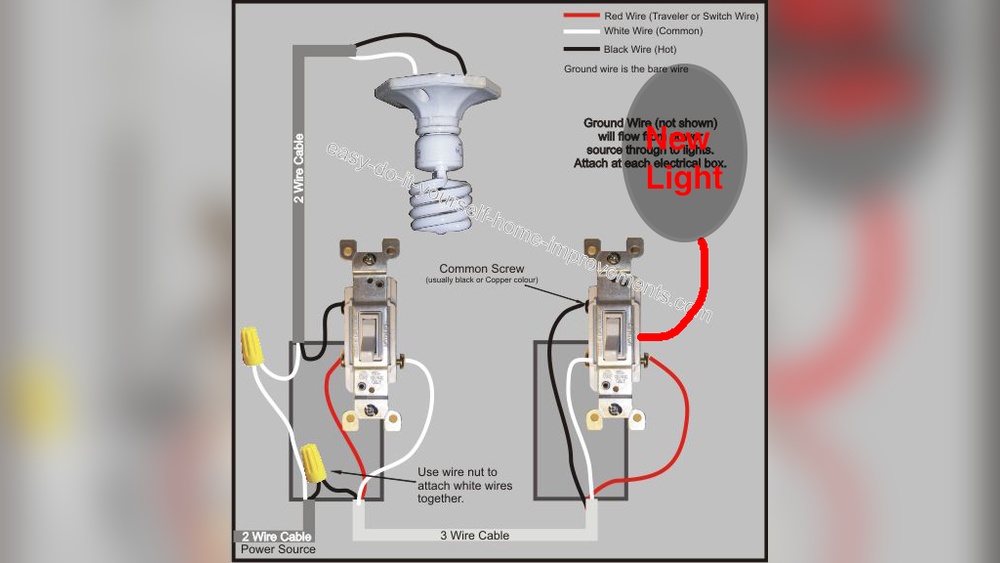
Wiring a motion sensor light switch is a key step in its installation. It controls the power flow to your lights and triggers them based on movement. Proper wiring ensures the switch works safely and effectively.
Understanding the wiring process helps avoid mistakes. It also protects your home from electrical hazards. The process involves identifying the wires in your wall box and connecting them correctly to the switch.
Identifying Wires
Start by turning off the power at the breaker. Use a voltage tester to confirm the power is off. Look inside the switch box for three main wires: line, load, and ground.
The line wire brings power from the breaker. It is usually black. The load wire goes to the light fixture. It is often black or red. The ground wire is green or bare copper. It protects against electrical shocks.
Some boxes also have a neutral wire, which is white. It completes the electrical circuit. Knowing these wires helps connect the switch correctly.
Connecting Wires Correctly
Attach the ground wire from the switch to the ground wire in the box. Twist them together and secure with a wire nut. Connect the line wire from the wall to the switch’s line terminal.
Connect the load wire to the switch’s load terminal. This controls the light fixture. If your switch has a neutral terminal, connect it to the neutral wire.
Double-check all connections. They must be tight and secure. Loose wires can cause the switch to fail or create hazards.
After wiring, carefully push the switch into the box. Fasten it with screws. Turn the power back on and test the switch.
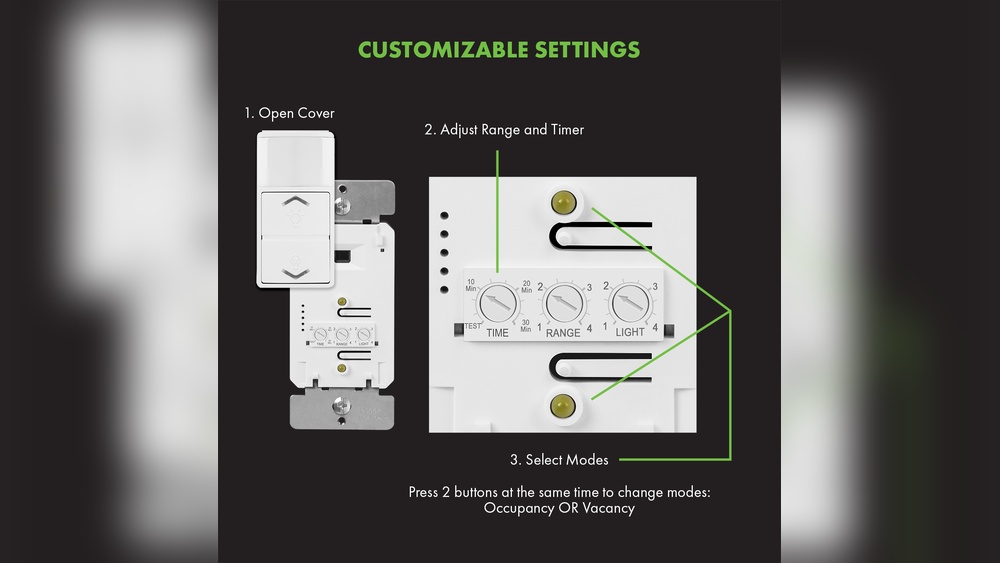
Setting The Sensitivity Levels
Setting the sensitivity levels on a motion sensor light switch helps control how it detects movement. It stops the light from turning on too often or staying on too long. Adjusting sensitivity ensures the light works well for your space and needs.
Adjusting Detection Range
Most motion sensor switches have a dial or button to change the detection range. Turn the dial to increase or decrease how far the sensor can see. A shorter range works best for small rooms or hallways. A longer range suits larger areas like garages or yards. Adjust slowly and test to find the right distance.
Testing Sensitivity
After setting the range, test the sensor’s sensitivity by moving in and out of its field. Walk at different speeds and distances. The light should turn on only when you want it to. If it triggers too easily, lower the sensitivity. If it misses your movement, raise it a little. Repeat tests until the light reacts properly.

Credit: www.youtube.com
Configuring Light Duration
Configuring the light duration on a motion sensor switch controls how long the light stays on after detecting motion. This setting helps save energy and improves convenience. Adjusting the timer length makes sure the light fits your needs perfectly.
Each space may need a different light duration. A hallway might need a short timer, while a garage might need a longer one. Learning to set the right time keeps the light useful without wasting electricity.
Setting Timer Length
Find the timer dial or buttons on your motion sensor switch. Turn the dial or press the buttons to increase or decrease the light duration. Most switches allow settings from a few seconds up to 30 minutes or more.
Start with a medium setting, about 5 minutes. Test the light to see if it stays on long enough. Adjust up or down based on how you use the space.
Optimizing For Usage
Think about how often people pass through the area. For places with quick movement, a shorter timer saves energy. For rooms where people stay longer, a longer timer prevents the light from turning off too soon.
Check the light duration during different times of the day. Adjust the timer to match your daily routines. This simple step improves comfort and cuts energy costs.
Adjusting Ambient Light Settings
Adjusting the ambient light settings on your motion sensor light switch helps control when the light turns on. It lets the sensor know how much natural light is enough to keep the light off. This saves energy and prevents the light from turning on during daylight.
Correct adjustment ensures the light works only when needed. It improves the sensor’s accuracy and avoids wasting power.
Daylight Sensor Calibration
Start by finding the daylight sensor on your switch. It often looks like a small window or lens. Use the adjustment dial or buttons to set the sensor’s sensitivity to light. Turn it to a higher setting for darker conditions. Lower the setting for brighter rooms.
Test the sensor by covering it to simulate darkness. The light should turn on quickly. Then expose it to bright light. The light should turn off. Repeat until you find the right balance for your space.
Preventing False Triggers
False triggers happen when the sensor turns the light on unnecessarily. This can occur from passing shadows or car headlights. To reduce this, lower the sensitivity of the daylight sensor slightly.
Keep the sensor away from direct light sources and reflections. Clean the sensor lens regularly to avoid dirt buildup. These steps help the sensor detect real motion under the right light conditions.
Testing The Motion Sensor Switch
Testing the motion sensor switch ensures it works correctly and saves energy. After installation, check if the sensor detects movement and turns the light on. This step helps confirm proper settings and placement. It also allows you to find any issues before regular use.
Trial Runs
Start by walking in front of the sensor. Watch if the light turns on quickly. Test at different distances to see the sensor’s range. Try moving slowly and quickly to check sensitivity. Adjust the sensor angle if the light does not respond well. Repeat tests at night and during the day for best results.
Troubleshooting Common Issues
If the light does not turn on, check the power source first. Make sure the switch is wired correctly. Clear any objects blocking the sensor’s view. Reduce the sensor’s sensitivity if the light stays on too long. Clean the sensor lens to remove dust or dirt. Reset the switch if it malfunctions or freezes.
Maintaining Your Motion Sensor Switch
Maintaining your motion sensor switch is key to keeping it working well. Dirt, dust, or wrong settings can stop it from sensing motion properly. Regular care helps the sensor detect movement accurately and saves energy.
Regular Cleaning
Dust and dirt build up on the sensor lens over time. Clean the lens gently with a soft cloth. Avoid using harsh chemicals or water directly on the switch. A clean lens helps the sensor spot motion quickly and correctly.
Periodic Recalibration
Recalibrate the sensor to keep its settings sharp. Sensors can drift and lose accuracy after some use. Follow the manufacturer’s guide to reset detection range and sensitivity. This keeps your light turning on and off at the right times.
Credit: www.familyhandyman.com
Frequently Asked Questions
How Do I Adjust The Sensitivity On A Motion Sensor Light Switch?
To adjust sensitivity, locate the sensor’s sensitivity dial or button. Turn or press it to increase or decrease detection range. Test changes by moving in front of the sensor. Adjust until the light activates at your desired distance.
Can I Change The Motion Sensor Light Switch Timer?
Yes, most switches have a timer dial or setting. Rotate or press it to set how long the light stays on after motion stops. Adjust the timer for shorter or longer illumination based on your needs.
Why Is My Motion Sensor Light Switch Not Turning Off?
The sensor might detect continuous movement or heat sources nearby. Clean the sensor lens to remove dust. Adjust sensitivity or timer settings to prevent false triggers. Ensure no objects block or constantly move near the sensor.
How Do I Reposition A Motion Sensor Light Switch?
Turn off power before repositioning. Loosen the switch or sensor mounting screws. Adjust the angle or location to cover the desired area. Tighten screws and restore power. Test to confirm the sensor covers the target zone effectively.
Conclusion
Adjusting a motion sensor light switch is simple and quick. Start by setting the sensitivity to match your needs. Next, adjust the timer so the light stays on just the right amount. Test your settings by walking in front of the sensor.
Fine-tune if the light turns on too often or not enough. Proper adjustment saves energy and improves security. Now, enjoy a smart lighting system that works for you.