Are you tired of fumbling with a pull chain every time you want to turn your light on or off? Changing your pull chain light to a simple wall switch can make your life easier and add a modern touch to your space.
You might think this is a complicated job, but with the right steps, you can do it yourself quickly and safely. In this guide, you’ll discover exactly how to switch from a pull chain to a wall switch, saving you time and frustration.
Ready to upgrade your lighting setup? Keep reading, and you’ll learn everything you need to know.
Tools And Materials Needed
Changing a pull chain light to a switch needs specific tools and materials. Having the right items makes the job easier and safer. Prepare everything before starting the project.
Tools Required
You need a screwdriver set with flathead and Phillips heads. A voltage tester helps check if the power is off. Wire strippers make it easy to prepare the wires. Needle-nose pliers help bend and hold wires. A drill may be necessary to make holes for the switch box. A flashlight can help see inside dark areas.
Materials Needed
A standard light switch replaces the pull chain. Use a switch box to hold the new switch safely. Electrical wires, usually 14/2 gauge, connect the switch to power. Wire nuts secure wire connections. Electrical tape adds extra safety to wire nuts. Wall plates cover the switch for a clean look.
Safety Precautions
Safety is the top priority when changing a pull chain light to a switch. Electrical work can be risky without the right care. Taking the right steps prevents accidents and damage. Here are key safety precautions to follow for a safe and smooth process.
Turn Off Power At The Circuit Breaker
Always switch off the power to the light circuit at the breaker box. This stops electricity from flowing to the fixture. Use a tester to confirm the power is off before starting work. Never trust the wall switch alone.
Use Insulated Tools
Choose tools with insulated handles. These protect you from electric shocks. Avoid metal tools without insulation. Handle wires carefully to avoid cuts or shocks.
Wear Safety Gear
Wear rubber-soled shoes to reduce shock risk. Use safety glasses to protect your eyes from dust or debris. Gloves can protect your hands from sharp objects and wires.
Check Wiring And Connections
Inspect all wires for damage or wear. Replace any frayed or exposed wires before proceeding. Ensure connections are secure and tight to avoid shorts or sparks.
Work In A Dry Area
Make sure the workspace is dry. Water increases the chance of electrical shock. Avoid working in damp or wet conditions to stay safe.
Turn Off The Power
Turning off the power is the first step to safely change a pull chain light to a switch. It protects you from electric shocks and prevents damage to the wiring. Never start any electrical work without cutting the power.
Always double-check that the power is really off before touching any wires. A small mistake can cause serious harm. Take this step seriously for your safety.
Locate The Circuit Breaker
Find your home’s circuit breaker box. It is usually in the basement, garage, or utility room. Open the box to see the switches controlling your home’s electricity.
Turn Off The Correct Breaker
Look for the breaker labeled for the room or area with the pull chain light. Flip the switch to the off position. This stops electricity from flowing to the light fixture.
Use A Voltage Tester
Before working, use a voltage tester on the light wires. This tool checks if electricity is still present. If the tester shows no power, it is safe to proceed.

Credit: us.amazon.com
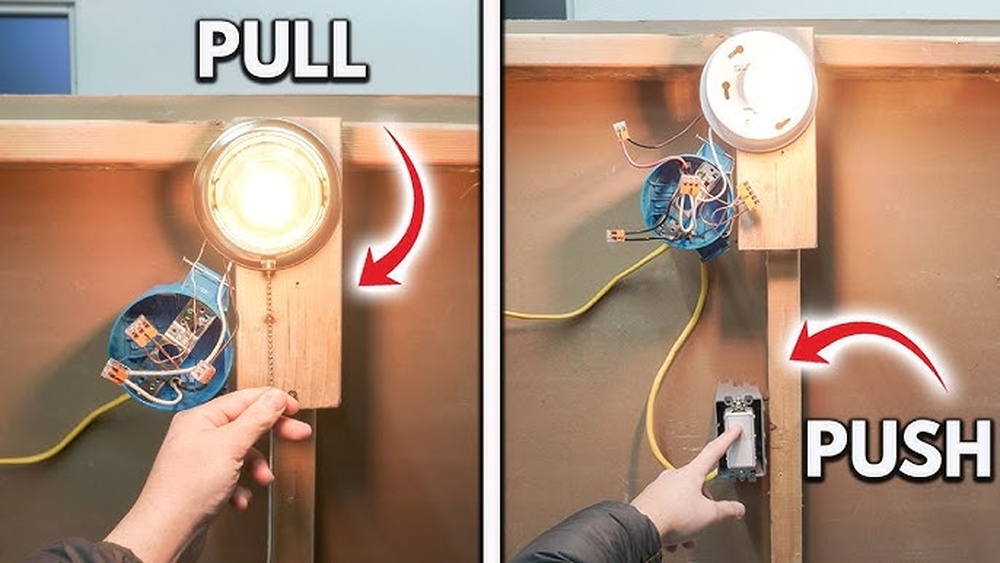
Remove The Pull Chain Fixture
Removing the pull chain fixture is the first step to change it to a switch. This part controls the light by pulling a chain. To install a switch, you must safely take out the old fixture. This process requires care and simple tools.
Turn off the power at the circuit breaker before starting. Safety is the top priority. After power is off, use a ladder or stool to reach the light fixture comfortably.
Gather Necessary Tools
Prepare a screwdriver, voltage tester, and pliers. These tools help remove the fixture and check wires. Keep a small container for screws to avoid losing them.
Remove The Light Bulb And Glass Shade
Unscrew the light bulb carefully. Set it aside. Take off the glass shade by twisting or unhooking it. This step exposes the pull chain mechanism.
Unscrew The Pull Chain Fixture
Locate screws holding the fixture to the ceiling or wall. Use the screwdriver to remove them. Hold the fixture firmly as you unscrew to prevent it from falling.
Disconnect The Pull Chain Wires
Check wires connected to the pull chain switch. Use the voltage tester to confirm power is off. Unscrew wire nuts or terminals to disconnect wires safely.
Remove The Fixture Base
After wires disconnect, gently pull the fixture base away. This reveals the electrical box behind. Inspect the box for any damage before installing the new switch.
Identify And Prepare The Wiring
Identifying and preparing the wiring is the first step in changing a pull chain light to a switch. This step ensures safety and makes the process smooth. You must know which wires control the light and how to handle them. Before starting, turn off the power at the breaker to avoid shocks. Use a voltage tester to confirm no electricity flows through the wires. This simple check protects you during the work.
Next, remove the light fixture cover and look inside. You will see wires connected to the pull chain socket. Typically, there are black (hot), white (neutral), and sometimes a green or bare copper (ground) wire. Knowing these colors helps you connect the switch correctly. Label the wires with tape if needed to avoid confusion later.
Locate The Hot Wire
The hot wire carries electricity to the light. Usually, it is black or red. This wire connects to the pull chain switch inside the fixture. Find where this wire connects and disconnect it carefully. This wire must run through the new switch for the light to work properly.
Identify The Neutral Wire
The neutral wire completes the electrical circuit. It is usually white. This wire often connects directly to the light socket. Keep the neutral wire connected as it is. Do not connect the neutral wire to the switch, as it will not work.
Check The Ground Wire
The ground wire is a safety feature. It is green or bare copper. Connect the ground wire to the switch’s grounding screw. If your switch has no ground screw, connect the ground wire to the metal box. This step prevents shocks and improves safety.
Prepare The Wires For Switch Installation
Strip about half an inch of insulation from each wire end. Use wire strippers for a clean strip. Twist the wire strands tightly for a solid connection. This preparation ensures a secure and safe switch installation. Handle all wires gently to avoid damage.
Install The Wall Switch
Installing a wall switch replaces the old pull chain with a cleaner, easier control. This step makes your light more convenient to use every day. The process requires basic tools and safety care.
Before starting, turn off the power at the circuit breaker. This prevents electric shocks and keeps the work safe. Next, gather a wall switch, screwdriver, wire strippers, and electrical tape.
Choose The Switch Location
Pick a spot on the wall near the light fixture. It should be easy to reach and follow your room’s layout. Mark the place lightly with a pencil for the new switch box.
Cut The Wall Opening
Use a drywall saw to cut a hole where you marked. The hole must fit the switch box snugly. Take care to avoid cutting wires or pipes inside the wall.
Run Electrical Wires
Pull new wires from the light fixture to the wall opening. Use a wire fish tape if needed. Leave enough wire length at both ends to connect easily.
Connect The Switch Wires
Strip about half an inch of insulation from each wire end. Attach the wires to the switch terminals. Usually, black wires connect to brass screws and white wires to silver screws.
Secure The Switch And Test
Fasten the switch into the box using screws. Attach the wall plate cover. Turn the power back on and check if the switch controls the light properly.
Connect Wires To The Switch
Connecting wires to the switch is a key step in changing a pull chain light to a switch. This step ensures the light works correctly and safely. Proper wire connections help avoid electrical problems and keep your home safe.
Before starting, turn off the power at the circuit breaker. Test the wires with a voltage tester to be sure no electricity flows. Safety first.
Identify The Wires
Look at the wires coming from the ceiling and the light fixture. Usually, you will see black (hot), white (neutral), and green or bare copper (ground) wires. The black wire carries electricity to the light. The white wire returns electricity to the panel. The ground wire protects you from shocks.
Strip The Wire Ends
Use a wire stripper to remove about half an inch of insulation from each wire end. This exposes the metal wire. Be careful not to nick or damage the wire. Clean wire ends make better connections.
Attach the black (hot) wire from the ceiling to one terminal screw on the switch. Connect the black wire that goes to the light fixture to the other terminal screw. Twist the wires clockwise around the screws for a tight fit. Use pliers if needed.
Connect The Ground Wire
Attach the green or bare copper ground wire to the green screw on the switch. If there is no ground wire in the box, connect the ground wire from the switch to the metal box if it is grounded. This step is important for safety.
Cap And Secure The Neutral Wires
Connect the white (neutral) wires from the ceiling and fixture together with a wire nut. Do not connect neutral wires to the switch. Keep them safely twisted and capped inside the box.
Mount The Switch And Restore Power
Secure the switch firmly to the wall box using screws. Turn the power back on at the breaker to restore electricity. Test the switch to ensure it works properly.
Mount The Switch
Start by placing the switch into the wall box. Align the screw holes of the switch with the box. Use a screwdriver to secure the switch with screws. Tighten the screws until the switch feels firm. Avoid overtightening to prevent damage. Make sure the switch sits flat against the wall.
Attach The Switch Plate
Place the switch plate over the mounted switch. Line up the screw holes on the plate with the switch. Insert the screws and tighten gently. The plate should cover all wiring and fit snugly. This gives a clean, finished look to your installation.
Restore Power
Turn the circuit breaker back on at your electrical panel. Test the new switch by flipping it on and off. The light should respond immediately. If it doesn’t, double-check your wiring and connections. Restoring power safely completes the switch installation process.
Test The New Switch Setup
Testing the new switch setup is a vital step after changing your pull chain light to a switch. It ensures the wiring is correct and the switch works properly. Testing also helps avoid potential electrical problems and keeps your home safe.
Turn On The Power
First, restore power to the circuit by turning the breaker back on. Check that the electricity flows to the switch. This step is important before you test the switch itself.
Operate The Switch
Flip the new switch on and off several times. Watch the light to see if it responds each time. The light should turn on immediately and turn off without delay.
Check For Flickering Or Issues
Look closely for any flickering or dimming of the light. Flickering may mean loose wiring or a bad connection. If the light stays steady, the wiring is secure.
Test Multiple Times
Test the switch multiple times over a few minutes. Consistent operation shows the switch is reliable. This avoids future headaches from faulty wiring or switch problems.
Use A Voltage Tester
Use a voltage tester to confirm power reaches the switch. This tool helps verify that wiring is correct and safe. No voltage means a wiring issue that needs fixing.
Credit: www.youtube.com
Troubleshooting Tips
Troubleshooting is key when changing a pull chain light to a switch. Small problems can stop the switch from working. Knowing what to check saves time and effort. Below are common issues and easy fixes to keep your project smooth.
Check Power Supply
Always start by checking the power. Use a voltage tester to see if electricity reaches the fixture. No power means the switch won’t work. Look for a tripped breaker or blown fuse in the panel box.
Inspect Wiring Connections
Loose or wrong wiring causes failure. Turn off power before touching wires. Ensure all wires connect tightly to the new switch terminals. Follow wiring diagrams carefully. Wrong connections can cause shorts or no power.
Test The New Switch
Sometimes switches are faulty. Test the switch with a multimeter before installation. A bad switch needs replacement. Testing avoids extra work and frustration after installation.
Look For Damaged Components
Check wires and parts for damage. Frayed wires or burnt spots mean replacement is necessary. Damaged parts can cause unsafe conditions or failure to operate.
Verify Switch Compatibility
Not all switches fit every fixture. Confirm the switch type matches your light fixture and wiring setup. Using the wrong switch can lead to problems or hazards.

Credit: www.wikihow.com
Frequently Asked Questions
How Do I Replace A Pull Chain With A Wall Switch?
Turn off power at the breaker. Remove the pull chain light fixture. Connect the fixture wires to a new wall switch using a junction box. Mount the switch on the wall and restore power to test the light.
What Tools Are Needed To Change Pull Chain To Switch?
You need a screwdriver, wire stripper, voltage tester, wire nuts, electrical tape, and a new wall switch. Having a drill and junction box may help. Always ensure safety gear like gloves and goggles are used.
Can I Install A Switch Without An Electrician?
Yes, if you have basic electrical knowledge and follow safety precautions. Always turn off power before starting. If unsure, consult a professional to avoid risks like electrical shock or code violations.
Is It Safe To Remove Pull Chain Lights?
Yes, but only after cutting power. Removing pull chain lights properly involves disconnecting wires and replacing them with a switch. Improper handling can cause electrical hazards, so caution is essential.
Conclusion
Changing a pull chain light to a switch can make your room easier to use. The steps are simple and safe when you follow instructions. You just need a few tools and some care. Take your time and work carefully.
This small change can improve your daily routine. Now, you can control your light with a normal switch. Try it yourself and enjoy the convenience.