Have you ever wished you could control one light from two different switches? Whether it’s a hallway, staircase, or large room, a 3-way light switch makes this possible—and it’s easier to install than you might think.
In this guide, you’ll learn simple steps to set up your own 3-way switch, saving you time and money on electricians. By the end, you’ll have the confidence to upgrade your lighting and make your home more convenient. Ready to take control of your lights?
Let’s get started!

Credit: nassaunationalcable.com
Tools And Materials Needed
Before starting a 3 way light switch project, gather the right tools and materials. This step ensures smooth work and safety. Each tool helps in a specific task during installation.
Knowing the materials needed saves time and avoids extra trips to the store. It also helps to follow the instructions carefully for a successful setup.
Basic Tools
Use a screwdriver set with flathead and Phillips tips. A wire stripper makes removing insulation easy. A voltage tester checks if wires are live. Needle-nose pliers help bend and hold wires. A drill may be needed for new holes.
Electrical Materials
Purchase two 3 way switches designed for your home’s voltage. Get electrical wire, usually 14/3 gauge with three insulated wires. Wire nuts connect wires safely. Electrical tape secures wire nuts and covers exposed wires.
Safety Gear
Wear safety glasses to protect your eyes. Use insulated gloves to avoid shocks. A flashlight helps in dim or dark spaces. A voltage detector adds extra safety checks before touching wires.
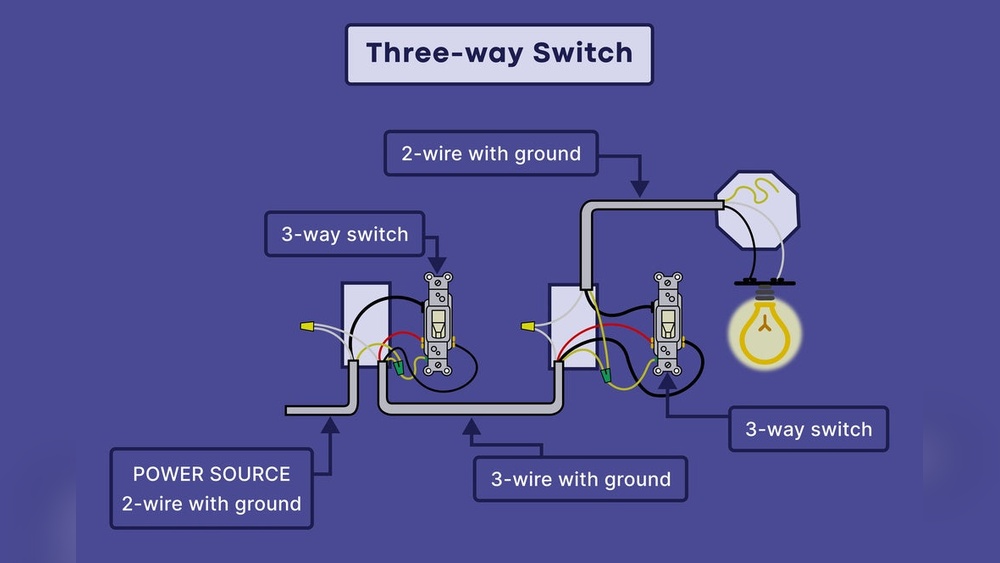
How A 3-way Switch Works
A 3-way switch lets you control one light from two different places. This is handy in hallways, staircases, or large rooms. It works differently than a regular switch. Understanding how it works helps with installation and troubleshooting.
What Is A 3-way Switch?
A 3-way switch has three terminals. It does not have an ON or OFF label. This switch works with another 3-way switch to control one light.
Both switches connect through traveler wires. These wires carry current between the switches. This setup allows the light to turn on or off from either switch.
The Role Of Traveler Wires
Traveler wires link the two 3-way switches. They carry electricity back and forth. Depending on switch positions, one traveler wire is active.
This active wire completes the circuit to the light. The other traveler wire remains inactive. Switching either switch changes which traveler wire is active.
How The Circuit Completes
The circuit completes when the switches connect the power to the light. If both switches align properly, electricity flows to the light bulb. This turns the light on.
If either switch changes position, the circuit breaks. This stops the electricity and turns the light off. The light can be controlled from two spots this way.
Safety Precautions
Working with electrical switches requires care. Safety is the first step before starting any wiring task. Following safety rules helps prevent shocks and accidents. It protects both you and your home.
Always prepare your workspace. Make sure it is dry and well-lit. Use tools that are in good condition. These small steps keep the job safe and smooth.
Turn Off The Power
Switch off the power at the circuit breaker. Do not rely on the wall switch alone. Use a tester to confirm the power is off. This step stops dangerous electric shocks.
Use Proper Tools And Equipment
Use insulated tools to avoid electric shocks. Wear rubber-soled shoes for extra safety. Avoid metal jewelry or watches while working. These tools and habits reduce risk.
Double Check Wiring Connections
Check each wire before connecting it. Look for damaged or frayed wires. Replace any damaged wiring before installation. Proper connections prevent shorts and fires.
Keep Work Area Clear
Remove clutter from your workspace. Keep children and pets away. A clean area helps you focus and work safely. It also prevents accidental trips or falls.

Credit: mepacademy.com
Identifying Wiring Types
Identifying wiring types is the first step to install a 3 way light switch. Knowing the wires helps you connect the switch correctly. It also prevents electrical problems and keeps you safe.
Wiring can look different in every home. Some wires carry power, others connect switches or go to the light fixture. Understanding these differences makes your work easier and safer.
Understanding Traveler Wires
Traveler wires connect the two switches in a 3 way switch setup. Usually, there are two traveler wires, often red and black. These wires carry current between the switches to control the light from two locations.
Identifying Common Wire
The common wire is important in a 3 way switch. It connects to the power source or the light fixture. This wire is usually black or dark-colored. It serves as the main pathway for electricity in the circuit.
Recognizing Ground Wire
The ground wire is a safety feature. It is bare copper or green. This wire prevents electrical shocks by redirecting electricity safely into the ground. Always connect the ground wires properly.
Spotting Neutral Wire
The neutral wire completes the electrical circuit. It usually has white insulation. In some 3 way switch setups, neutral wires may not be connected to the switches but are present in the box. Knowing this helps avoid confusion during installation.
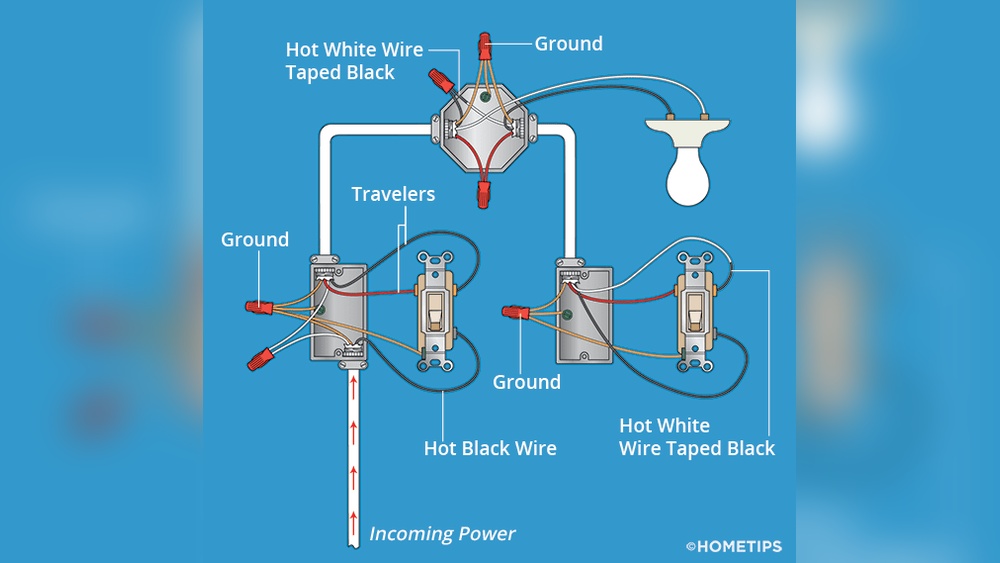
Step-by-step Wiring Guide
Wiring a 3-way light switch can seem tricky. This guide breaks down the process into clear steps. Follow each step carefully to ensure safety and success. You will learn how to connect wires correctly and test the switches.
Prepare your tools and materials. Wear safety gear. Let’s start wiring the 3-way switch.
Turn Off Power
Switch off power at the circuit breaker panel. Use a voltage tester to check if wires are live. Never work on electrical wiring without confirming power is off.
Remove Existing Switches
Unscrew the cover plates on existing switches. Carefully pull out switches from the wall box. Note the wire connections before disconnecting them. Take a photo for reference.
Connect Traveler Wires
Identify the traveler wires. These usually have the same color, often red or black. Attach traveler wires to the traveler terminals on both switches. Tighten screws securely to avoid loose connections.
Attach Common Terminal
Locate the common terminal on each switch. Connect the black (hot) wire to the common terminal on the first switch. On the second switch, connect the wire going to the light fixture to the common terminal.
Ground The Switches
Find the ground wires in the box, usually bare copper or green. Connect these wires to the green ground screw on each switch. Proper grounding helps prevent electrical shocks.
Secure Switches And Test
Push switches back into the wall boxes. Screw the switches and cover plates in place. Turn on the power at the breaker. Test both switches to ensure the light works from either location.
Troubleshooting Common Issues
Troubleshooting common issues with a 3 way light switch can save time and frustration. Understanding typical problems helps fix the switch quickly. Many problems come from wiring mistakes or faulty switches. Following clear steps can identify and solve these issues easily.
Check For Loose Or Disconnected Wires
Loose wires cause the switch to fail or flicker. Turn off the power before inspecting the wiring. Look inside the switch box for any loose or disconnected wires. Tighten any loose screws or reconnect wires firmly. A secure connection often fixes the problem.
Test The Switches With A Voltage Tester
A voltage tester finds if the switch gets power. Turn off the switches, then test each terminal. If a switch does not have power, the problem is in the wiring or circuit. Replace a switch if it does not work despite having power.
Replace A Faulty Switch
Switches wear out over time. If the switch feels loose or does not click, it may be broken. Turn off the power, remove the old switch, and install a new one. Make sure to connect wires correctly to avoid new issues.
Inspect The Traveler Wires
Traveler wires connect the two switches in a 3 way setup. Check if traveler wires are connected to the right terminals. Swapping these wires causes the switch to work incorrectly. Correct traveler wire placement ensures smooth operation.
Verify The Light Fixture Connection
Sometimes the problem lies in the light fixture. Check the bulb and socket for damage or loose connections. Replace the bulb if it is burnt out. Secure any loose wires at the fixture for proper lighting.
Upgrading To Smart 3-way Switches
Upgrading to smart 3-way switches adds convenience to your home lighting. These switches let you control lights from multiple locations using your phone or voice. They offer more than just on and off functions.
Smart switches improve energy efficiency and add safety features. You can schedule lights to turn on or off automatically. This upgrade fits well in any modern home.
What Are Smart 3-way Switches?
Smart 3-way switches replace traditional switches controlling one light from two spots. They connect to Wi-Fi or a smart hub. This connection allows remote control and automation.
Benefits Of Smart 3-way Switches
Control lights from anywhere. Set timers and dim lights easily. Save energy by turning off lights automatically. Increase home security with scheduled lighting.
Installation Tips For Smart 3-way Switches
Turn off power before starting. Identify the traveler wires in your switch box. Follow the manufacturer’s instructions carefully. Use a voltage tester to ensure safety.
Compatibility And App Control
Check if the smart switch works with your home system. Use apps to control lights remotely. Voice control works with assistants like Alexa or Google.

Credit: www.belkin.com
Frequently Asked Questions
What Is A 3-way Light Switch Used For?
A 3-way light switch controls one light from two different locations. It is ideal for hallways and large rooms. It provides convenience by allowing you to turn lights on or off from multiple spots.
How Do You Wire A 3-way Light Switch?
Wiring a 3-way switch involves connecting two switches to the same light fixture. Use traveler wires between switches and connect the common terminal properly. Ensure power is off before starting to avoid electrical hazards.
Can I Replace A Single-pole Switch With A 3-way Switch?
Yes, but you need two 3-way switches and proper wiring. A single-pole switch controls lights from one location only. Converting requires running traveler wires between the two switches for 3-way functionality.
What Tools Are Needed To Install A 3-way Switch?
You need a screwdriver, wire stripper, voltage tester, and electrical tape. These tools help safely connect wires and secure the switches during installation. Always follow safety guidelines when working with electricity.
Conclusion
Installing a 3 way light switch can save time and effort. It lets you control one light from two places. Follow each step carefully to ensure safety. Double-check your wiring before turning on the power. With practice, the process becomes easier and more natural.
This simple skill helps in many home projects. Try it yourself and see the difference it makes. Keep learning and improving your electrical knowledge. Safety first, always.