Are you tired of your motion light turning on at the wrong times or not sensing movement properly? Adjusting your motion light sensor switch can solve these frustrating problems quickly.
With just a few simple steps, you can customize how your light reacts to motion, saving energy and adding convenience to your daily routine. Keep reading, and you’ll learn exactly how to fine-tune your motion sensor switch so it works perfectly for your space.
Choosing The Right Sensor
Choosing the right motion light sensor switch is important for effective lighting control. The correct sensor improves security and saves energy. It also ensures the light turns on only when needed. Understanding sensor types and placement helps make the best choice for your space.
Types Of Motion Sensors
There are mainly two types of motion sensors used in light switches. The first type is the passive infrared sensor, or PIR. It detects body heat and movement in its range. PIR sensors work well indoors and outdoors in mild weather.
The second type is the microwave sensor. It sends out radio waves and detects movement by changes in the waves. Microwave sensors cover a larger area and work through some walls. These sensors suit larger spaces or places with obstacles.
Sensor Placement Tips
Proper placement of the sensor ensures it works accurately. Avoid placing sensors near heating vents or direct sunlight. These can cause false triggers or reduce sensor life.
Install sensors at a height of six to ten feet for best coverage. Point the sensor toward the main area where motion is expected. Avoid pointing sensors at moving trees or busy roads to reduce false alarms.

Credit: www.youtube.com
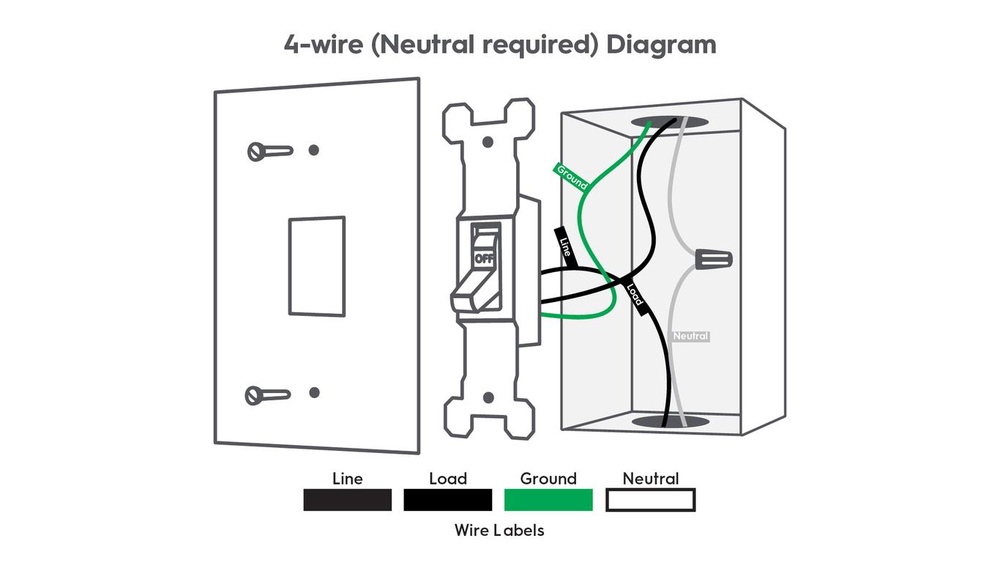
Basic Components Of The Switch
Understanding the basic components of a motion light sensor switch helps in adjusting it correctly. Each part controls a different function. Knowing these parts makes your adjustments more effective. It also ensures the light works exactly as you want.
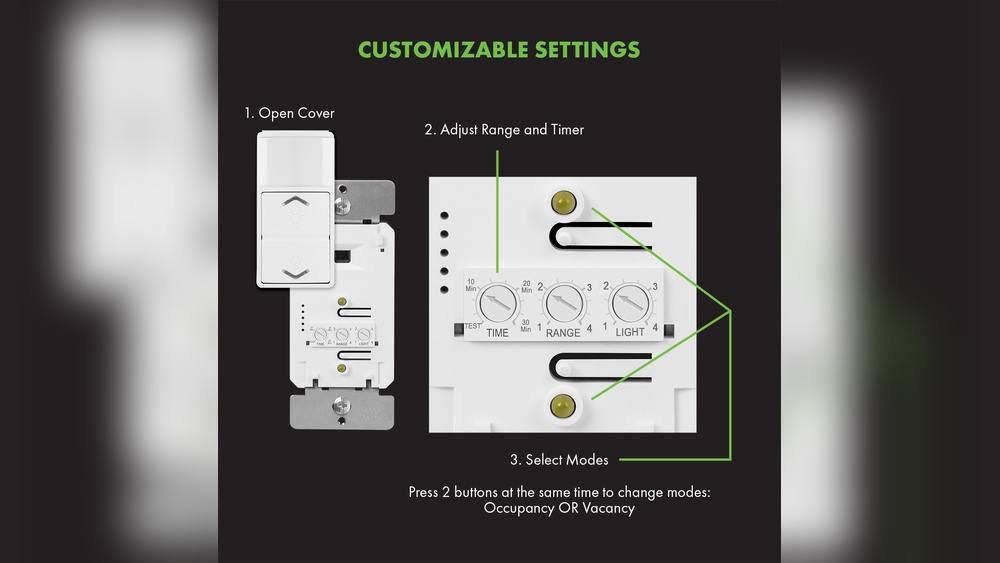
Sensitivity Control
Sensitivity control adjusts how much motion the sensor detects. Increasing sensitivity makes the light react to small movements. Lowering it stops the light from turning on for distant or minor motions. Set this based on how close you want the sensor to detect movement.
Time Delay Setting
The time delay setting decides how long the light stays on after detecting motion. You can set it from a few seconds to several minutes. A longer time keeps the light on for more time after motion stops. A shorter time saves energy by turning off the light quickly.
Light Level Adjustment
Light level adjustment controls when the sensor activates based on surrounding light. It prevents the light from turning on during bright daylight. You can set it to work only in low light or darkness. This saves power and extends the sensor’s lifespan.
Step-by-step Adjustment Guide
Adjusting a motion light sensor switch improves its performance and saves energy. Follow this step-by-step guide to set up your sensor correctly. Each step helps you fine-tune the sensor for the best results. Take your time to make sure everything works smoothly.
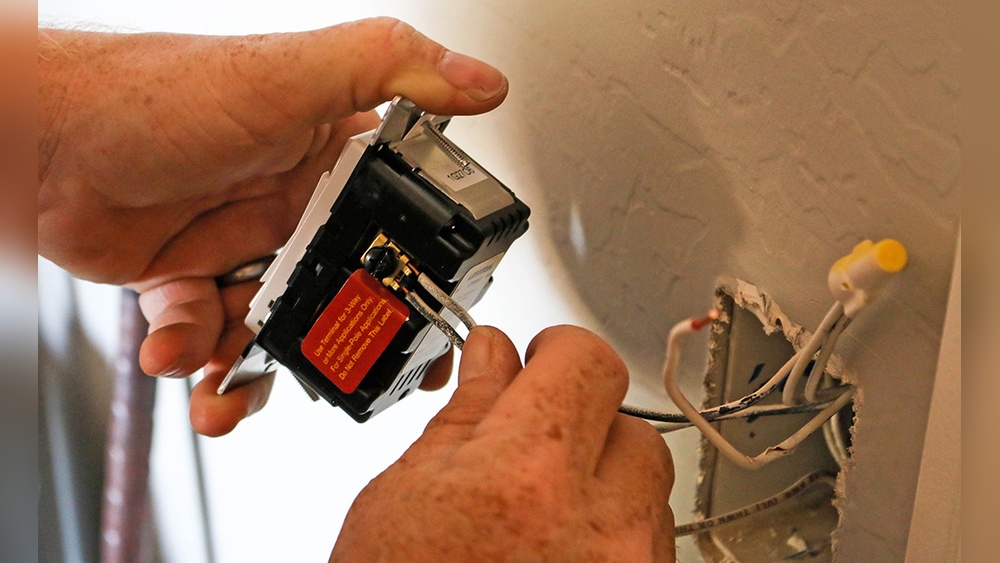
Power Off And Safety Measures
Turn off the power at the circuit breaker. This stops any electrical shock risks. Use a voltage tester to confirm no power is flowing. Wear insulated gloves for extra protection. Never touch wires with bare hands.
Initial Sensor Positioning
Place the sensor where it can detect motion easily. Avoid pointing it at windows or heat sources. Set the sensor height around six to eight feet. This height helps detect movement in most areas. Adjust the angle for the best coverage.
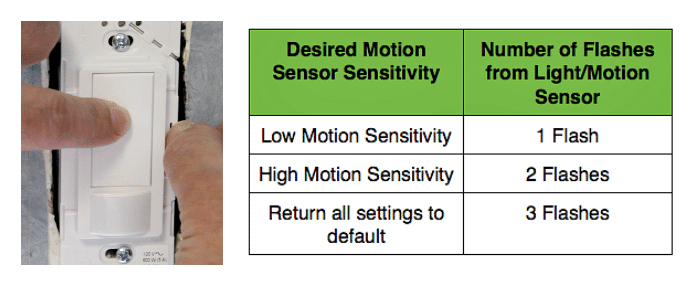
Setting Sensitivity Levels
Locate the sensitivity dial on the sensor. Turn it slowly to increase or decrease sensitivity. High sensitivity detects small movements but may cause false alarms. Low sensitivity works well for large spaces. Test the sensor after each adjustment.
Adjusting Time Delay
Find the time delay control on the switch. This controls how long the light stays on after motion stops. Set it to a few seconds or several minutes. Shorter delay saves more energy. Longer delay is good for safety and convenience.
Configuring Light Threshold
Adjust the light threshold to set when the sensor activates. It stops the light from turning on during daylight. Use the dial to increase or decrease the threshold. Test it in different lighting conditions. Make sure the sensor only works in the dark.

Credit: www.youtube.com
Testing And Fine-tuning
Testing and fine-tuning your motion light sensor switch is essential for proper function. This step ensures the sensor detects movement accurately and avoids turning on unnecessarily. Proper testing improves security and saves energy by preventing false triggers. Follow simple methods to check and adjust your sensor settings for the best results.
Walk Test Method
The walk test method helps you see how the sensor reacts to movement. Walk slowly across the sensor’s detection area. Watch if the light turns on promptly and stays on for the set time. Test from different angles and distances to cover all zones. This check confirms the sensor covers the desired space well.
Adjusting For False Triggers
False triggers happen when the light turns on without real movement. Common causes include pets, shadows, or nearby traffic. Adjust the sensitivity setting to reduce false alarms. Lower sensitivity avoids small movements, but do not set it too low. Balance is key to catch real motion without false triggers.
Optimizing For Different Environments
Different places need different sensor settings. Outdoor areas may require higher sensitivity for wide coverage. Indoor spots might need less sensitivity to avoid false triggers from pets. Adjust the timer to fit how long you want the light on. Consider weather and lighting conditions for best performance.
Common Issues And Fixes
Motion light sensor switches are helpful but can face problems. Knowing common issues helps fix them fast. This section covers typical problems and simple solutions. Follow these steps to keep your sensor working well.
Sensor Not Activating
The sensor may not detect motion due to dirt or blockage. Clean the sensor lens with a soft cloth. Check if anything blocks the sensor’s view. Adjust the sensor angle to cover the right area. Ensure the sensor is set to the correct mode. Test the sensor by moving within its range.
Light Staying On Constantly
The light may stay on if the sensor settings are wrong. Lower the sensitivity to avoid constant activation. Set the timer for a shorter period. Check for objects that reflect light near the sensor. Bright sunlight can trigger the sensor mistakenly. Move the sensor away from direct sunlight if possible.
Interference Problems
Other devices can cause interference with the sensor. Wireless signals and electrical noise may affect performance. Keep the sensor away from strong electrical devices. Check for nearby lights that flicker or pulse. Replace bulbs with compatible types for the sensor. Reset the sensor switch to clear any glitches.
Maintenance Tips
Maintaining your motion light sensor switch ensures it works properly and lasts longer. Simple care steps keep the sensor accurate and responsive. Regular attention prevents common issues and helps you avoid costly repairs.
Regular Cleaning
Dust and dirt can block the sensor’s view. Clean the sensor gently using a soft cloth. Avoid harsh chemicals that might damage the surface. Wipe the surrounding area to prevent buildup. Do this cleaning every few months.
Firmware Updates
Some motion sensors have software inside. Check if your sensor needs an update. Updates fix bugs and improve performance. Follow the manufacturer’s guide to update safely. Regular updates keep your sensor working smoothly.
Replacing Faulty Components
If the sensor stops working, parts may be faulty. Identify damaged components like the sensor or switch. Replace broken parts with original or compatible ones. Use proper tools and follow safety steps. This restores your sensor’s function quickly.
Credit: homerepairtutor.com
Frequently Asked Questions
How Do I Adjust The Sensitivity Of A Motion Light Sensor?
To adjust sensitivity, locate the sensor’s dial or switch. Turn it clockwise to increase sensitivity or counterclockwise to decrease it. This controls how much motion triggers the light, helping avoid false activations or missed detections.
What Is The Best Height To Install Motion Sensors?
Install motion sensors at 6 to 10 feet high for optimal coverage. This height captures most human movement effectively and reduces false triggers from small animals or objects. Adjust based on your sensor’s specifications and area layout.
How Can I Set The Motion Light Timer Duration?
Find the timer dial on the sensor switch. Rotate it to set how long the light stays on after detecting motion. Typical settings range from a few seconds to several minutes, allowing customization for your needs.
Why Is My Motion Light Sensor Not Detecting Motion?
Check if the sensor lens is clean and unobstructed. Ensure the sensor angle covers the desired area. Verify batteries or power supply are functional. Adjust sensitivity and range settings if necessary to improve detection.
Conclusion
Adjusting a motion light sensor switch is simple and useful. You control when and how the light turns on. Set the sensitivity to catch movement just right. Change the time delay to fit your needs. Check the settings after adjusting to make sure it works well.
This small task can improve your home’s safety and save energy. Give it a try and enjoy better lighting control today.