Are you tired of fumbling for the light switch in the dark? Installing a two-way light switch can change that, giving you control over your lights from two different spots.
It’s easier than you might think, and you don’t need to be an expert electrician to do it. In this guide, you’ll learn step-by-step how to install a two-way light switch safely and efficiently. By the end, you’ll have the confidence to upgrade your home lighting and enjoy the convenience it brings.
Ready to brighten up your space with just a flick? Let’s get started!

Credit: www.youtube.com
Tools And Materials Needed
Installing a two way light switch requires specific tools and materials. Having the right items makes the job easier and safer. Prepare everything before starting to avoid interruptions.
Essential Tools
Gather these tools for a smooth installation process:
- Screwdrivers (flathead and Phillips)
- Wire stripper
- Voltage tester
- Needle-nose pliers
- Electrical tape
- Drill (optional for new holes)
- Level (to align switches properly)
Required Materials
These materials are necessary for the two way switch setup:
- Two way light switches
- Electrical wires (usually 14 or 12 gauge)
- Wire connectors (wire nuts)
- Switch boxes
- Wall plates
Safety Equipment
Protect yourself during the installation with these items:
- Insulated gloves
- Safety glasses
- Non-conductive shoes
Safety Precautions
Safety is the top priority when installing a two way light switch. Electrical work can be dangerous without the right steps. Taking the proper precautions helps prevent accidents and injuries. Follow these safety tips closely to protect yourself and your home.
Turn Off The Power
Always switch off the main power at the circuit breaker. This stops electricity from flowing to the wires. Use a voltage tester to make sure the power is off. Never start work without confirming no current is present.
Use Insulated Tools
Choose tools with insulated handles to avoid electric shocks. Insulation keeps your hands safe from live wires. Check tools for damage before use. Replace any that show wear or cracks.
Wear Protective Gear
Wear rubber-soled shoes and safety gloves. These reduce the risk of electric shock. Eye protection is also important to guard against sparks or debris. Keep a clean workspace to avoid slips or falls.
Follow Wiring Diagrams
Use the correct wiring diagram for your switch. Wrong connections can cause short circuits or fires. Double-check each wire’s color and placement. Label wires if needed to keep track during installation.
Do Not Work Alone
Have someone nearby in case of emergency. They can help or call for help if needed. Working with a partner improves safety and confidence. Make sure your helper knows basic safety rules too.
How Two Way Switches Work
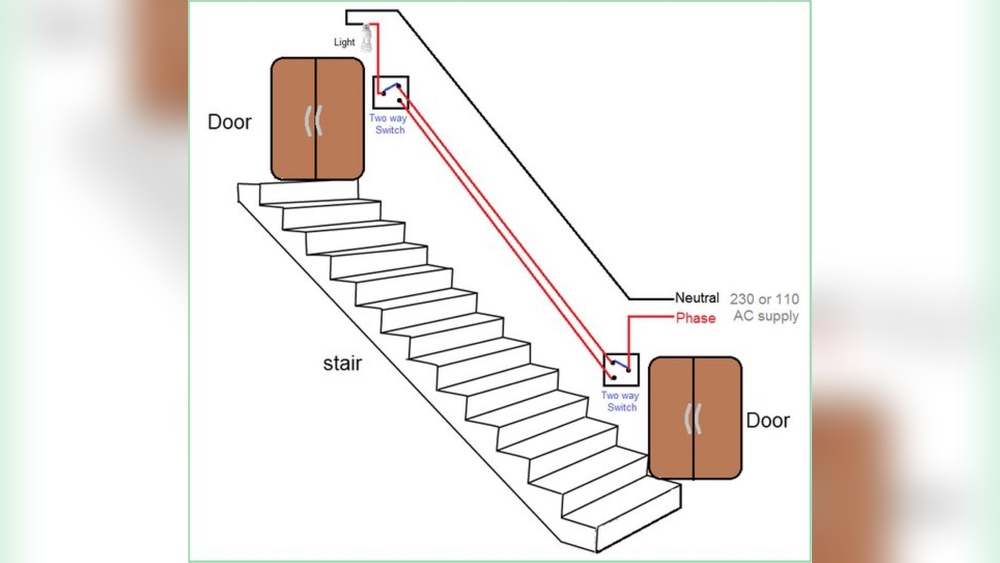
Two way switches control a light from two different places. Installing them involves connecting wires between both switches and the light. This setup lets you turn the light on or off from either switch easily.
Two way switches control one light from two different places. This setup is common in hallways or large rooms. It lets you turn the light on or off from either switch.
Each switch has three terminals. Two of these connect to the other switch. The third terminal connects to the light or power source. The switches work by opening or closing the circuit.
Basic Wiring Of Two Way Switches
Two wires, called travelers, connect the two switches. These wires carry current between switches. The common terminal connects to the power or the light. When either switch flips, it changes the circuit’s path.
How The Circuit Changes
Flipping one switch changes which traveler wire is connected. This opens or closes the circuit to the light. The light turns on or off depending on the switch positions. Both switches work together to control the light.
Why Two Way Switches Are Useful
They add convenience to your home lighting. You can control lights from two locations easily. This is safer for dark staircases or large rooms. It also saves time and effort in daily use.

Credit: www.realpars.com
Preparing The Wiring
Preparing the wiring is an important step before installing a two-way light switch. This step ensures safety and helps the installation go smoothly. Take your time to check everything carefully.
Make sure to follow the right process. This prevents accidents and wiring mistakes. Start by turning off the power and then identify the wires you will work with.
Turning Off Power
Safety is the top priority. Turn off the power from the main circuit breaker. This stops electricity from flowing to the switch.
Use a voltage tester to check if the wires have power. Never touch wires before confirming the power is off. This step protects you from electric shocks.
Identifying Wires
Look at the wires inside the switch box. Usually, you will see three types of wires: live, neutral, and earth.
Use color codes to help identify each wire. Live wires are often red or brown. Neutral wires are blue or black. Earth wires are green or yellow-green.
Label the wires with tape for easy recognition. This helps avoid confusion during installation. Knowing which wire is which is key to a proper connection.
Installing The First Switch
Installing the first switch in a two-way light switch setup is the key step. This switch controls the light from one point. Proper wiring here ensures the system works smoothly. Follow the steps carefully to avoid mistakes.
Start by turning off the power at the circuit breaker. Safety is very important. Use a voltage tester to confirm no electricity flows to the switch box.
Connecting The Common Terminal
The common terminal is the main connection point on the switch. This terminal usually has a different color screw, often black or dark bronze. Connect the live wire from your power source to this terminal. Make sure the wire is stripped and tightly secured under the screw. A loose connection can cause flickering or failure.
Double-check that the wire is attached properly before moving on. This connection sends power to the light controlled by both switches.
Wiring The Travelers
Two traveler terminals connect the two switches. These terminals usually have brass or light-colored screws. Run two traveler wires between the first and second switch boxes. Connect each traveler wire to one traveler terminal on the switch.
These wires carry the current back and forth between the switches. Ensure the wires are firmly attached and not touching each other. Correct traveler wiring allows the light to be turned on or off from either switch.

Credit: www.realpars.com
Installing The Second Switch
Installing the second switch in a two-way light switch setup is a key step. This switch controls the same light as the first one but from a different location. It allows you to turn the light on or off from two places. Understanding how to connect the wires and secure the switch properly ensures safety and function.
Matching The Wiring
Start by identifying the wires in the second switch box. Typically, you will find a common wire and two traveler wires. The common wire connects to the switch’s common terminal. The traveler wires connect to the remaining terminals. Match each wire carefully to the correct terminal. This step is important for the switch to work properly.
Use a voltage tester to confirm power is off before touching wires. Label the wires if needed to avoid confusion. Keep the wire connections tight and secure for safety.
Securing The Switch
Once the wires are connected, gently push them into the switch box. Fit the switch into place without bending or pinching the wires. Use screws to fasten the switch firmly to the wall box. Check that the switch is level and straight.
Attach the switch cover plate. Turn the power back on and test the switch. The light should turn on and off from both switches smoothly.
Testing The Installation
Testing the installation is a key step after wiring a two-way light switch. It ensures everything works safely and correctly. Proper testing prevents electrical issues and helps confirm the switch controls the light from both locations.
Follow these simple checks to verify your work. Take time to test carefully for the best results.
Restoring Power
Turn the main power back on at the circuit breaker. This restores electricity to the switches and light. Be sure the area is dry and safe before turning power on.
Check the breaker is fully switched on. Sometimes it may not be completely in the on position.
Checking Switch Functionality
Test each switch by flipping it up and down. The light should turn on and off from both switches.
Try switching one switch on, then the other off. The light must respond to both switches independently.
If the light does not work as expected, turn off power and recheck your wiring connections.
Troubleshooting Tips
Troubleshooting a two-way light switch can be simple with the right steps. Problems usually happen because of wiring mistakes or loose connections. Careful checks help find the issue quickly. This section gives easy tips to fix common troubles.
Check The Power Supply
Ensure the power is off before starting any work. Use a voltage tester to confirm no current flows. Sometimes, the circuit breaker might be off or tripped. Reset it if needed. Without power, the switch will not work.
Inspect The Wiring Connections
Loose wires cause most problems in two-way switches. Remove the switch cover carefully. Look for wires that are not tight or disconnected. Tighten all screws and reconnect loose wires. Make sure the wires match the correct terminals.
Test The Switches Individually
Check each switch to find faults. Turn one switch on and off while the other stays fixed. Listen for a click sound which shows it works. Replace any switch that does not click or feels loose.
Verify The Common Terminal
The common terminal is key for two-way switches. Ensure the live wire connects here properly. Mixing up terminals causes the switch to fail. Mark the common terminal before disconnecting wires to avoid errors.
Replace Faulty Components
Old or damaged switches can cause problems. Buy new switches from a hardware store. Swap out broken switches with new ones. Test the system again after replacement to confirm fix.
Upgrading To Smart Two Way Switches
Upgrading to smart two way switches brings new convenience to your home lighting. These switches allow control from multiple points and offer remote access. They improve energy efficiency and add modern style to any room.
Smart switches connect to your home Wi-Fi network. You can turn lights on or off using a smartphone app or voice commands. This feature makes it easy to manage lighting without getting up.
What Are Smart Two Way Switches?
Smart two way switches replace traditional switches. They control one light from two different locations. Unlike regular switches, smart ones link to your phone or smart home system. This lets you control lights anytime, anywhere.
Benefits Of Upgrading
Smart switches save energy by scheduling lights to turn off automatically. They increase safety with remote control when away from home. They also add comfort by adjusting lighting without walking to the switch.
Basic Installation Steps
Turn off power at the circuit breaker before starting. Remove the old switch carefully. Connect wires to the smart switch following the manual. Restore power and connect the switch to Wi-Fi. Test the switch with the app or voice control.
Frequently Asked Questions
What Tools Are Needed To Install A Two Way Light Switch?
To install a two way light switch, you need a screwdriver, wire stripper, voltage tester, electrical tape, and the two way switch itself. Safety gloves and a drill may also be useful for mounting the switches securely.
How Do Two Way Light Switches Work Together?
Two way switches control one light from two different locations. They use a pair of traveler wires to alternate the electrical path, allowing the light to be turned on or off from either switch.
Can I Install A Two Way Switch Myself Safely?
Yes, if you follow safety precautions like turning off the power and using a voltage tester. Basic electrical knowledge is important. If unsure, consult a professional electrician to avoid hazards.
What Wiring Configuration Is Required For Two Way Switches?
Two way switches require a common wire, two traveler wires, and a load wire connected to the light fixture. Correct wiring ensures the switches operate properly and safely control the light.
Conclusion
Installing a two-way light switch is easier than it seems. Follow each step carefully and take your time. Always turn off the power before starting work. Double-check your connections to avoid mistakes. This setup lets you control lights from two places.
It adds convenience and saves energy in your home. Practice safe habits and use the right tools. With patience, anyone can complete this simple project. Enjoy the comfort of managing your lights with ease.