Are you tired of fumbling in the dark, wishing you could control two lights from one spot? Installing a double switch light can solve this problem and give you more control over your room’s lighting.
You might think it’s complicated, but with the right guidance, you can do it yourself safely and quickly. Keep reading, and you’ll learn step-by-step how to install a double switch light that works perfectly for your space. By the end, you’ll have the confidence to upgrade your lighting and make your home more convenient and stylish.
Tools And Materials Needed
Installing a double switch light needs the right tools and materials. Having these ready makes the job easier and safer.
Each tool and material plays a key role in the process. This section lists what you need to get started.
Basic Tools For Installation
Start with a screwdriver set. Both flathead and Phillips types are important. You will also need a wire stripper to remove insulation from wires. A voltage tester helps check if wires carry electricity. Pliers are useful for bending and twisting wires.
Materials Required
Use a double switch designed for your home’s electrical system. Electrical wire, usually 14 or 12 gauge, connects the switch to power and lights. Wire nuts secure wire connections safely. Electrical tape insulates wires to prevent shorts. A faceplate covers the switch for a clean look.
Safety Equipment
Wear insulated gloves to protect against shocks. Safety glasses shield your eyes from debris. Use a sturdy ladder if the switch is high on the wall. Always turn off power at the breaker box before starting work.
Credit: www.doityourself.com
Safety Precautions
Safety is the top priority when installing a double switch light. Electric work can be risky without proper care. Follow these safety steps to protect yourself and your home.
Turn Off The Power
Switch off the circuit breaker for the room you work in. Use a voltage tester to confirm the power is off. Never trust the switch position alone.
Use Insulated Tools
Choose tools with insulated handles. These reduce the chance of electric shock. Avoid using metal tools without insulation.
Wear Protective Gear
Put on rubber-soled shoes and safety glasses. This gear adds extra protection against shocks and debris. Do not work barefoot or with wet hands.
Follow Wiring Codes
Check local electrical codes before starting. Using correct wiring ensures safety and legal compliance. Incorrect wiring can cause shorts or fires.
Work In A Dry Area
Keep the workspace dry and clean. Water and electricity are a dangerous mix. Avoid working in damp or wet conditions.
Turn Off Power Supply
Turning off the power supply is the most important step before installing a double switch light. Working with electricity is dangerous. A small mistake can cause shocks or injuries. Always make sure the power is completely off to stay safe.
Electricity flows through wires even if the light is off. The switch only controls the light, not the power. Cutting off power at the source stops all electricity from reaching the switch. This prevents accidents while you work.
Locate The Main Electrical Panel
Find the main electrical panel in your home. It is usually in a basement, garage, or utility room. The panel contains circuit breakers or fuses. These control power to different parts of the house.
Identify The Correct Circuit Breaker
Look for the circuit breaker that controls the room or area with the switch. It might be labeled, but if not, turn off breakers one by one. Test the light switch to confirm power is off before starting work.
Switch Off The Circuit Breaker
Flip the circuit breaker to the “off” position. This stops electricity to the switch and light fixture. Double-check by trying to turn on the light. No light means the power is off.
Use A Voltage Tester For Safety
Always test wires with a voltage tester. Touch the tester to the wires in the switch box. No signal means no electricity is flowing. This confirms a safe work area.
Remove Existing Switch
Removing the existing switch is the first step in installing a double switch light. This process helps ensure safety and prepares the wall for the new switch. Follow each step carefully to avoid any electrical hazards.
Turn Off Power At The Circuit Breaker
Locate your home’s circuit breaker panel. Switch off the power for the room you will work in. Confirm the power is off by testing the switch or light. Safety is the top priority.
Unscrew The Switch Cover Plate
Use a screwdriver to remove the screws holding the cover plate. Take off the cover plate gently. This exposes the switch and wiring inside the wall.
Remove The Switch From The Wall Box
Unscrew the switch from the electrical box. Pull the switch out carefully to see the wires attached. Avoid pulling too hard to prevent damage.
Take Note Of Wire Connections
Look closely at how the wires connect to the switch. Note the positions of the wires for easy reconnection later. A quick photo can help as a reference.
Disconnect The Wires
Loosen the screws holding the wires. Gently pull the wires free from the switch terminals. Keep the wires separated to avoid any short circuits.
Identify Wiring Types
Identifying wiring types is the first step to install a double switch light. Knowing the wires helps you connect the switch safely and correctly. It also prevents damage or electrical hazards.
Different homes may have different wiring setups. Understanding the common wires used in lighting circuits is important. This knowledge guides you through the installation process with confidence.
Understanding The Hot Wire
The hot wire carries electricity from the power source. It is usually black or red. This wire connects to the switch to control the light. Always handle the hot wire with care to avoid shocks.
Recognizing The Neutral Wire
The neutral wire completes the electrical circuit. It is often white or gray. The neutral wire usually connects directly to the light fixture. It does not connect to the switch in most cases.
Identifying The Ground Wire
The ground wire offers safety by directing electricity away from faults. It is bare copper or green. Ground wires connect to the switch box or metal parts. They reduce the risk of electrical shock.
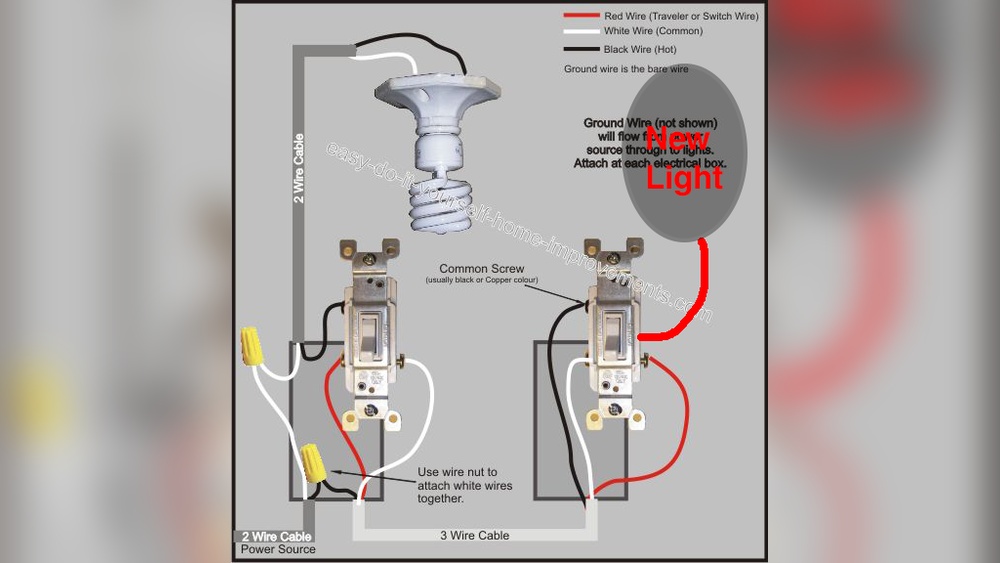
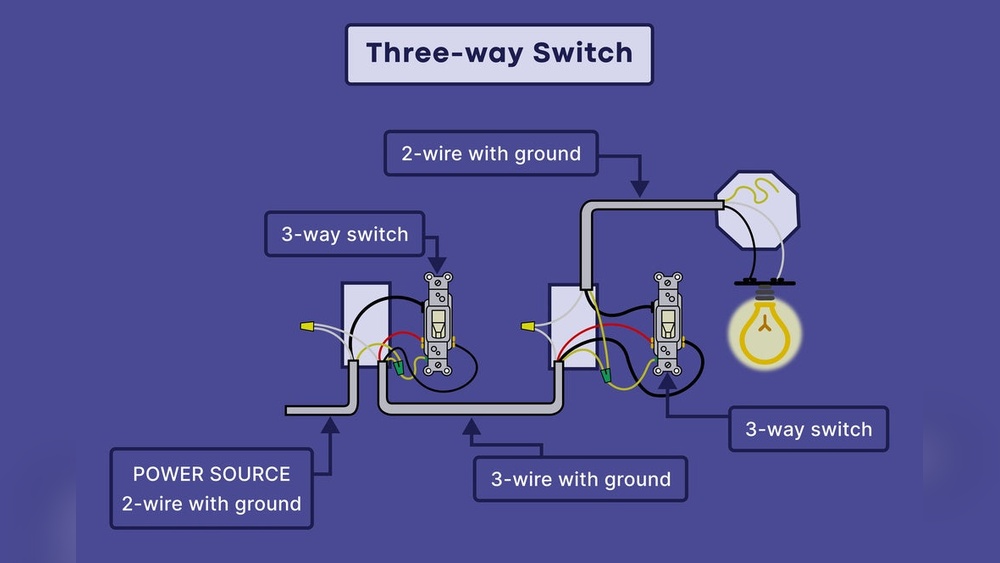
Spotting Traveler Wires For Double Switch
Traveler wires link the two switches in a double switch setup. These wires are often red or black. They allow control of one light from two locations. Knowing these wires is key to proper installation.

Credit: www.electricaltechnology.org
Connect Wires To Double Switch
Connecting wires to a double switch is a key step in installing it correctly. Proper wiring ensures the switch works safely and controls your lights properly. Follow these steps carefully to connect each wire to the double switch.
Connect Ground Wire
Start with the ground wire. It is usually green or bare copper. Attach this wire to the green screw on the double switch. This connection protects against electric shock. Make sure the wire is tight and secure.
Attach Neutral Wire
The neutral wire is typically white. Some double switches do not require a neutral connection. Check your switch instructions. If needed, connect the neutral wire to the silver screw or the neutral terminal. This completes the circuit for the switch.
Connect Load And Line Wires
The line wire brings power from the breaker. It is usually black or red. Connect this wire to the common terminal on the switch. The load wires go to the lights. Attach each load wire to the remaining terminals. Tighten all screws firmly to avoid loose connections.
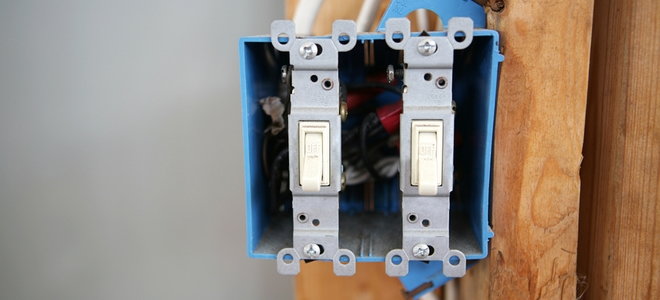
Secure Switch And Mount Plate
Securing the switch and mount plate is a key step in installing a double switch light. It keeps the switch steady and safe. A loose switch can cause problems or be unsafe. Follow clear steps to secure everything right.
Align The Mount Plate
Place the mount plate over the electrical box. Make sure the screw holes line up. The plate should sit flat against the wall. Check the position carefully before fixing it.
Attach The Mount Plate With Screws
Use the screws that come with the switch. Insert them into the holes on the mount plate. Tighten the screws with a screwdriver. Do not overtighten; it can crack the plate.
Secure The Double Switch To The Plate
Position the double switch on the mount plate. Line up its screw holes with the plate’s holes. Insert the screws and tighten them gently. The switch should feel firm and not wiggle.

Credit: www.doityourself.com
Restore Power And Test Switch
After wiring your double switch light, restoring power is the next critical step. This step brings electricity back to your switches so you can check if everything works correctly. Testing the switch ensures your installation is safe and functional.
Safety first. Make sure all wires are secured before turning power back on. Use the circuit breaker to restore power carefully. Then, test each switch to confirm the lights respond properly. This process avoids any electrical hazards and confirms your work.
Turn On The Circuit Breaker
Locate your home’s electrical panel. Find the breaker you turned off earlier. Flip it back to the “on” position. This action restores power to the switch and light fixture.
Test Each Switch Separately
Flip the first switch up or down. Check if the corresponding light turns on or off. Repeat the same for the second switch. Both switches should control their lights independently.
Check For Any Issues
Listen for unusual sounds or buzzing. Look for flickering or dim lights. These signs may mean wiring problems. Turn off the power and double-check your connections if you see any issues.
Troubleshooting Common Issues
Installing a double switch light can be simple, but some common issues may arise. Troubleshooting helps fix these problems quickly. Understanding common mistakes saves time and effort.
This section covers typical problems and how to solve them safely.
Incorrect Wiring Connections
Check all wires carefully. Loose or swapped wires cause the switch to fail. Use a voltage tester to confirm power is off before handling wires. Match wire colors and positions with the instructions.
Switch Does Not Control Both Lights
Verify the traveler wires are connected properly. Each switch controls one light, so make sure the wires go to the right terminals. Tighten any loose screws holding the wires.
Switch Feels Hot Or Sparks
A hot or sparking switch indicates a bad connection or wrong wiring. Turn off the power immediately. Replace the switch if damaged. Never use a switch that overheats.
Lights Flicker Or Do Not Turn On
Loose bulbs or poor contact cause flickering. Check the bulbs first. Then inspect the switch connections for stability. Replace old bulbs and tighten sockets if needed.
Frequently Asked Questions
What Tools Are Needed To Install A Double Switch Light?
You need a screwdriver, wire stripper, voltage tester, electrical tape, and wire connectors. These tools ensure safe and efficient installation.
How Do I Safely Turn Off Power Before Installation?
Switch off the circuit breaker controlling the light switch. Use a voltage tester to confirm no electricity flows to the wires.
Can I Replace A Single Switch With A Double Switch?
Yes, but you must ensure wiring supports two separate circuits. Follow wiring diagrams carefully to connect switches correctly.
What Wiring Connections Are Required For A Double Switch?
Connect the live wire to the common terminal. Attach traveler wires to each switch terminal. Ensure the ground wire is properly connected.
Conclusion
Installing a double switch light is easier than it seems. Follow each step carefully and take safety seriously. Double-check your connections before turning the power back on. This simple upgrade can improve your home’s lighting control. With patience and care, you can do it yourself.
Enjoy the convenience and functionality of your new switch. Keep tools and instructions handy for future fixes. Trust your work and light up your space confidently.