Have you ever looked at a light switch and wondered how it actually works? Understanding how to fix or install a light switch can save you time, money, and frustration.
Imagine never having to wait for an electrician again when a switch stops working. You’ll discover simple, clear steps that anyone can follow. By the end, you’ll feel confident handling your own light switches safely and easily. Ready to take control of your home’s lighting?
Let’s get started!
Credit: www.x10.com
Tools And Materials Needed
Before starting to replace or install a light switch, gather all the tools and materials. Having everything ready makes the job easier and safer.
Each tool has a specific role. The right materials ensure the switch works well and lasts long.
Basic Tools
You need a screwdriver, usually a flathead or Phillips. A voltage tester helps check if the power is off. Wire strippers remove insulation from wires. Needle-nose pliers help bend and hold wires.
Materials Required
Choose the correct light switch for your needs, such as a toggle or dimmer switch. Electrical tape secures wire connections. Wire nuts join wires safely. Make sure to have replacement screws if needed.
Safety Gear
Wear insulated gloves to protect from electric shocks. Safety glasses shield your eyes from debris. Use a flashlight if the area is dark or power is off.
Turn Off Power Safely
Turning off power safely is the first step before replacing a light switch. It protects you from electric shocks and accidents. Always take this step seriously. A simple mistake can cause serious injury or damage.
Follow these steps carefully. They help you work with confidence and safety. Never skip turning off the power, even if you think the switch is off.
Locate The Circuit Breaker
Find your home’s circuit breaker panel. It is usually in the basement, garage, or utility room. Look for a box with switches or fuses. Each switch controls power to different parts of your home.
Turn Off The Correct Breaker
Identify the breaker for the room with the light switch. The breakers usually have labels like “kitchen” or “living room.” Flip the switch to the off position. This cuts power to that area.
Test The Power
Use a voltage tester or plug in a lamp to check. Make sure the light switch you want to replace has no power. If the lamp does not light, the power is off. Never assume the power is off without testing.
Use Safety Gear
Wear insulated gloves and shoes before touching electrical parts. Avoid working in wet or damp areas. Safety gear reduces the risk of electric shock. Always prepare before starting any electrical work.
Remove Old Switch
Removing the old light switch is the first step in installing a new one. It ensures a safe and clean replacement. Follow simple steps to do this task carefully. Always prioritize safety by cutting off power before handling wires.
Take your time to avoid damage to the wiring or wall. Use the right tools and keep track of screws and parts. This makes the next steps easier and faster.
Turn Off Power At The Circuit Breaker
Locate the circuit breaker panel in your home. Switch off the breaker that controls the light switch. Use a tester to confirm no power flows to the switch. This step prevents electric shocks during removal.
Remove The Switch Cover Plate
Use a screwdriver to unscrew the cover plate. Keep the screws in a safe place for later use. Gently pull the plate away from the wall. This exposes the switch and wiring behind it.
Unscrew The Old Switch From The Wall Box
Unscrew the mounting screws holding the switch in place. Carefully pull the switch out from the wall box. Avoid pulling on the wires to prevent damage. This frees the switch for wire disconnection.
Disconnect The Wires From The Old Switch
Note the wiring positions or take a photo for reference. Loosen the terminal screws or release wire connectors. Gently remove wires from the switch terminals. Keep wires straight and ready for the new switch connection.
Identify Wiring Types
Identifying wiring types is the first step in changing a light switch. Different wires serve different purposes. Recognizing each wire helps avoid mistakes and ensures safety.
Wires come in various colors and sizes. Each color shows the wire’s role in the circuit. Learning these colors makes the job easier and safer.
Understanding Live (hot) Wires
Live wires carry electricity from the power source. They usually have black or red insulation. Always assume these wires are dangerous. Handle live wires with care to avoid shocks.
Recognizing Neutral Wires
Neutral wires complete the electrical circuit. They usually have white or gray insulation. Neutral wires carry current back to the panel. They are less risky but still require caution.
Identifying Ground Wires
Ground wires protect from electrical faults. They are bare copper or green insulated. Ground wires do not carry current normally. They provide a safe path for electricity if something goes wrong.
Connect New Switch Wires
Connecting new switch wires is a key step in installing a light switch. This part ensures your switch controls the light properly. It requires careful attention to safety and detail.
Before starting, double-check that the power is off at the breaker. Use a voltage tester to confirm no electricity flows through the wires. This prevents shocks and accidents.
Identify The Wires
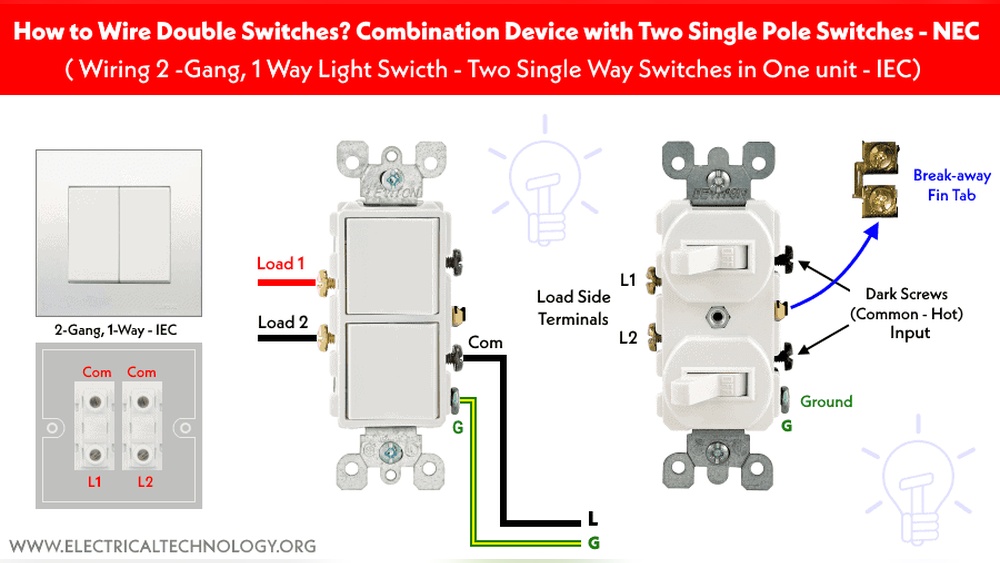
Look at the wires in your wall box. Usually, you will see a black (hot) wire, white (neutral) wire, and a green or bare copper (ground) wire. The black wire carries the power. The white wire completes the circuit. The ground wire protects against electrical faults.
Attach The Ground Wire
Start by connecting the ground wire. Twist the green or bare copper wire from the switch to the ground wire in the wall. Use a wire nut to secure them tightly. Grounding is important for safety and code compliance.
Connect The Hot Wires
Next, connect the black wires. Attach the black wire from the switch to the black wire in the wall. Twist them together and secure with a wire nut. This allows the switch to control the power flow to the light.
Secure The Neutral Wire
Most light switches do not connect to the neutral wire. Leave the white wires twisted together inside the box. Cover them with a wire nut. This keeps the circuit complete and safe.
Double-check All Connections
Make sure all wire nuts are tight and no bare copper is exposed. Tug lightly on each wire to test the connection. Proper wiring prevents shorts and switch failure.
:strip_icc()/BHG-home-improvement-electrical-guide-to-light-switches-and-dimmers-hero_31187-e8349e7ac5f84023ab572db07231401a.jpg)
Credit: www.bhg.com
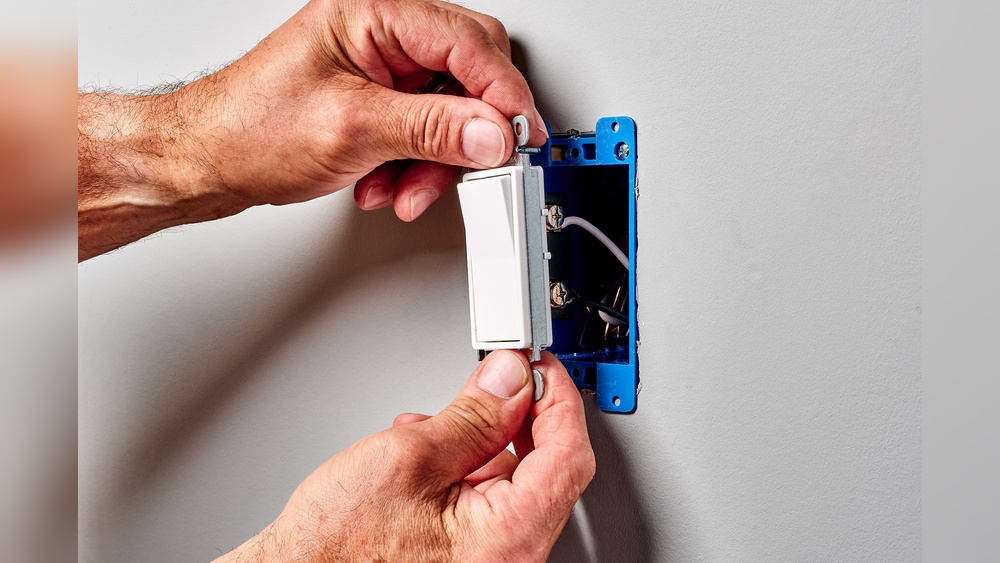
Secure The Switch In Place
Securing the light switch properly is key for safety and function. A loose switch can cause problems or even hazards. Follow clear steps to fix the switch firmly into the wall box. This step ensures the switch stays stable and works well every time you use it.
Prepare The Switch For Installation
Before tightening, check the switch alignment. Make sure the wires are connected tightly. The switch should sit flat against the wall box. Adjust the wires if they seem loose or twisted.
Use Screws To Fasten The Switch
Take the mounting screws included with the switch. Insert them into the holes on the switch’s metal frame. Turn the screws clockwise using a screwdriver. Tighten until the switch feels secure but do not over-tighten.
Check The Switch Stability
Gently wiggle the switch to test its hold. It should not move or feel loose. If it moves, tighten the screws a bit more. Confirm the switch remains flush with the wall surface.
Test The Installation
Testing the installation is a key step after wiring a light switch. It ensures the switch works safely and correctly. This step helps spot any mistakes or loose connections. Proper testing prevents electrical problems and keeps your home safe.
Turn On The Power
First, restore power at the circuit breaker. Do not skip this step. Without power, the switch cannot work or be tested. Check that the breaker controlling the switch is fully on.
Operate The Switch
Flip the switch up and down. The light should turn on and off smoothly. Listen for any unusual sounds like buzzing. If the light does not respond, check your wiring again.
Check For Loose Connections
Feel the switch and wires for heat. Warm wires mean a poor connection. Tighten any loose screws or wire nuts. A solid connection keeps the switch safe and reliable.
Use A Voltage Tester
A voltage tester confirms power flows correctly. Touch the tester to the switch terminals. It should show voltage when the switch is on. No voltage means a wiring issue.
Inspect The Light Fixture
Make sure the bulb is not burnt out. Swap the bulb if needed. Check the fixture for any damage or loose parts. The switch works only if the light fixture is good.
Safety Tips And Precautions
Working with electrical switches can be risky without the right safety steps. Small mistakes cause shocks or damage. Follow safety tips to protect yourself and your home. Understanding precautions helps you avoid accidents and complete the task safely.
Turn Off The Power
Always switch off power at the circuit breaker. Do not rely on the wall switch alone. Use a tester to check no electricity flows to the switch. Safety starts with no live current.
Use Proper Tools
Select insulated tools made for electrical work. Avoid metal tools without insulation. Good tools reduce shock risk. Keep tools dry and in good condition.
Wear Safety Gear
Wear rubber-soled shoes and safety gloves. Glasses protect your eyes from sparks or debris. Safety gear adds a layer of protection.
Work In A Dry Area
Keep the work zone dry at all times. Water and electricity cause shocks. Wipe hands and tools before starting. Avoid working in damp or wet conditions.
Follow Instructions Carefully
Read the switch’s manual or guidelines. Follow each step in order. Do not rush or skip steps. Clear understanding prevents mistakes and hazards.
:max_bytes(150000):strip_icc()/200526811-001-56a5a63e5f9b58b7d0ddd35e.jpg)
Credit: www.thespruce.com
Frequently Asked Questions
How To Safely Turn Off Power Before Changing A Light Switch?
Always switch off the circuit breaker before starting. Use a voltage tester to confirm no electricity flows. This prevents shocks and ensures safe handling of wiring during the light switch replacement.
What Tools Do I Need To Install A Light Switch?
You’ll need a screwdriver, voltage tester, wire stripper, and electrical tape. These tools help remove the old switch, test wires, and securely connect the new switch safely and efficiently.
How To Identify The Wires In A Light Switch Box?
Look for black (hot), white (neutral), and green or bare (ground) wires. Use a voltage tester to verify the hot wire. Proper identification prevents wiring mistakes and ensures correct switch installation.
Can I Replace A Single-pole Switch With A Dimmer Switch?
Yes, single-pole switches can be replaced with compatible dimmers. Ensure the dimmer matches the bulb type and switch rating. This upgrade allows adjustable lighting and enhances room ambiance.
Conclusion
Changing a light switch is simple and safe with the right steps. Turn off the power first to avoid shocks. Use basic tools and follow instructions carefully. Double-check your work before restoring electricity. This small task can save money and add confidence.
Try it yourself and see how easy it can be. No need to call a professional every time. A little effort goes a long way in home repair. Keep learning and improving your skills bit by bit. You got this!